Sunday, July 31, 2022

Estes Super Orbital Transport Build, Kit #7314, Part 5, Wing Tab Fitting

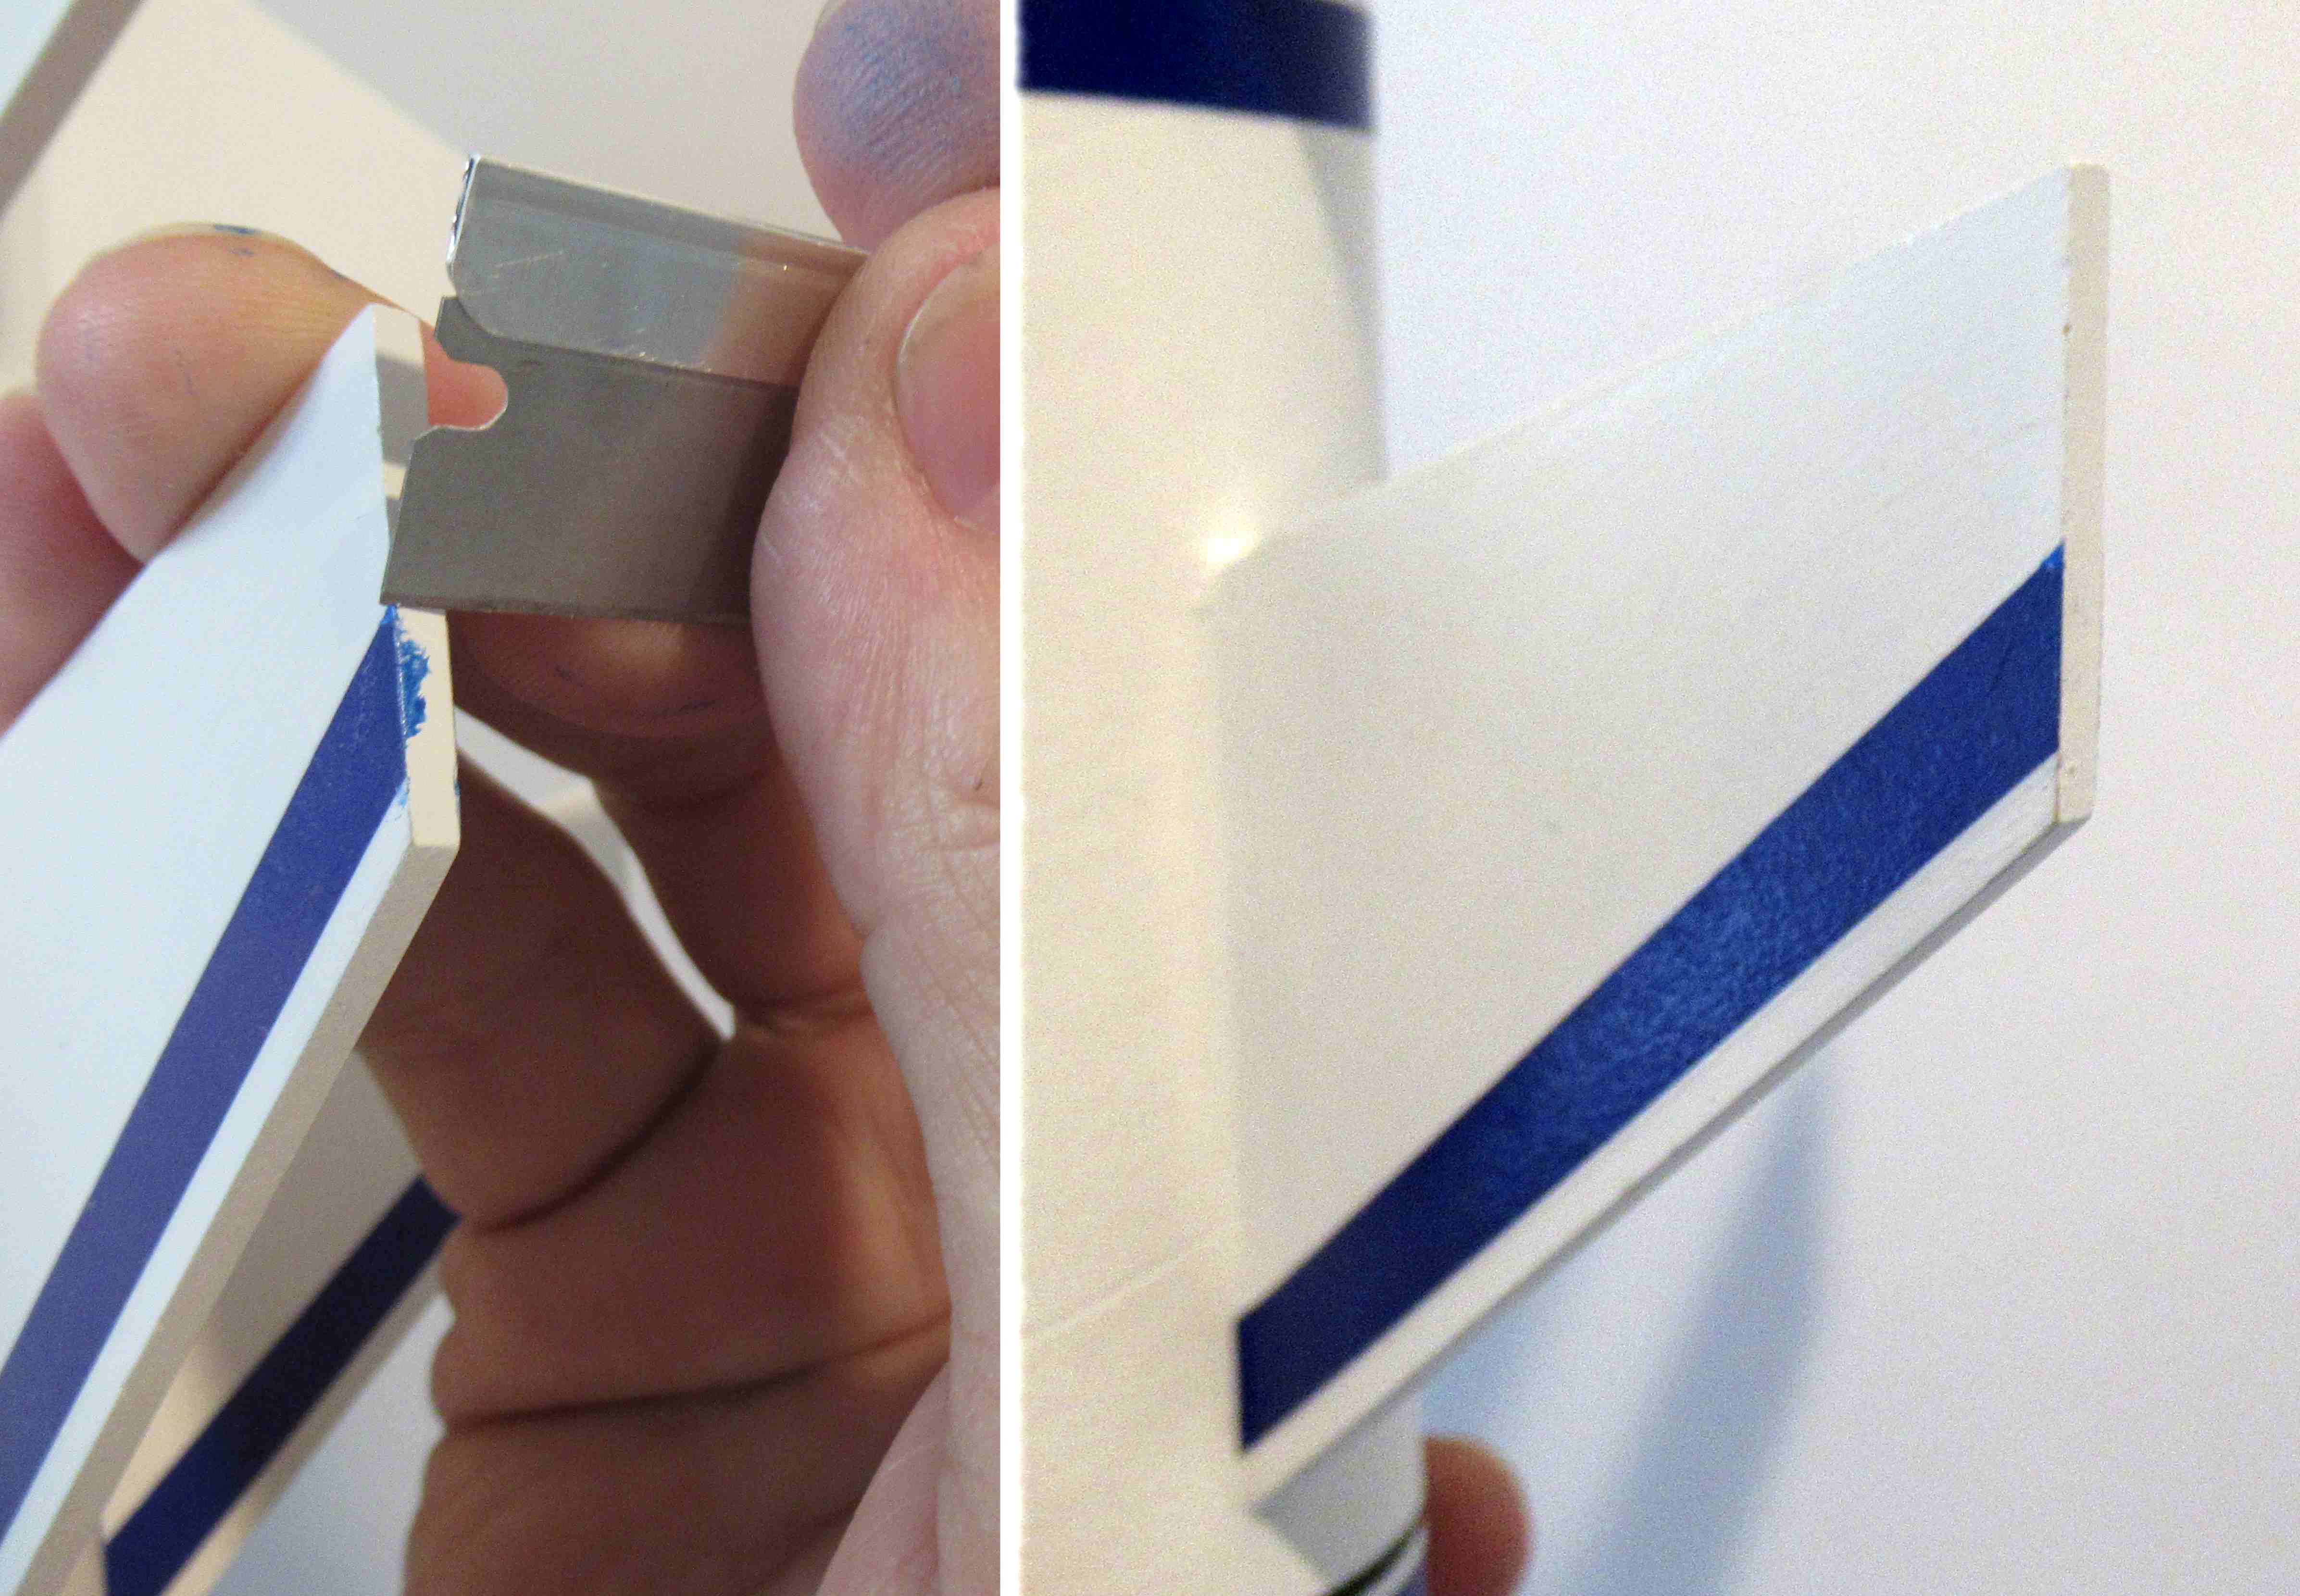
I did leave  the tabs on the Part "R" wing tip piece. This joint needs to be strong if there were a hard landing.
The problem is - 
The tab is short when set into the outside wing notch. That would lead to some difficult fills.
I slightly deepened the low edges outside the tab.

Note: This was a pre-production kit. Changes might have been made before the model went into distribution.


The notch on the wing end was deepened with a file. Go easy, file and check the fit, then file some more.


Earlier I mentioned not sanding the center tab on the "R" wing tip. I wanted it left long for this fitting.

After filing down the sides, the R piece tab now extends slightly above the flat face of the wing.
The R piece can be glued onto the outside of the wings. 
After the glue dries, sand the extended tab down to the surface face of the wing.

Saturday, July 30, 2022

Estes Super Orbital Transport Build, Kit #7314, Part 4, Main and Glider Wings Glued Together


Here's the main wing pieces butted up together after gluing.

Notice I left the notch pieces in place. The two notches between the joined pieces will be filled later.


Set a weight over the joint so both flat face surfaces are even. I used a heavy base water glass.


You don't have to do this - you can build the model with the simpler tab and slot construction.

Those two slots at the joint that remained open were filled with 3/32" thick scrap balsa. The other burnt lines will be filled with the balsa grain with CWF.

Here's an example of why the laser cuts should be squared up before gluing.

The top picture shows the glider wing pieces without sanding the laser cut "wedge" burn. 

The bottom picture shows the edges butted together after the sides were trued up. It's a stronger bond and less of a seam to fill.

Friday, July 29, 2022

Estes Super Orbital Transport Build, Kit #7314, Part 3, Engine Mount & Balsa Prep

The lowest engine mount centering ring will be even with the end of the body tube and visible on the finished model.
TIP: I'd recommend sanding the face of the lowest position centering ring flat. Smooth out the wrap ridges and removing any remaining green off the face. You can also do a smooth coat of wood glue and sand that flat. Your finished model will look cleaner.

Note the cut angle of the engine hook notch in the lowest ring. This makes a square notch when the mount is glued up.

TIP: A piece of tape will keep the open notch closed as the glue sets up.

As mentioned many times before - 
Laser cuts are wedge shaped. Sand the root edges flat for a larger, flatter gluing surface against the body tube.

I didn't remove the laser cut slots from the main wing. After many notched "tab and slot" builds, like the QCC Explorer and Low Boom SST, I found the low tabs and notches take a lot of extra work to fill after assembly
Especially if the tabs ended up below the surface of the adjoining part face. It's up to you-
I sanded off most of the slot tabs on the engine housing Parts AA, N, O and Z. 

Tab/slot construction is easier to line up the parts. I had to draw up a positioning template. 
Some models require tabs for strength. On this build I figured the engine housings would be strong enough doing surface gluing.

I did leave the tabs on Parts R (wing tip) and Parts H (Wing) where I felt a stronger notched outside joint was needed.

On the outside (Part R) wing tips and the outside notch of the wing (part H), 
Leave the long edge of the tabs as they are - long with no removal of the burnt laser edge.
You'll have less of a seam joint to fill if a (longer) tab is sanded to surface after gluing together.

Built a I did, the engine housings glued under the wing will be a surface mount (no tabs) like the original 1969 kit.

Thursday, July 28, 2022

Estes Super Orbital Transport Build, Kit #7314, Part 2, More Parts

There are 36 laser cut pieces of balsa!
In the 1969 kit and 2002 reissue you hand cut all the balsa. Cut out a template with scissors, trace on the balsa sheet with a pencil and dig in with your hobby knife! We've come a long way.

You do still have to round many leading edges. Pay close attention to the instructions to be sure you are rounding the correct sides.


Here's the assembly jigs still on the cardstock. They come in very handy gluing on the larger wings. 


These jigs fit together very well! No glue is needed to hold them together. You can glue them if you wish.

Wednesday, July 27, 2022

Estes Super Orbital Transport Build, Kit #7314, Part 1, Parts


The kit comes in one of the new style boxes.


All the parts:


On the left are the cardstock assembly jigs. The main body is two BT-55 tubes joined by the red coupler. This time around the Glider (Orbiter) tube is a larger BT-50. 


All the laser-cut balsa is 3/32" thick.

The decals are on two sheets in the traditional red, black and yellow.
The narrow, long sheet at the bottom are the stripes that run down the body of the booster.

Tuesday, July 26, 2022

Estes Super Orbital Transport Build, Kit #7314, Background

Some of this post is background copy from my Semroc MicroMaxx Orbital Transport build.
   
I remember getting this 1970 catalog in the mail!
The slick, new Orbital Transport was featured on the cover. This was Estes kit number K-42 and sold for $3.25.
The design was by Wayne Kellner. The kit was sold from 1969 through 1985.

No die-cut or laser cut balsa on this one! All 36 (Yes, I said 36) pieces of balsa were traced from patterns and cut by hand. Launch lugs and stand-off dowels were also cut to size.

The O.T. is still a fun launch. At ejection the orbiter usually glides well, circling around the booster descending under a parachute.

Estes re-released the kit in 2002. Surprisingly you still had to trace and cut out all the balsa!
Semroc has also released their version of the original size O.T. All the balsa stock is laser cut, the parts are notched for better alignment and easier assembly.


Here's the catalog page from the kit introduction from 1969.

This time around, the "Super" Orbital Transport is an upscale using 24mm motors. 
The original 1969 version used BT-20 and BT-50 tubes. The Super O.T. Orbiter/Glider uses a BT-50, the main body is two  BT-55 tubes joined with a coupler.
The original O.T. was 23" tall. The Super O.T. is 31.3" tall.

The two builds are very similar. To get an idea of the construction, go to JimZ's: CLICK HERE

The build starts tomorrow!

Monday, July 25, 2022

Quest Harpoon Decals Fix

I don't use clear coats - either overall sprayed or Future. I've never been able to get great results. 
There are some times when I apply Future clear acrylic to seal and strengthen old, dry, brittle decals.

Future can be used to hold down the seams where two ends of a decal meet. I dip a Q-tip, wipe off the excess on a paper towel then brush  down the joint.

I used a new, single edge razor blade to cut off the overhang on the outside edge of the decal. Use a "sawing" motion to remove the long decal without cutting into the balsa. That overhang chipped!

Some Future was wiped onto the decal root area and the broken up edge to prevent any more of the blue breaking off.


Here's a broken edge before the touch up. 

Darkest colors are the easiest to match up. Some Royal Blue paint was sprayed into a small cup and the decal breaks painted.


I was careful but still had some paint overlap the outside face.

After the paint dried, some very light scraping removed 90% of the blue. I didn't want to go too deep and cut into the white. 

Not perfect, but much better.

Sunday, July 24, 2022

Inspiration - Robert McNamee's Space Station


From the Facebook Estes Model Rockets page,
Robert McNamee's Space Station


In 1973, this was a close as we got - 
The Centuri Sky Lab. Solar panel fins and lot of vacu-formed details.

Saturday, July 23, 2022

Estes Super Orbital Transport Coming July 27!


Oh Boy! Seen on Facebook and an Email - 
The blog build starts with a "Background" post on Tuesday, July 26.
Until then, some interesting filler posts.

I've already built three display models for Estes. 
Some Tips along the way -

Mini Outdoor Hygrometer Thermometer

I do read the directions on spray paint cans.
My goal - To get better spray can glosses in the Summer heat.
Most spray cans say the recommended temperatures should be from 55 to 75 degrees Fahrenheit. Humidity should be at 60 or below.
Sure I could always check my outside wall Thermometer, but who had a Hygrometer to know the humidity level?

I have one now! (Actually, I have five!)
I found it on Ebay. To see it: CLICK HERE
What I didn't realize is I was sent FIVE units for $12.69! I thought I was buying only one.

It's small. Clips on the side imply it could have been snapped into a dashboard or control panel cutout.

I simply set it on my patio table and can easily read it through the window. The "35" is the Humidity, 107 is the "feels like" temperature on July 15 at 2:30 p.m.

I have mentioned in an earlier post, I didn't realize what time of day had the lowest humidity.
In central Florida, humidity is highest in the morning, lowest in the mid afternoon and highest in the early evening.

So it's a compromise - I could try spraying early in the day when the temps are lower, but the humidity is higher!


I took the batteries out of the extra Hygrometers and all went into small zipper baggies.

So I have four extras.
I also have solid wood guitars and ukuleles.
Those cases now have humidity monitoring.

Friday, July 22, 2022

Which Chrome Paint? None Of These! Part 2


A few of the YouTube test videos rated the Rustoleum Bright Coat Chrome the best of the available hardware store paints.


Here's a test spoon after two coats.
It is more reflective but still not a mirror finish.


The Duplicolor Chrome is on the left,
The Rustoleum Chrome is on the right.
The Rustoleum Chrome is more reflective. 


Still, I can't recommend any of them!

After three weeks of drying - one light rub of my thumb dulled the finish turning the sheen a dull gray!

Why bother doing a post if you can't report any decent results?
Maybe this information might save you money and frustration.
There are other chrome paint "systems" available but are much more expensive and outside the blog budget.

Thursday, July 21, 2022

Which Chrome Paint? None Of These! Part 1

Back story - 
I found an original Citation Quasar (in the box!) for a friend.
This was his favorite rocket - I thought it would make a good gift.

The kit arrived and was a great shape except for the "chrome" nose cone and fin unit. I thought at first these might be newer orange Alpha fins and nose cone that had been spray painted chrome by the seller.
Apparently over time, that chrome finish gets dull and mottled.
Why not find a good chrome paint and brighten the fins and nose cone. 

I've read on forums how some had problems with chrome paint when painting a model like the Mercury Atlas. It may look okay at first, but any handling dulls the finish.

I watched some YouTube videos where many different Chrome spray paints were tested side by side. I bought and tried the top three.
Some of the test sprays were done on plastic spoons. I had some black plastic spoons. Many say to use a black undercoat when spraying metallics.

First up was Krylon Premium Metallic, Original Chrome. The cap was painted chrome - I wish the test spoons turned out with that same reflective sheen! They didn't! 
Dull, no better than some Silver or Aluminum spray paints.


I've had some great results with Duplicolor paints. I always use their FP101 Filler/Primer.


Well - it was a better chrome than the Krylon,
Not a mirror finish by any stretch.

More tomorrow . . . 

Wednesday, July 20, 2022

Goofing Up A Build - MRN, June, 1964

Steve Riegel posted on the NAR Facebook page:

"When I was a kid in the 80s, I recall reading a parody article (maybe older than the 80s?) from the POV of a newb who made every classic blunder a he rushed through building his first kit. There was a specific line about using scissors to cut out the balsa fins since it left a nice, splintery edge for gluing.
If anyone has a copy of that article, I would love to get one for the classes I teach. Thanks."

Edit: Found it, Model Rocket News, June 1964. Copy available on JimZ's site.

I remember this article from a "Best Of the MRN" collection you could buy from Estes.
How many of you used too much glue thinking: "My rocket will be stronger than everybody's!"
Always remember: "That's their way of selling more stuff."
Read on . . . it's a good laugh!


Tuesday, July 19, 2022

Estes Blackhawk #2053 Build, Finished


Well, it still looks cool! All black - no decals.
Cardstock has it's own build concerns but at least you don't have to fill balsa grain.
Here's the view from the back. You can see some white inside where the black spray didn't reach.

Mentioned before, cutting all the vent tubes was difficult. I wonder if younger builders gave up on the build because of the tough tube cuts.
The white Centuri version with the rear eject was the easier way to go. 


And. the other kit from the Buck Rogers series. On the left is the Draconian Marauder, just about the same length.

The Draconian Marauder was not a great flyer. Very heavy and draggy.

Monday, July 18, 2022

Estes Blackhawk #2053 Build, Part 17, A Fix & Decals?


Directly opposite the knife tip you could see a corner of a fin split.

Set some glue on the knife blade and work it into the split cardstock.


Pinch the split together with tweezers until the glue sets.

You can use the tweezers to reform and get rid of any crease lines. 

The parachute assembly is standard. 
A longer elastic shock cord was substituted for the short rubber cord.

The tri-fold shock cord mount was glued 1 1/2" below the top of the tube, 1/2" farther down than the instructions recommended.


I was worried about the age of the decals so I gave them a coat of decal film. 
The decal film goes on with visible brush strokes but is smooth after it dries.


This time around, the decal film didn't help at all.
The first decal easily broke up! Why bother with the rest of them, this wasn't a good sign.

So for now, I've got a black rocket.

Sunday, July 17, 2022

Estes Blackhawk #2053 Build, Part 16, Black Paint


There is no reason to do white undercoats on a model that is going to be painted an overall black.
Here's the model before paint. All fillets are done and surfaces are as smooth as I can make them.


The first light coats of gloss black showed some ridges around the fillets. Fine 400 grit sandpaper smoothed them out before the next coat.
On the right - 
It's difficult to get paint into all the nooks and crannies in the profile engine vanes.


On an overall black model you can use a wide point Sharpie to darken up the edges that may not have got a full black coverage.


After the second coat I still had some minor smooth sanding around the canopy and flat fin surfaces.

The final black coat will be heavier. The trick to a good gloss finish is to spray more than the initial coats but not enough to cause drips.