Pages

Friday, September 30, 2022

Bill Stine Retires From Estes


The Estes family would like to honor Bill Stine, Estes's Vice President and General Manager. We wish him the best in his retirement from Estes. Bill has been fundamental in the transformation of Estes and is monumental in our growth, development, and success. The Estes family would like to thank Bill for his leadership and expertise and remind him that he will always be a part of the Estes Family!
"I have been involved in model rocketry all of my life since my father G. Harry Stine was one of the industry founders. I started working for Estes's sister company Centuri in 1978 and designed my first Estes product in 1979. Back in those days, R&D was located in Vern & Gleda’s old farmhouse in the grove of trees north of the woodshop (the house is gone now). I worked in Phoenix but traveled to Penrose every time a new product went into production. When I arrived at Estes in May of 2018, there were 28 employees. My immediate job was to begin rebuilding the company so it could be a stand-alone business again. The previous owners HOBBICO had been doing all the sales, marketing, and HR/payroll/benefits functions from their home office in Illinois. Another big task was to re-establish our factory relationship in China since they got hurt pretty badly financially in the HOBBICO bankruptcy. I traveled several times to China to regain their trust and get manufacturing running again. I was focused on the people, products, and the process, and now almost five years later, Estes is once again a successful business. I’ve enjoyed building and leading this team of people, so I would say my favorite moments have been about interactions with the people here. I am very pleased with our safety record and the process improvements we have made to engine manufacturing and achieving our ISO Certification. One of my absolute favorite products is the ANTAR".

Estes Space Shuttle Columbia Build #1385, Part 19, Setting The Gray Trim

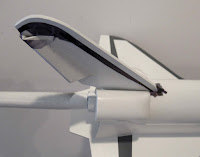
This Gray trim on the leading edge of the wing underside didn't work! 
I'll still show the process. Sprayed decals can be a good workaround, especially a simple color band wrapped around a body tube. The more complex the surface, the more likely this trim may not be an option. 


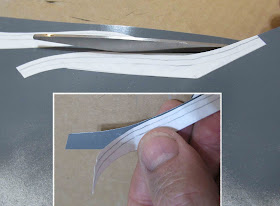
The paper template was cut out. A glue stick was used to stick the paper down onto the gray painted (white) decal sheet.
The decal sheet was cut out with scissors around the paper template.
The paper template was peeled off the decal.


There was some paper fibers and glue still on the gray painted decal.
Not a concern - this will dissolve when the decal is soaked.
The gray decal trim was soaked and set over the leading edge of the wing.
Here the wing is held up to a bright light to see the overhang and visual placement of the decal.


After the decal thoroughly dried - 
With a sharp blade the decal overhang was trimmed off.

Go slow, don't cut into the leading edge paint or balsa.

Thursday, September 29, 2022

Estes Space Shuttle Columbia Build #1385, Part 18, A Trim Decal Try


I knew this nose cone curve could be a problem.
Well, let's fix it.

On the left you can see the overspray.
Some light knife scraping and some white touch up paint gave me a sharper edge.


The rudder mask was okay. This picture was before I did some brush touchups.

That gray discoloration smudge is some Sharpie ink that was rubbed onto the white paint. A few passes with a Magic Eraser Sponge cleaned it up.

There is some gray trim underneath the wing leading edge. 
I did not want to go through an entire mask again!

I tried a cheat which didn't work out this time. I sprayed some gray paint on a white decal sheet to make a trimmable water slide. 


Paper was set under the wing edge to get a good pencil tracing.


I added onto the width, made some straight cuts and a curve on the back end. 

This will be the template for cutting out the decals.

Wednesday, September 28, 2022

Estes Space Shuttle Columbia Build #1385, Part 17, Nose Cone Mask

More masking!
The black areas on the nose are outlined.

On the left side, look close at the intersection of the tape lines. I lightly cut the intersection with a diagonal line, trying to cut just through the tape.

On the left, the vertical excess has been pulled. Next I remove the horizontal extension.

I'll usually add another piece over the cut diagonal line just to be sure. A mistake shown in the picture - That added piece of tape should have been going outside the intersection to the upper left. It was moved outside the black paint area after the picture was taken.


Here you can see the open nose with the corner tape piece moved.

All the area remaining white was masked with brown masking tape and pieces of plastic grocery bag.


The entire bottom surface of the wing is black. 

Brown tape was extended over the back and will allow the edges to get some black.

Tuesday, September 27, 2022

Estes Space Shuttle Columbia Build #1385, Part 16, Black Rudder Mask

Did I mention before - this is a difficult mask? After the gray - on to the black trim.
    
I tried to "fold" the tape around the curve at the top of the rudder. No luck.

There is that second, left over balsa rudder - 
Scotch tape was stuck down and blackened with a Sharpie. Wipe off the excess surface ink or some could transfer onto the model.
The rudder top curve was traced and the tape mask cut.


Here's the rest of the rudder mask.
The curve at the top is joined with straight pieces of tape down the front leading edge.


The rest of the larger areas were covered with brown masking tape and plastic bag material.

Monday, September 26, 2022

Estes Space Shuttle Columbia Build #1385, Part 15, Pulling The Tape & A Fix


This paint is actually a mid gray color. It just photographed dark.

I was happy with the Scotch tape masks after the tape was lifted. Most all the lines were straight and sharp except for this outside edge.

Another piece of marked Scotch tape was set over the rough line.
Gray paint was sprayed in a small plastic cup. A clean brush was dipped in the pool of paint and the excess wiped off. 
Paint was lightly brushed over the rough edge.


The tape was pulled and I was left with a cleaner line. Not quite as sharp as other masks, but much better than it was.

This gray is Ace Premium Enamel spray paint.
When brushed on as a touch-up, the Ace paint shows very little brush marks and won't lift the previous color coat. It just works!

Sunday, September 25, 2022

Estes Space Shuttle Columbia Build #1385, Part 14, The First Gray Mask


With the Summer heat and humidity I did get some paint "fogging" on the balsa. The body tube and nose cone dried with a good gloss.

Here's the before and after when the hazy areas were shined up using automotive polish paste.


This is a complicated and time consuming mask.

Here's the Scotch tape initial gray border mask. There is gray around the outside leading edge of the wing and a tapered stripe along the back' 


The smaller white areas were covered with masking tape. 
The larger areas were covered with grocery bag plastic.


The bottom surface is completely masked off for now.
The bottom mill be masked for black - then masked again for some additional gray trim.
 

Saturday, September 24, 2022

Estes Space Shuttle Columbia Build #1385, Part 13, Sanding Between White Coats

One way to get a smoother final finish is light sanding between coats.
You can sand the Ace Premium Enamel 30 minutes after spraying.
Recoat times are still within one hour then after 48 hours.

Here's the Shuttle after light sanding the first white coat.
Closeups below will show the sanding areas of concern.


Here's some rough areas on the cardstock side/wing glue fillets. Knock off the high points between the white under coats. 
I use 800 grit when dry sanding between coats. Some 400 grit sandpapers will show scratches under your paint.


Enlarge the picture to see some areas around the nose cone "notch" recess. These were slightly raised areas in the plastic that needed to be smoothed out before more paint.

Another example of glue fillet ridges around the launch lug.
Sand and knock down the ridges. It's not necessary to sand down the fillets, just the ridges that were left after the glue dried.


Around the raised flap - 
Forward of the flap were some glue dots that were carefully shaved off then lightly sanded.
It's hard to get good paint coverage with a painting wand dowel slid into the engine mount. 
First to paint just the end - 
A expended engine was slid into the mount. Notice the casing isn't slid all the way in. This allows no paint to get inside and easier to remove the casing without touching much wet paint.
For now, only spray the back end of the engine mount.

Remove the engine casing without touching the wet paint on the model. You might get a bit of paint on your fingers from the back end - the front of the model had no new paint yet.
While holding onto the unpainted front end of the model, Slide in a painting wand with engine casing set on the front of the dowel. Now you can paint the rest of the model.

Friday, September 23, 2022

Estes Space Shuttle Columbia Build #1385, Part 12, Fairing Top Gluing

With the fairing back slightly "splayed" out and the glue tabs dried,
The tops get a light even film of glue. The ends are rolled over onto the body tube.

Note the ends didn't end up evenly spaced beside my rudder placement line. Not a real problem.


The rudder is glued on centered between the rolled over cardstock tops, directly over the centered engine hook. The rudder was set down just to the side of the original pencil line. It did end up visually centered.


I did a dry fit of the OMS Pods and found the back slightly raised sitting on the cardstock. The ends of the fairing were trimmed back in a straight line so the bottoms can sit flat and into the root edge of the rudder.


The OMS Pods were glued on, 1/4" back from the front edge of the rudder.
The back of the pods overhang the end of the body tube.

Thursday, September 22, 2022

Estes Space Shuttle Columbia Build #1385, Part 11, Body Side Fairing Gluing


Interesting - 
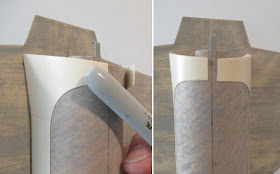
The face card picture (of an pre-production build) doesn't show the cardstock sides overhanging the front and onto the nose cone.


Bottom flap is glued on first -
The bottom long flaps are sharply folded in and are glued onto the body tube. 
Try to keep the length of the fairing straight and at a 90 degree angle to the flat wing. 

After the bottom flaps are glued and dried - 
The rear side tabs are glued onto the body tube.

Apply a glue "skin" (it doesn't take much) down the top edge and press down the sides, leaving the rear tabs open.


On the left, you can see how little glue was used on the inside of the top edge. Smooth it out and press onto the tube. 

I used a burnisher to smooth out the sides of the fairing where the glue made contact.

Wednesday, September 21, 2022

Estes Space Shuttle Columbia Build #1385, Part 10, Wing Gluing & Cardstock Fuselage Sides


Dry fit the wing before gluing onto the body tube.

Notice how the front of the wing overhangs the BT-60 body tube and onto the notch running across the bottom of the nose cone.
 
GOTCHA: The instructions say there is a space of 1 1/8" from the back of the body tube to the edge of the wing extension. 
With the wing all the way forward and against the recess notch in the nose cone -  my rear spacing was at 1 1/32".

The back of the wing extension is straight, there is some camera distortion.
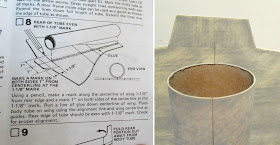
The instruction drawing does not show the nose cone in place. Glue the wing on with the nose cone seated in the tube to be sure the wing front is far enough forward. 

Pre-bend the cardstock sides. Be sure your two pieces are "mirrored".


With the nose cone in place - 
Do plenty of dry fits.


Note how the cardstock fairing sides are slid all the way forward and stop in the side notch on both sides of the nose cone.

Tuesday, September 20, 2022

Estes Space Shuttle Columbia Build #1385, Part 9, Rudder Fitting


After the glue fill there was still a dip where the glue had shrunk in.

Some CWF filler was applied then sanded with 400 grit. 

The tube marking guide matched up! The tube is marked on two sides.
The tri-fold Shock Cord Mount is printed inside the marking guide. This old style mount is printed on 65 lb. cardstock, stronger than the usually printing the mount on 20 lb. instruction sheets.


The rudder drag brake still a tight fit in the balsa rudder.

The top and bottom of the rudder cut out was trimmed.


Again, I used very little glue to set the cardstock drag brake.
After the initial tack glue had dried I checked the alignment. It did need some adjustment. 

Glue fillets were applied and tape held the cardstock triangle under tension - pressing and centering the brake in the correct position.

Monday, September 19, 2022

Estes Space Shuttle Columbia Build #1385, Part 8, Cutting & Setting The Flap

The instructions have you glue the wing onto the tube before cutting the wing flap. I thought it would be easier to make this cut with the wing not glued on yet.

I would assume the single flap on the right side of the wing makes a slow stabilizing spin during boost. It reminds me of the spin tabs on the old Astron Space Plane.

You use a template to trace and cut the elevon flap.

The vertical cut was cut all the way through the balsa. 
I tried to make the horizontal cut not quite through the wood hoping to make a "hinge". When I tried to bend the half cut - the elevon flap broke through! No big deal. I'll just glue it as it was intended.


I used very little glue on this joint.
A little glue allows for repositioning. You can always add more glue after you get the right angle.
Check the angle with the supplied guide. 


After the angle was right - 

Small bits of glue were added to the bottom open joint and the angle checked again.

More glue was added to fill the gap.
 

Sunday, September 18, 2022

Estes Space Shuttle Columbia Build #1385, Part 7, Balsa, Launch Lug & Tube Filler/Primer


Here's the wing, rudder and launch lug ready for a good shot of filler/primer. The parts will be taped to a piece of scrap cardboard for spraying with loops of masking tape, sticky side out.

Spray one side, let dry.

Flip over, re-tape and shoot the other side. Be sure to get the filler primer on the outside edges.
The primer was sanded with 400 grit until the CWF just starts to show under the gray primer.

Down the center is the glue area to attach to the main body tube. I wrapped some 400 grit around a small glue bottle to remove the gray primer. 
Sand down to the the CWF filler. The CWF is water soluble and wood glue will give a good bond.

The body tube was also shot with filler/primer. 
The tube ends were masked off. 

I press and lift the tape against my pants leg a few times to reduce the stickiness. Sometimes you can start an interior peel of the tube when pulling off the tape. With the tape less sticky there is less chance of peeling and delamination.