Pages

Sunday, April 30, 2023

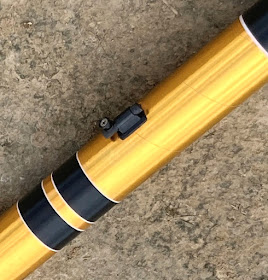
Leo Nutz Rail Button Adapter

On the Facebook Estes Model Rocket page, James JM asked: 
"Do they make 1010 rail buttons to put on Rockets like the Ascender and Mammoth that don't require drilling a hole?"


Leo Nutz answered: "I made my own by mounting a rail button to a dowel that fits snug in the launch lug. 
Has never failed me."

Questions: "So thats a 1010 button glued onto a dowel that slides into the original lug?"

Leo went on the explain: "Not glued (would never hold) but screwed into the dowel."

Question: "So the button is screwed into the dowel but is the dowel glued into the lug?"

Leo answered: "No, it is not glued into the launch lug but as I mentioned in my first post friction fitted."

Saturday, April 29, 2023

Wolverine Phoenix AIM-54A, Fix!, Part 8, New Decal & Finished


To place the home print decals, I had to consult the online instructions at Jim Z's: CLICK HERE

Nothing too complicated, simply center the decal in the open space.
Here's the decal in place, another is directly on the other side.

I centered the large lowest line "SERNO 20115" between the yellow bands.

The kit included a single 18" chrome Mylar parachute. The original Estes kit had a larger 24" parachute. These fins are delicate. I'll probably put two (duel) 15" chutes in.


Here's the 4" taller original build - 


And the same corrected, shorter Phoenix. 
A much better look.

Friday, April 28, 2023

Wolverine Phoenix AIM-54A, Fix!, Part 7, An Interesting Mask

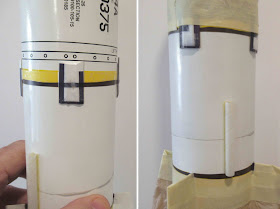
This was an interesting mask. I had to work around the rectangle plates so the paint ridge would be hidden.
For whatever reason, I used yellow Trim Monokote for the yellow stripes. This allowed me to set marked Scotch tape masks on the yellow tape. If this yellow was a water slide decal, the tape would probably lift the ink.

It took quite a few small pieces of tape to outline the raised plates,
The picture on the right shows the lower mask again set over the yellow Monokote bands. 

I crossed my fingers and used Rustoleum 2X Gloss White. I've had a bad history using white Rusto 2X, sometimes it sprays out a rough flat chalk no matter how long you shake the can. I wanted to match the white I used back in 2012.

This time it went on smooth.
On the left is the tape lifts. The paint ridge is "hidden" by the yellow trim edge and raised plate thickness.


Here's the finished patch and paint.

You can see a slight ridge where the tubes were joined. I did a better job of filling the ridge the first time around.

The next time I print decals I can add the missing wordage. That will take the focus off the slight tube joint bump.

Thursday, April 27, 2023

Wolverine Phoenix AIM-54A, Fix!, Part 6, Filling The Tube Joint

Some CWF was set in place on the tip of a dull knife blade much the same way I normally fill a tube seam.
Some masking tape was set down surrounding the filler line so I wouldn't sand too wide an area around the fill line. 400 grit was used to sand the filler to surface.


The filled seam was masked off about 1/4" on both sides to direct the filler/primer spray. I didn't want primer anywhere else except on the seam.
When the tape was removed the filler/primer was left on the seam area.

400 grit was used to sand the filler/primer to surface. The gray was only left in the low areas. 

This probably won't be an invisible fill but will look better than the long body tube.

Wednesday, April 26, 2023

Wolverine Phoenix AIM-54A, Fix!, Part 5, Gluing Together The Tubes


My older Bob's Epoxy was dried up. I rarely use epoxy on LPR builds.
I did want epoxy for this one. I would hate to have the upper tube freeze up in the wrong position. The upper rectangle details have to line up with the four fins.

Epoxy allows you some working time. It is slippery and will drip! Don't use too much where drips can form. Wear gloves when using Epoxy. Some people have allergies and it can really tear up your skin.

Notice the drawn A ---------A pencil line. After I lined up the upper rectangle plates with the fins, the pencil line was drawn for alignment.

Epoxy was mixed up and spread around the inside of the lower tube. The upper tube was slid into place and turned until the pencil marks lined up.


I also spread a thin coat of epoxy around the inside end of the body tube. The epoxy was spread with a stick off a Q-tip, trying to keep it as even a coat as possible.

A review on rocketreviews.com said there can be some motor charring. The epoxy should protect the back end a bit.

Tuesday, April 25, 2023

Wolverine Phoenix AIM-54A, Fix!, Part 4, Peeling & Squaring Up

This is the 4" extension glued 2" over the coupler.
If I cut through just the tube I can still use the original coupler.

On the left, the outside layer of the tube is carefully peeled off.

On the right, the coupler is starting to show. I was surprised how most of the coupler didn't have much glue. On the original build - after sliding the tube segments together, the glue was pushed towards the bottom.


The coupler was 4" long, 2" extend out the bottom.

Little bits of glue still remain towards the low end. This was sanded clean with 220 grit on a block.


The lower cut above the fins was sanded flat using a block.

This low end can be squared up - the upper part can't with the coupler in place. I tried to get as straight a cut as I could.

Monday, April 24, 2023

Wolverine Phoenix AIM-54A, Fix!, Part 3, Tube Cuts


At the pencil lines - 
A straight piece of 110 lb. cardstock was wrapped around the tube and taped closed.

Tape was also added to the bottom edge to keep the cardstock guide still while cutting.
I started with a razor blade but switched over to my X-Acto knife with a new #11 blade.

The cardstock guide edge made the cut pretty easy to do.

As always, don't try to cut through a tube with a single pass. Ease up on the knife. It should take a few rotations of the tube to cut completely through.

TIP: Turn the tube under the blade. Keep the knife blade still. 


This was a pretty clean cut. 

With the upper tube removed, repeat the second cut at the line 4" above this lower cut.

Sunday, April 23, 2023

Wolverine Phoenix AIM-54A, Fix!, Part 2, Measure & Mark


The only decals that will be lost when removing the 4" of body tube is this small one.

I took a picture with a ruler reference so I can home print something later at the correct size.

The upper launch lug will be cut off and replaced later. 
Slice off most of the lug just above the glue fillets, then remove the fillet areas.

The Estes kit had two 1" long, 3/16" diameter launch lugs.
This Wolverine kit included two, 2" long 3/16" diameter lugs.
I marked the tube at the body tube joint (right side pencil mark) -
then 4" below that. These will be the two cut lines.

The inside coupler is 4" tall. After the cuts, there should be 2" of coupler (half) extended down out of the top tube. 

Saturday, April 22, 2023

Wolverine Phoenix AIM-54A, Fix!, Part 1, What Happened?

Here's one I assembled in 2012, the Wolverine Phoenix.
It's a clone of the big Estes Phoenix kit, #1380. 

There was a glitch in the pre-production kit I received. 
The model is made up of two BT-80 body tubes, the lower tube should be 14" long, the upper tube, 7.6" long. Both tube lengths are joined by a coupler. 
In my "kit" the lower body tube was sent at its original length of 18". I assumed the tubes were the correct length and assembly followed.

Having never built a Phoenix rocket before, it didn't think anything was amiss until I went to apply the decals. The open mid section ended up  about 4" too long!

While building, I also drew up the kit instructions for Uncle Mike's Rocket Shack/Wolverine Rocketry.

Here's a link to the first build from finish to start: CLICK HERE


This project is to cut out the extra four inches as cleanly as I can.
The scrap tube will have to be peeled off the coupler. Cleaned up then rejoined (hopefully) at the right length. I might lose the upper launch lug. I can home print and replace the small black decals in the middle.

This has bugged me for years! The model has never been flown.

Friday, April 21, 2023

How Do YOU Say It?

Sung to the melody of "You Say Potayto, I Say Potahtoe",


You say Est-tees, I say Ess-tis,
You say Cen-tour-ee, I say Cen-chu-ree,
Glay-da, Glee-da,
Pees-ter, Pie-ster,
Lets count the whole thing down.

So how is it pronounced?
Estes = Ess-tiss
Centuri = Cen-tour-ee
Gleda = Glay-da
Piester = Pee-ster
So is it Motor or Engine?
Yaaaaaaaaahhhh!

Andy Nothern's Rocket Stand


Andy Northern posted this on the Facebook Estes Model Rocket page:

"I made this display stand for the Estes Wolverine clone I am working on. It is a wood base from Hobby Lobby, the rod is a metal straw cut to length, an old, used engine that is epoxied to the rod, and a star cut on my Cricut. Super cheap and super easy."

Thursday, April 20, 2023

What's Going On In This SpaceX Rocket Video?

Here's a great video showing what's really going on -


To see the video: CLICK HERE

Wednesday, April 19, 2023

Color Wheel Compatible Colors?

From the Facebook Estes Model Rocket page: Eric K. posted: 
"I was thinking this might help in color choices for your next build."
   
Kirk G. responded:
"No. it doesn't help at all."
 
White isn't even mentioned.
Another thing that always struck me as strange - When light color filters are used, white ends up as the combination of all colors. Black is the absence of all color. 
Explain that concept to a five year old with a box of crayons. To a kid, white is the paper you add colors to. When color crayons are layered and combined, you end up with a dirty purple/brown - almost a black.

I never found the Color Wheel helpful when picking out compatible color combinations on model rockets. In my teens, spray paint color picks were whatever was left in the garage.

Now, I tend to go with a three color "rule" on sport models.
First major color, usually a light color overall. White, maybe yellow. White works best if decals are to be added. Never an overall green! Did you ever try to find a green Centuri Star Trooper in the grass?
Secondary color, a bright darker color used on fins or nose cone (one quarter to one third of the total surface area) Orange, Red maybe Purple. 
Third color accent - Black nose cone, decals and/or some chrome trim.

If you want a good idea how it should be done, peruse the pages of the 1973 Centuri Catalog: CLICK HERE


For me, this is the work by which all catalogs (previous and new) can be compared.

Tuesday, April 18, 2023

Estes Klingon Battle Cruiser, #1274, Finished


Well, I'm glad that's over!
Not a fun build. The chrome stickers went on fine, the water slide decals in one of the two kits weren't useable.


The rear view picture makes the model look big.
It's not a large rocket.
At least this one doesn't have a parachute "probe" extension like the Enterprise did.


That long decal windows decal is lifting. The other decals on this sheet seem fine - at least for now.

This is a tough build. If you see it on Ebay - I probably wouldn't bid on it!

Monday, April 17, 2023

Estes Klingon Battle Cruiser, #1274, Step 27, Decals

I thought about scanning the decals but I wouldn't be able to home print a replacement because of the white areas. 

I had built two of these - 
The decals were old so I gave them a coat of decal film. 
The two kits must have been from two different batches. Only one decal sheet was useable, even after the decal film coat.

One sheet transferred after 30 seconds in the soak water.
The second decal sheet did transfer, but wouldn't stick to the model.
Micro-Sol didn't help the bad decals.


Look at the left side of the long windows decal. It is starting to lift. Some Future applied with a brush to hold it down.

Below that is the black "eye". It's a two piece decal that has to go over the raised seam.


The white "TEZ" decal centers over the Mylar sticker.

There are some tiny red decals that go on the rear of the engine pylons.


More small windows between the front dimples,


Windows on the adapter.


It's a big parachute considering length of the lower BT-50 body tube.

I set the parachute beside the body tube allowing for the length of the engine below it. There isn't enough room for wadding and the shoulder of the adapter.

Sunday, April 16, 2023

Estes Klingon Battle Cruiser, #1274, Step 26, Chrome Trim Positioning


A few of the chrome trim pieces were long (on the left) and two others too tall (right).

I didn't want to do the trimming after the pieces were on the model. These were stuck back on the backing paper and cut.


As my usual practice,
The sticky back pieces weren't touched where I could help it.

I positioned the pieces while they were stuck on just the tip of my hobby knife. 


Here's the outside wing trim pieces.


The windows sticker was trimmed earlier to fit the the height of the flat side of the bridge.

Saturday, April 15, 2023

Estes Klingon Battle Cruiser, #1274, Step 25, Small Brush Painting Details


Considering how small the hand painted areas are, it doesn't make much sense to include the brush paint bottles. 
Small black dots in the primary hull recesses (upper left) 
Silver paint in the rear ridge centers of the warp drives (Upper right) 
Two small red dots on the top of the bridge (bottom)
You can't brush paint the black into the round recesses. You could dip a sharpened dowel in the paint and touch the centers of the recess making a round dot.

I used Sharpie pens. 
Rotating a larger round point pen in the hole left a center where the tip couldn't reach.
A ultra fine point Sharpie filled in the center.


Here's the finished black. 
The Sharpies came through again.


The red dots were done with a fine point brush.
This Klingon nose cone reminds me of Squidward.

The "Bonus" kit included a bottle of red paint - for these two little dots. No other red on the model.


The third brushed color is silver.

If you've got a decent square brush, it's easier than you would think.

Friday, April 14, 2023

Estes Klingon Battle Cruiser, #1274, Step 24, Painting The Light Gray

One of my two kits included two cans of spray paint. One is a primer, the other a light gray. 
Also included were four small brush bottled paints in black, red, silver and thinner. These kits were probably over 20 years old. I'll use the small brush paints but really don't trust the small cans of spray paint.


I don't use tack cloths. 
When tack cloths are new, they can leave an film on your model.

I simply use a cheap chip brush to clean off any dust.

One of the warp drive assemblies cracked right down the seam! A few more drops of CA and some finger pressure closed it up. 


As mentioned, the kit came with a short can of Testor's Light Sea Gray paint. The can was too old to trust.
I used the Ace Hardware Light Gray. 
It is just about the same shade.
There are plenty of nooks that are hard to reach with the spray paint.
Shoot all the tight inside areas first, then shoot the entire model.

On the right are two areas that didn't get good coverage. I went back afterwards and touched up the gray using a brush. The gray paint sprayed into a small mixing cup.