Pages

Thursday, June 30, 2016

Estes Interceptor Build #1250, Part 18, Oh, Those Decals!


The instructions say to start applying the bottom decals first. The Bottom View was a bit confusing, the image was flipped. You'll definitely want the USAF and stars and bars decals on the opposite side.
I'd recommend going to the older Interceptor instructions on JimZs: CLICK HERE The decal pictures there might answer some placement questions. 


Previous builds on RocketReviews.com talked about the decals being thin. They were right!

The lower left vertical line broke and had to be reassembled. I've learned through past experience - don't start with the largest decals!
TIP: Start with smaller decals set in an area that won't be seen. If you have problems with them, these flaked or folded first decals might not be noticed.

This bottom front decal flaked at the upper left vent corner.
I couldn't fix it so the bottom vent was cut off to match the upper broken vent.

Before proceeding, both decal sheets got a spray of Krylon UV acrylic clear.


The underside of the wing has large decals that go over the root edge fillet and up the body tube.
After the decal was centered on the wing the line in the decal didn't meet at the root edge.

Roll a wet Q-tip to press the decal into the fillet area.

Throwback Thursday Pic 7


Another picture from NARAM 17.
NARAMs are a great place to meet to meet vendors. On the right is Col. Howard Kuhn of Competition Model Rockets. When CMR was up and running, you'd see many of his kits in NAR competitions.

That square blue building in the background is still there! It's right down the street from the Universal Studios entrance.

Estes Interceptor Build #1250, Part 17, Antenna and Tail Cone Painting


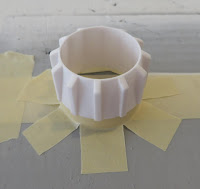
You can paint the tailcone off the model. This will save you from any masking around all the raised vanes.

Some masking tape was rolled around the shoulder. The overhanging tape was slit a few times and bent outward to tape to a spraying board.


Somewhere I saw a picture of a finished Interceptor where the antennas were painted black. I wish I could find it again and give credit to the original builder. To me the Interceptor could use a little more black detail for a stronger contrast.

To spray these black off the model some of the 1/8" scrap balsa strips were thinned to 3/32", the same thickness as the upper fins. The antenna slots were wedged in over the ends.

The tail cone and antennas were all painted with Rustoleum metallic black.

Wednesday, June 29, 2016

Estes Interceptor Build #1250, Part 16, Painting The Wing Pod


Plastic grocery bags were used to cover up the rest of the body.

Near the pods you can see the brown masking tape that goes on after the Scotch tape and holds the bags on the body.

Here's one of the pods after the tape was pulled. A little back push with a knife tip evened out the paint line where the Scotch tape overlapped.
While the instructions called for fluorescent orange, this Ace Hardware "Rocket Red" fluorescent came out a red/orange. Compare the can lid to the color on the pod. I can live with this color.
Fluorescent paints do require a white undercoat. This final color would have been darker if a colored undercoat were used. Then again, that might have made it too dark.

Estes (Centuri) Mercury Redstone Tower Complaints


On Facebook, I read complaints about how hard it is to assemble the tower on the Estes Mercury Redstone kit.

Originally this was the Centuri Mercury Redstone. The body tube size is the first give-away, a ST-20. CLICK HERE

The tower is a bit fiddly but not impossible. I did a detailed blog build with lots of tips - CLICK HERE
The tower assembly is at Posts 12 - 17. Build it the way Centuri had you build it - from the top down, not the bottom up.

Take a deep breath and have the right glue.
And, by all means - SLOW DOWN!

"You young whippersnappers don't know how easy you've got it today."

We had the Estes Mercury Redstone, K-41. It was BT-60 based and smaller. To see it in all it's glory, CLICK HERE

If you think that plastic tower is a "bitch"  
We didn't even get dowels in the kit. The "dowels" were cut from some (badly produced) steam pressed hard wood. They were cut from the plank and rounded by hand.
If that wasn't enough, enlarge the picture and check out the SIX PIECE FINS in Step 7. How you gonna fill the grain on those?

In a way I'm glad I grew up in the 1960s and learned patience building kits like this.

Tuesday, June 28, 2016

Estes Interceptor Build #1250, Part 15, Masking The Wing Pod


There are a lot of root edges and nooks to get paint on evenly.

As careful as I was to get full coverage there was still a few spots near the wing pods that didn't get enough white paint.
Rusto 2X touch-ups blends in pretty well. Paint was sprayed into a cup and a Q-tip used to roll on some gloss white.
It would have been easier to paint the wing pods separately off the model.  But there would have been that joint gap on the upper part of the pod. The face card model was probably painted that way. The same reason you paint the tail cone black, off the model.

The mask of the wing pods was interesting but not hard to do.
Scotch tape was set down on my patio door glass.
The wing pod was set over it and a pencil tracing was done right around the outside edge of the nose cone. The side of the pencil was set right on the nose of the pod.


Cut down the pencil line first then mark down the drawn line with a permanent marker.
Cut with just enough pressure to cut through the tape. Press too hard and you could scratch the glass.

Trace and cut two right sides and two left sides.


A small thin strip was set over the top.

The curved piece cut in the previous picture is set down the pod/wing joint in the middle of the fillet.

Monday, June 27, 2016

Semroc SPEV for Auction on Ebay


A finished Semroc SPEV is up for auction on Ebay:
CLICK HERE
The auction runs through Sunday evening, July 3.

This build is very clean with sharp mask lines.
It's a bit of Estes (overstock) history and a great demonstration rocket.

I'm also selling a Quest launcher and controller: CLICK HERE

Stop by, make a bid and support the blog!

Estes Interceptor Build #1250, Part 14, Wing Pod Gluing


The two piece wing pods were glued on with the Beacon Fabri-Tac Glue.
If any of this thick glue squeezes out, wipe it away immediately. It is a bit gummy going on and dries hard.

After drying, the wing pods seem strong and very well adhered.
Notice the gap at the front of the pod/wing joint.
The gap was filled in with two fillets of Titebond M&TG.
After a small spray of gloss white, any fillet marks and glue boogers were sanded down for the next color coat.

Sure it'd be easier to paint the pods separately and glue them on afterwards, but I wanted to get rid of the gap at the pod/wing joint.


I had to dry fit the antennas on the vertical fins and see what the model profile looked like.
This was a very cool design in 1971 and is still impressive 45 years later.

Sunday, June 26, 2016

Estes Interceptor Build #1250, Part 13, Parachute Fix Tips

After a good tug, the shroud lines on the pre-assembled parachute seemed pretty strong.
The reinforcement disks were peeling off! They also tore easily telling me they were paper.
The disks will be replaced with Avery plastic disks.
I didn't want to replace the shroud lines. There is a way to work around them.


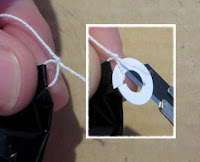
Cut a line through one side of a plastic disk.
The inset picture shows how the disk will sit with the cut facing away from the shroud line.

Fold over the parachute corner and open up the shroud line loop at the tie.
Slip the cut ring through the open loop being careful not to touch the sticky back to the plastic chute. It's a little tricky but can be done.
It may take a few tries to get the disk into position. In the end this takes much less time than tying on new shroud lines.


It's hard to see in the picture but the cut ring line is to the center, opposite any stress of the shroud line pulling on the parachute.

Saturday, June 25, 2016

Estes Interceptor Build #1250, Part 12, White Paint Sanding


After filling with CWF and sanded down primer/filler I had a lot of raised grain. This really shows up on the first white undercoat.

In addition to the raised grain there was some open grain pores throughout.


Light sanding will get rid of the raised pore lines. This is pretty much dry sanding. A wet sand might get into the thin coat of paint and swell the wood. The open pores got a fill with more CWF. The excess was taken off with a razor blade so there will be very little to sand off.


The white undercoats act as a final filler when sanded down.
Look close around the upper launch lug. much of the Titebond M&TG fillet "boogers" have been sanded to surface.

Friday, June 24, 2016

Estes Interceptor Build #1250, Part 11, Fillets

The fin root edges were glued on with yellow Carpenter's Glue. I don't initially use much, this way I can remove and re-position the fin if it ended up out of line.

A fillet of Carpenter's Wood Glue follows.
Then a second fillet of Titebond M&TG.
The ends are done first. Apply a small bead over the top of the fin and smooth out with a fingertip rounding over the tip joint.

Then do the sides.
The long wing fins fillet should be applied one half at a time. The Titebond M&TG skins over fairly quickly so do long fillet lines applications in two steps.
On the left is the applied glue bead right out of the bottle. The inset right side picture is the fillet smoothed out.
Apply the glue bead and smooth out with a fingertip. Smooth twice, the first time to even out and remove excess. The second time picks up any glue spread out too wide and away from the joint.

A Better Shock Cord Knot? Tips, Part 2


Tie an over hand loop knot in both the Kevlar and elastic cords. The loops should be about 3/4" long. (Left side picture)

Pass the Elastic loop over the Kevlar loop. The elastic loop can pass over the Kevlar knot. (Right side picture)


Pass the loose end of the elastic through the Kevlar loop. (Left side picture)
Pull the end of the elastic almost completely through the Kevlar loop.
Pass the elastic knot and loose end up and through the Kevlar loop.
Pass the Kevlar knot and loose end down and through the elastic loop. (Right side picture)


On the left are the loops after the knots and ends are passed through, before cinching up the knot.

On the right is the finished and tightened knot.
The new knot is cleaner, stronger with less stress on the elastic.

You may not get it right the first time. All new knots take practice.

Thursday, June 23, 2016

Estes Interceptor Build #1250, Part 10, Fin Gluing


Here's all the fins in place, viewed from the rear.

The six fins are not spaced at 60 degree intervals.
Note the wing fins are not evenly placed but slightly below the center line of the body tube.


All the fins are in line with the center point of the body tube.
Enlarge the picture to see the pencil lines I drew that intersect at the center.

A side view with all the fins glued on.

The upper fins are glued 1/2" from the rear of the tube, the large main wings are glued 3" up from the end.

A Better Shock Cord Knot? Tips, Part 1


Here's how Quest shows to tie the Kevlar to an elastic shock cord. We've all tied shock cords on this way.

I was concerned that the tight knot might weaken the tightly cinched elastic.


For years I've tied the elastic on like this. There is no knotted elastic where the Kevlar makes contact. The tension at ejection will be spread out more.

An overhand loop knot was tied in the lower Kevlar line.
The only way I could attach the elastic was to tie a square knot. The end of the elastic ended up out and away, not side by side like on the Kevlar below it.


I know I'm probably not the first person to tie the Kevlar and elastic shock cord like this. In the next post I'll show how to tie the knot.
This cinch knot spreads out the tension even more and has a neater look with both lines side by side.

This is one of those things that I should have figured out years ago. Sometimes a simple solution can slip right past you.

Wednesday, June 22, 2016

Estes Interceptor Build #1250, Part 9, Fin Gluing


The fin lines were marked and the glue lines were sanded down to the tube.
The sanded area was wide enough for the fin width and glue fillets.

After sanding off the pencil lines they were re-drawn for gluing.
The sub fins are glued on first.
Be sure the wide end is facing forward. It's easy to follow your first instinct and flip these.

The drawing on the upper right is incorrect. It shows the sub fin directly above the engine hook. The two sub fins are actually on either side of the engine hook.
I understand the point they are trying to make, the drawings just don't jive.
TIP: Where you can, try to center the engine hook between two fins. It's easier to install and remove engines without the fins in the way. This is especially true when longer fins trail past the end of the body tube.


Here's both sub fins glued on. Glue with the wide end forward. It's easy to follow your first instinct and flip these.
The rear edge is 1/8" from the end of the main tube.

Centuri Glue?

Here's one I saw for sale on Ebay -

Centuri Model Rocket Super Bond Glue.
"Twice As Strong As White Glue"

This was in the Centuri catalogs for years. I always thought it was interesting that Centuri had it's own formula glue, especially made for building model rockets.

I got to know the Centuri guys at the NARAMs in the mid 1970s. I asked Bob Del Principe what made their model rocket glue so special.

He turned to me with his hand part way over his mouth and whispered: "We buy Titebond in gallon jugs and fill Centuri labeled smaller bottles."

Tuesday, June 21, 2016

Mystery Parts Kit - Solved!


A while back, Estes posted these parts for the upcoming Nike Smoke kit. These aren't the right parts and many speculated what they were for.


I took a guess and came up with this - To me, not my favorite design.
The crescent shaped pieces on the centering ring sheet led me to believe there would be cut, tapered tubes.


Yesterday, Estes posted pictures of some "Coming Soon" kits.
MYSTERY SOLVED!

http://www.estesrockets.com/coming-soon/

My design guess was pretty close, After looking at my drawing I realized the upper tube had to be longer. One of the upper shrouds turned out to be a tail cone nozzle.
The three small strakes ended up on the middle transition and not in the squeeze transition area. The fins mount on the tapered body tubes, not between them.

Estes Interceptor Build #1250, Part 8, Engine Mount Gluing and Nose Cone Seams

TIP: Glue the engine mount in BEFORE marking the tube for the fins.
It's easier to simply glue the mount in without worrying about lining up the engine hook with the launch lug line. Glue in the mount then wrap and rotate the marking guide to the engine hook.

The instructions have you glue in the engine mount with 1/2" exposed.
Use the tail ring shoulder to press the mount to the proper depth.


Add a glue fillet to the rear centering ring using a Q-tip and a drop of glue. It'll take four or five drop applicationss of glue to get a fillet all the way around the body tube joint.


Here's a before and after of the molding seams on the nose cone.

The nose cone was pretty good but could use a little cleaning up.


Fold some 400 grit and sand down the recesses where you can see a raised mold line.

Monday, June 20, 2016

New Kits From Estes

From TRF, EXPJawa found some new products coming from Estes - CLICK HERE


Here's the two new kits:
A 24mm model with lots of transitions and body tube cutting -
The instructions are posted, thanks to Neil W. - CLICK HERE

More on this mystery design to be posted tomorrow.


A good two-stager for small fields
This is a high drag model using 13mm engines -


These two are reissues -
This Nike Apache was built on this blog: CLICK HERE
To see the older instructions: CLICK HERE


From 1985, the Airborne Surveillance Missile. A mini engine model with lots of fins and details.


There is also an "ORBIS" package with 3D parts you print at home.
Interesting, but - How many people have their own personal 3D printer?