Showing posts with label E Mercury Redstone. Show all posts

Tuesday, February 23, 2021

Estes Mercury Redstone Capsule Tip

When I assembled my Mercury Redstone capsules - 
I scraped and turned a small file to remove paint from the gluing "dimples" in the upper ring. (Shown at the right) With the paint removed I can get a better glue bond.

Here's a great TIP in a comment from LDJBaxter:
"As an experiment on our Little Joe capsule we placed a drop or two of white glue from a toothpick into the "dimples" prior to painting. After the glue dried and the piece was painted we used the hobby knife blade to pop out the glue and had a clean surface for glue."

Thanks Mr. Baxter! A small dot of white glue won't stick to the plastic and when removed makes a great small "point" mask! 

Wednesday, August 3, 2016

Centuri Mercury Redstone Tower Instructions

I know, I've been harping about the Estes Mercury Redstone capsule and tower instructions for a while. For an easier tower assembly I refer people to the Centuri instructions on the JimZ website. Those instructions don't come up now. On some Facebook pages people are still having trouble assembling the tower.

When I was first building the Estes MR I printed the Centuri capsule instructions. These cover the correct, easier (upside down) tower assembly, the capsule and how to tie a recovery sling that allows the capsule to fall tower up under a separate parachute.
The Estes instructions have you glue the tower sides (right side up) into the dimples in the antenna housing. Centuri has you first gluing two tower sides together. The tower sides are upside down. Then align them top down using the inverted escape motor bottom piece.

I took pictures of the instructions, I don't have a scanner right now. These were copied at twice my normal resolution for the blog. Enlarge them and they should be easily enough to follow.
For large, easiest viewing - Right click, then "Open link in new tab". Open the new tab at the top of the screen.


Tuesday, July 5, 2016

Latest Estes Order


I rarely order from Estes directly unless there are some good prices on clearance models.
A short while back Estes added the Mercury Redstone and Little Joe Apollo capsules, separately from the kits. CLICK HERE and scroll down to the bottom.
These parts kits do not include the white print decals.

Centuri once offered the Mercury Redstone capsules in their catalogs. I always regretted not picking up a few for projects like the Mercury Little Joe I. I think I have enough now.

Wednesday, June 29, 2016

Estes (Centuri) Mercury Redstone Tower Complaints


On Facebook, I read complaints about how hard it is to assemble the tower on the Estes Mercury Redstone kit.

Originally this was the Centuri Mercury Redstone. The body tube size is the first give-away, a ST-20. CLICK HERE

The tower is a bit fiddly but not impossible. I did a detailed blog build with lots of tips - CLICK HERE
The tower assembly is at Posts 12 - 17. Build it the way Centuri had you build it - from the top down, not the bottom up.

Take a deep breath and have the right glue.
And, by all means - SLOW DOWN!

"You young whippersnappers don't know how easy you've got it today."

We had the Estes Mercury Redstone, K-41. It was BT-60 based and smaller. To see it in all it's glory, CLICK HERE

If you think that plastic tower is a "bitch"  
We didn't even get dowels in the kit. The "dowels" were cut from some (badly produced) steam pressed hard wood. They were cut from the plank and rounded by hand.
If that wasn't enough, enlarge the picture and check out the SIX PIECE FINS in Step 7. How you gonna fill the grain on those?

In a way I'm glad I grew up in the 1960s and learned patience building kits like this.

Monday, January 25, 2016

New Estes Mercury Redstone Kit Run


I had heard that Estes corrected the decals on the Mercury Redstone kit. I saw the new kit run yesterday at Hobby Lobby.

The face card is now a black background, much like the Saturn V (#2157) and new Little Joe II.
The vertical UNITED STATES decal looks to be a darker red, the plastic capsule and tower parts still look pink to me.


The "MR8" is a correction builders are looking for. You can see it above the fins.
MR8 designates the Liberty Bell 7 flight.

Thanks to Estes for listening and making the corrections.

Wednesday, October 7, 2015

Estes Mercury Redstone Capsule Tether Follow-Up, Part 2


Here's something extra you can do on your Mercury Redstone capsule tower line.
The white embroidery thread line can be camouflaged so it isn't seen.

Set the white thread down along the tower and capsule.
Using permanent markers, color the thread red over the tower area and black over the capsule.
The inset picture is after coloring the white line. It's not as noticeable now.

I could probably use a snap swivel for the top tower attachment. But a snap swivel is hard and might strain the tower.

Tuesday, October 6, 2015

Estes Mercury Redstone Capsule Tether Follow-Up, Part 1


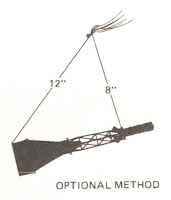
On TRF, DMKeifer posted this illustration from the old Centuri Mercury Redstone instructions. I'm posting it here because I can't pull up the Centuri instructions on the JimZ website.

It was about time I tied a 12" Odd'l chute to the capsule.
There are two reasons for using this tie.
1. If the tower comes loose, it stays with the capsule. Yes, the tower can pop off on a hard landing.
2. The capsule base hits the ground first lessening the chance of tower damage.

When tied with these lengths of line the capsule will hang at a sharper angle.

NOTE: The aerodynamic spike is not in the illustration. Centuri recommended that it come off for flight and be inserted for display.

Wednesday, August 12, 2015

Mercury Redstone at Hobby Lobby


I stopped into Hobby Lobby to buy some 1/8" dowels for the Odd'l Cyclone kits. I checked the rocket aisle.

There was one Estes Mercury Redstone kit on the rack. I picked it up and with my 40% off coupon it was only $14.39! The retail sticker read $23.99.

I was curious about the decals, if corrections were made. The decal was a definite darker red, not a pink color.
The MR7s were still there.

The body tube was crimped on one end. No problem, that tube will be cut down and eventually end up as my Mercury Little Joe I. My other bagged MR kit will probably end up as a Juno 1.

In the bag was an Axial RC car brochure.
There's also a NAR flier. No application but the NAR website address is there along with pictures featuring some Estes kits.

Saturday, August 1, 2015

Estes Mercury Redstone #1921 Build, Finished


This is a big, impressive model when finished. It's probably a good thing I converted it for 24mm engines. I'll have to get the 18mm stock model C/G and add nose weight if needed.
After all the extra work drawing up correct and red decals, I was glad to finish it.

Estes website says the finished, empty weight is 3.7 oz. Mine was at 3.53 oz.
Or, the Estes gram weight - 1.04 g, my finished model is 100 g.
A C6-3 engine weighs .88 oz. + model weight of 3.7 oz = 4.58 oz.
That's over half an ounce more than the recommended C6-3 combined launch weight of 4 oz.
While I've seen this model fly fine with a C6-3 (low and slow) I'm glad I upgraded to a 24mm engine mount.

I understand Estes is enclosing the corrected decals now.
The RED and MR8 decal PDF is available to Patreon supporters for those who home print decals. The decal also has the UNITED STATES decals in a less bold font and includes the 1/8" band above the fins.
Email me at oddlrockets@bellsouth.net and request the Mercury Redstone decal PDF.


Friday, July 31, 2015

Estes Mercury Redstone #1921 Build Part 28, Decals


According to the older Estes instructions, 
The side of the roll pattern decal lines up with the left side of the UNITED STATES decals already in place.

TIP: Notice the masking tape set inside the body tube. With a decal so close to the end of the tube, water might get inside. The masking tape prevents any chance of water getting absorbed in the open tube.

You'd better have a tall glass to soak the tall decal.

The inset picture shows a spot that wouldn't absorb any water. On that area the decal had to be torn off. There was a stretch mark there, good thing it was on a clear portion of the decal.
The wrap is BIG and feels slimy when transferring.
I always rub some water on the area where the decal will be placed so it can be re-positioned easily. The water under the decal made the decal very slippery.
Be ready, it takes extra time to line up and work out air bubbles.

All the pink boxes and bars got a red decal overlay. Wait until the wrap decal is completely dry before laying the red decals on top of the pinkish areas.


With the nose cone in place there is some white showing on the body tube lip.


TIP: I marked the checkerboard areas black so it continued the black squares over the top of the tube.

Go slowly and carefully with the Sharpie marker. The decals must be completely dry before using the marker.

Thursday, July 30, 2015

Estes Mercury Redstone #1921 Build Part 27, Decals

The kit decals didn't have the 1/8" wide lower black bar.
I cut mine from old decal sheets.

Notice how the MR8 decal is set over the bar, no space between it and the black band.
I used online pictures of the actual launch and Alway's ROTW as a reference. The low bottom line of the MR8 box overlaps the black band and disappears.

Online rocket data searches can be misleading. You'll find incorrect painting and detail photos especially on rockets that are on display at some museums. Every few years a rocket is repainted, sometimes incorrectly!
In the end it's a compromise. I try to get my decals and decal placement as close to the original as possible.
I often refer to Alway's Rockets Of The World for colors and detail placement.


I placed the 1/4" wide center black band 8.75" down from the top of the body tube edge.

I used paper wrap to be sure it was going straight around the tube.
The decals are slippery! This horizontal band can easily slide after you think you have it straight.

As mentioned earlier:
The older instructions say the vertical UNITED and STATES are set 3/16" above and below that line.

It's hard to see in the picture but you can line up the UNITED STATES by the reflection of the fins sharp leading edge.
When you look down the body tube you'll see the leading edge reflected in the glossy, wet decal.


After positioning my home print UNITED STATES decal, I placed the kit supplied decal next to it for comparison.

You can see the pink tint of the kit decals.

Wednesday, July 29, 2015

Estes Mercury Redstone #1921 Build Part 26, Still More Decal Questions

I don't know what this decal is for!
It's the same length as the 1/4" middle band so I assume it simulates the bolts in the band right above the fins.
The dashed line looks too thin. The older instructions say it's 1/8" wide. For right now I'll just add a line of black from some old decal sheets.


Here's the fins from the Mercury Redstone on display at KSC.
Check out the bolt band recess right above the fins.

The pull out plugs (lower right side) are raised a bit above the end of the body!


I added the low 1/8" black band to the decal sheet.
Below the solid black band is the band with the bolts. I tried to make them look 3D.

I'll use the simpler 1/8" black band cut from an old decal sheet.
I make no guarantee that the second bolt wrap will fit or be evenly spaced. I've printed up too many decal sheets trying to get the other stuff close.

If you have one of the pinkish, MR7 decal sheets in your kit, the PDF is now available if you print your own decals.
If you are a Patreon supporter, email me at: oddlrockets@bellsouth.net and request the Mercury Restone decal PDF.

PLEASE NOTE: The line thickness of the MR8 boxes may vary on your PDF decal sheet. This is typical of some PDFs. That's why there are extras, pick the best ones for the model.
The two lowest 1/8" wide bolt wraps may also have varying shading thicknesses. Again this is a PDF thing. If it doesn't look right to you, use the plain black band above it.

Tuesday, July 28, 2015

Estes Mercury Redstone #1921 Build Part 25, More Decal Questions

To help with decal placement, go to the older Estes instructions: CLICK HERE
Decal placement is at the bottom of page 7.


The single, long kit body tube is 19.5" long.
The older Estes instructions say the two kit tubes were the same length.
The 1/4" wide black strip was placed over the body tube seams at the center. This would center the decal on the new kit at 9.75" from the top.
The older instructions say the vertical UNITED and STATES are set 3/16" above and below that line. After looking at many M.R. pictures, that spacing looks too tight against the wide black band.
I'm spacing mine at 9/32" away from the horizontal band.

The face card decal placement is incorrect. See View 2 in the above older instructions.
The UNITED STATES should be centered over the next fin or 90 degrees to the right of what is shown.
The area above the "half-half" black and white fin quadrant has no decal.

Am I nit-picking? Yes.
If the decals are positioned like the face card picture it is still a good representation of the Mercury Redstone. At a club launch nobody will know the difference.

Monday, July 27, 2015

Estes Mercury Redstone #1921 Build Part 24, Fin Masking

Masking a Mercury Redstone is a bit deceiving.
It looks like a such simple pattern. One hour into masking you think you are close to being done, then realize there is more tape to be set down!

I did my typical Scotch tape masks at the color separation lines then brown masking tape outside that.
The Scotch tape was set set on a glass patio door and a permanent marker line ran down the middle.
The marker center line was cut in two with a knife and straightedge.
That's the black on the tape line you see in the second picture.


The masking tape strips were set down on my pant leg and pulled up three or four times. This reduces the stickiness of the tape and makes for an easier removal.
TIP: The tape on the rudder piece has a lift tab on it. Just fold the tape over on itself the last 1/4" or so.


Here's the finished fin mask.
I know, it looks pretty messy. My main concern is the Scotch tape masks, those edges are well sealed and clean.
The masking tape is what makes the mask look clumsy. There are some extra small pieces covering up any areas I thought might still be open.

The horizontal color separation line height I picked was 15/16" from the bottom of the tube.

Sunday, July 26, 2015

Estes Mercury Redstone #1921 Build Part 23, Capsule Decals


I went to Alway's Rockets Of The World for decal placement.
The kit only gives you one "UNITED STATES". I'll set it on the opposite side of the window as shown in the overhead drawing.

The white decals are very hard to see on the decal sheets so they are outlined with a dashed line.

The inset picture shows how I cut them just inside the dashes.

Here's how the decals were placed.
Rolling over the decals with a wet Q-tip will help the decal fit better into the corrugations.


I've had a bottle of Micro Sol for a few years and use it rarely.
It's needed for this kit so the decals will go all the way into the corrugations.
It you use Micro Sol correctly, the decal will look like it is painted on the model.
I didn't use a brush but dabbed the Micro Sol over the decal with a Q-tip.
On the left is the decal before using the Micro Sol, the inset picture shows the decal after using it.

There was a slight distortion on the "RTY" of Liberty and the "LL" of Bell.
On the capsule, the left side of that decal area is smooth. The right side has corrugations. The decal could shrink a bit where the decal is pulled down into the corrugations.

Estes Mercury Redstone Kit Decal Fix

This isn't a repeat post, but an update.
I received a comment from Steve Stokes -

Steve Stockes July 25, 2015 at 8:46 p.m.

I just received my kit on Monday and 
The decals show MR8 and the red looks ok. 
From my experiences Estes has great customer service. I ordered my kit from Tower Hobbies. Back ordered for 3 months. When it finally arrived Monday, the body tube was damaged beyond repair so I contacted Estes to see if I could purchase a new tube. The new tube showed up yesterday, no charge. Mike at Estes said they were a sister company to Tower so they help correct any issues with them.
From the previous post:
On the inside front cover of the July/August issue of Sport Rocketry is the new Estes full page ad.
Look close at the inset picture. The MR7 decals have been replaced with MR8 decals.
This might indicate new decals in the next run of kits.

Saturday, July 25, 2015

Estes Mercury Redstone #1921 Build Part 22, Capsule Window

The first Mercury Redstone had an round window, this kit is based on the second Redstone launch and should have had a trapezoid shaped window.

I can't paint the fins with all the Summer rain so I decided to cut in a more correct window shape.

On the left is the molded round window. On the right are some taped guidelines.


This was a little iffy with the tower already glued on.

I used a combination of knife cuts and small diamond filing.
The final shape might not be totally correct but it's closer.


The clear window was cut from a fluorescent light cover.
It's already curved and should fit the inside of the capsule.

It was cut oversize so glue could be brushed on the outside overlap and not fog up the plastic.


Here's how it ended up. You can still see the top of the rounded window. I didn't want to sand down the rivets and deal with painting the capsule again.
The inside edges showed red plastic. I used a Sharpie to blacken it.

I know there should be another layer of "glass" on the outside but this is good enough for me.

Friday, July 24, 2015

Estes Mercury Redstone #1921 Build Part 21, Fin Fillets


The lugs were lined up with a ruler and double checked with a 3/16" rod.

The kit supplied 1/8" diameter lugs were swapped out with 3/16" lugs.
I felt the model was too large for the 1/8" lugs.


Looking at the Mercury Redstone on display at KSC, you can see the rounded fairings on the lower 2/3rds of the root edge area.


You can build this up (to an extent) with a few more fillet layers of Titebond M&TG.
While it won't give you as wide fairing it will build the area up some.

Thursday, July 23, 2015

Estes Mercury Redstone #1921 Build Part 20, Fin Placement


The body tube was roughed up down to the bare tube with 220 grit.

The sides of the fin closest to the root edge were also carefully sanded for better adhesion in the fillet area. Rough up the primer coat just a little bit down the side.
I do this because the fins were shot with primer / filler and sanded smooth before gluing onto the body tube. The primer / filler seals the fin and the glue fillets wouldn't have been very strong.


Even if you were to draw double lines, these fins would be harder to line up than normal. They are thick and the penciled alignment line is covered.

Glue was applied to the root edge.
Looking down from the top, the back end of the fin was set down like a hinge.
Once it was centered down the line, the front end was set down onto the body tube.


Look across the rear to be sure the fins are in line with each other.