Pages

Wednesday, July 31, 2024

Enerjet by Aerotech, Astrobee D Build, Part 4, Engine Mount


The fin-lock centering rings are a tight fit on the engine mount tube.

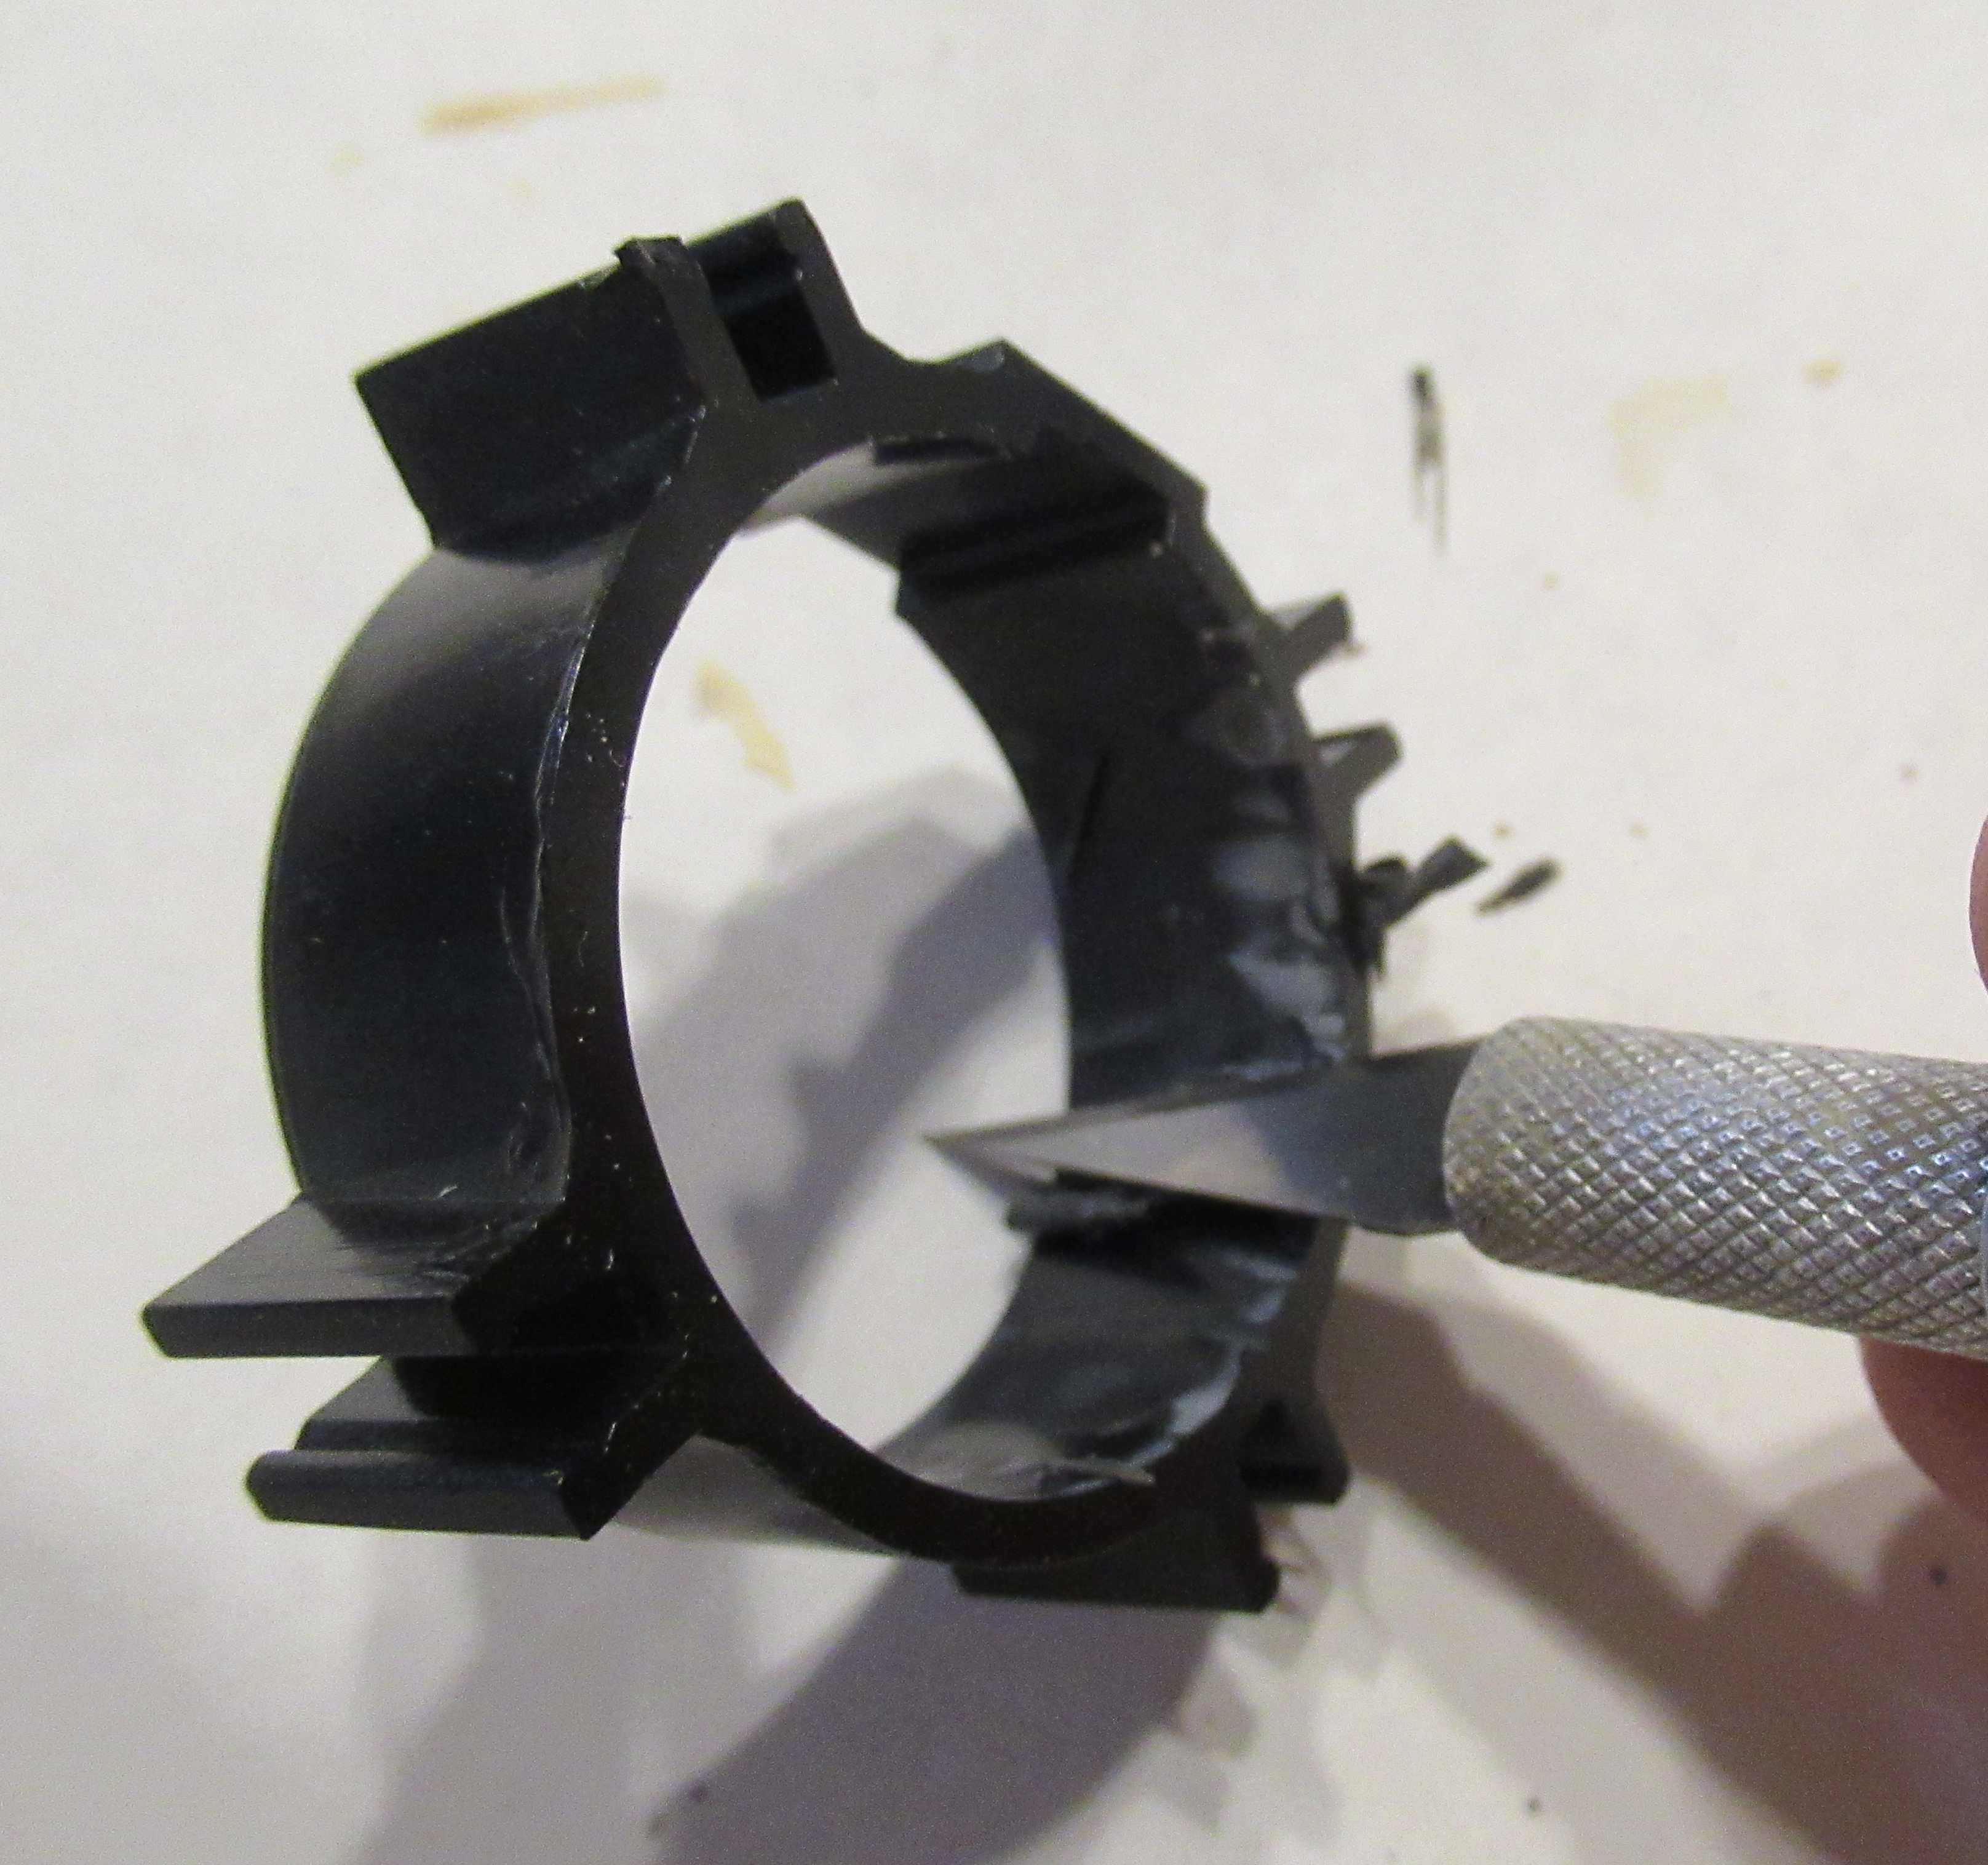
I scraped the inside walls with a #11 blade until I got a good fit.
These rings are molded to fit tightly but I didn't want to distort the engine mount tube.


Here's a dry fit, no glue yet.
This kit no longer includes an engine hook or thrust ring (engine block) A revision sheet explains the changes and which steps to skip.

Pay attention to the positions of the rings. 
From the rear edge of the engine mount tube:
At 1 1/2" is the front edge of the rear fin-lock ring.
At 3 9/16" is the rear edge of the forward fin-lock ring.

With the rings slid in place, make sure both the rings are in line and the fin tab fits into the notches in the fin-lock rings.


You are instructed to make four 1/4" cuts, spaced 90 degrees in the top of the tube. This allows the baffle shoulder to slide into the top of the tube.

Mark the cuts with pencil first.
You can get closer to a 90 degree spacing using a single edge razor blade.


No ejection wadding is needed on Enerjet by Aerotech rockets.

The permanent cooling mesh is stretched out to 6" in length.
Insert it into the front end of the tube.

Tuesday, July 30, 2024

Enerjet by Aerotech, Astrobee D Build, Part 3, Fin Prep


I'd recommend taping off the outside half of the fins. It's easy to scratch the fin face with the sanding block when sanding down the nub. 


Notice I'm using my thumb as a "bumper" so I can focus the sanding just the nub.

Earlier I mentioned one side of all four fins has a recessed nub. Just sand down the raised side of the nub.


On the left you can see the area that needs to be filled.

If you don't have Tamiya putty, 
You can use a bead of medium Super Glue. The medium glue "beads" and won't run as easily. I pick up this CA glue at the Dollar Tree store.


On the left is the CA glue bead. Be patient, it will take a while to dry.

Sand with 220 grit on a block and follow with 400 grit.

On the right is the finished fill. Run a fingernail over the hard clear fill to see if there are any dips. You may have to do a second application.

Monday, July 29, 2024

Enerjet by Aerotech, Astrobee D Build, Part 2, Fin Prep


The TTW fin tabs are interesting. 
These fins can be used with different diameter body tubes.

Initially I questioned the instruction which said to use pliers to break off the outside half of the fin tab.

After trying my razor saw first, I found the pliers broke off the tab just fine.

It does leave a rough edge that will be sanded clean with 220 grit on a sanding block.


You are also directed to sand down the molding "hub".
On one side of the fin the nub sanded down cleanly.

The other side nub was recessed and will require some filling. If you were to sand this recess all the way down it would end up too deep.

The recess will be filled in the next post.

Sunday, July 28, 2024

Enerjet by Aerotech, Astrobee D Build, Part 1, Parts


All the parts:
There are two body tubes, both the same length at 27" long.
Two parachutes are included, the lower body descends on a 30" nylon chute, the upper body has a 22" chute.


The small white pieces are molded "screws" that will glue onto the scale launch lugs.

Included are both 1/4" lugs and conformal launch lugs.
In the center are the scale antennas.

The silver coil is the labyrinth ejection cooling system.
On the upper right is the aluminum motor retainer.

At the bottom is one of the four fins.


The decals are peel and stick.

Above the decals is a self adhesive foil strip that will wrap around the body.

Saturday, July 27, 2024

Enerjet by Aerotech, Astrobee D Build, Background


My mistake - 
Aerotech needs the Astrobee D built before the Strong Arm, I'll be shifting builds and get back to the Strong Arm later.
This is a tall rocket, the largest I've ever assembled.
It's a scale model. As the info block reads: "Nearly 6 feet long - Almost one half size of the actual sounding rocket!"


Here's all the specs - 

There are two parachutes as the body splits in half at ejection.

Friday, July 26, 2024

Enerjet by Aerotech Strong Arm Build, Part 4, Strakes


On the left is the front of the strake, on the right is the rear.
The final tip cuts are marked with pencil.


Cut them a little wide outside the pencil lines. Then sand to shape with a block.


TIP:
It's easier to visualize the shape by turning over the strake and checking the bottom.
I drew a centerline to better see the wedge shape.

Thursday, July 25, 2024

Enerjet by Aerotech Strong Arm Build, Part 3, Strakes


Here I'm cutting the back of the strake.
Notice I'm cutting a little outside the pencil line.


The top picture shows the rough cut using a knife.


Here's the same cut after sanding with 220 grit on a block, followed by 400 grit on a sanding block.


Another before and after picture - 


220 to take down the rough cuts then 400 grit to smooth.


This inside angle is tough to smooth out.

Mark the side with a pencil and use a finger to block the block edge from cutting in too deep.

Wednesday, July 24, 2024

Enerjet by Aerotech Strong Arm Build, Part 2, Strakes


The strake material is white plastic, 12" long.

Be sure to check the lengths of the four strakes.
Set back to back, one strake was about 1/16" longer than the other three.
Even them up before trimming the strake shape.

Use a pencil to mark the side of the strake cuts.
The top picture shows the rear of the strake.

The bottom picture shows the front half of the strake.
At first I tried a razor saw but the raised base made it difficult.
It's also hard to get a straightedge onto the surface to use as a cutting guide.

I ended up simply cutting the lines freehand. I cut a little wide knowing I would do the final shaping and cleaning up with a sanding block.
In the two pictures on the right side - 
This obtuse (inside) angle cut is the most difficult.

Start and stop your cuts right at the apex of the inside angle.
The upper picture shows one cut.
The strake is flipped over in the second picture showing the start of the cut from the center to the outside edge.

Tuesday, July 23, 2024

Enerjet by Aerotech Strong Arm Build, Part 1, Parts


Out of the box, all the parts are of high quality.
There is a second body tube, same length as the tube on the left, without fin and launch lug slots.
The tube in the upper center is a coupler to joint the two 2.6" diameter tubes.
The instructions mention "Aero-Fibre" centering rings. The kit now includes plywood rings.
The black ring in the lower left is an screw on aluminum motor retainer.


The strakes are molded in white plastic.
These are trimmed to shape. The inset picture shows the profile.

The conformal rail guides are 3D printed.
The black launch lugs fit a 1/4" diameter launch rod.


The decals are peel and stick.

Monday, July 22, 2024

Enerjet by Aerotech Strong Arm Build, Background


Here's my latest build for Aerotech.
The Aerotech mid-power kits now carry the Enerjet name.

It's a big model for me at 44" tall.
It resembles the General Dynamics AGM-78 Standard ARM. 


All the Specs:

The build starts tomorrow!

Friday, July 19, 2024

Enerjet by Aerotech Initiator Build, Part 13A, Launch Lugs

A little backtracking to show the launch lug attachments in the body tube slots.
   
The kit includes (squared) plastic launch lugs and conformal rail guides. The client asked for the squared launch lugs.
Like the fins, there are pre-cut slots for the rectangular tab underneath the base of the lug.

The top of the plastic lug overhangs the top end of the body tube slot. The back end is even with the low ends of the slot.

When cutting out the die-cut slot, try to make the low end clean and square. Don't make vertical cuts below the base end of the launch lug. 

I had painted the tubes and launch lugs before assembly, the launch lugs were molded out of black plastic.

You should cut away the paint for better glue adhesion.
I used lines of masking tape to guide the knife blade line and score into the paint. 
On the right side picture, the tube is flipped over.


The paint was scraped. The paint should chip along the score lines.


Here's one of the two inline lugs glued in place.
The tab molded into the bottom face of the lug fits into the cut slot.

Wednesday, July 17, 2024

Back To School Rocket Items

Back to school sales often include supplies that can be used in model rocket construction.

That glue nozzle came off a 50 cent Elmer's School Glue bottle. 
I don't use school glue in rocket construction, but the round small tip nozzle fits a wood glue bottle, both the Elmer's and Titebond types. It replaces the flat wide nozzle found on wood glue.

The modeling clay was found at a Dollar Tree store. $1.25 is cheap for this much clay nose weight.

Tuesday, July 16, 2024

Rocket Limericks, Part 2

 ROCKET LIMERICKS

Newbies ask with some caution,
What glue is best for construction,
There’s CA, white and wood glues,
So many that I could choose,
How ‘bout following instructions!

On the rocket he spent much cash,
The finish had sheen and flash,
The chute did open up
On gravel it ended up,
His shiny work now has road rash.

The forecasts say low winds are like-ly,
But at launches the breezes seem dic-ey.
High up winds can shift,
Your rocket will drift,
To the limbs of that single oak tree.

Monday, July 15, 2024

Rocket Limericks, Part 1

I'm in the middle of multiple builds, 
Duplicates take more time than a single build. I might be falling behind in daily posts.
Before anyone knocks my bad poetry - 
Limericks are supposed to be a bit tacky.

ROCKET LIMERICKS

That new Rocketeer was quite green, 
To a club launch he’d never been, 
His family all goaded, 
Biggest motor loaded 
After launch no rocket was seen.

He’d taken his time in construction,
Carefully chose spray painting options,
He sprayed with gusto,
A new can of Rusto,
Gloss finish was not in the outcome.


Sunday, July 14, 2024

Large Nose Cone Painting - Quick Tip


How do you hold onto a large, 2.6" diameter nose cone for spray painting? Here's one way.
If you don't have any scrap 2.6" diameter tubing - 

110 lb. cardstock was taped and rolled around to cover the shoulder.
This gives you a stiff "tube" to hold onto the nose cone for horizontal spray painting.


How to stand up the nose cone while the paint dries?

A spray can will slide into the bottom open end of the cardstock wrap.
The weight of the can makes a stable drying stand.

Regarding the Aerotech nose cones - 
Be sure to rough up the plastic surface before painting or the paint may not stick and could chip off!

Saturday, July 13, 2024

Engine Removal Tip?

Mike Meyer posted on the Facebook Estes Model Rockets page:

"I was finishing up the Super Orbital Transport today.

I got the bright idea to stuff a D engine in. It went in flush with the tube and wouldn’t slide back out. Tried a few knives and then knew what I had to do. I used a cork screw to yank it out. But then I noticed the retainer clip slid out a 1/4 inch. And I was able to clear everything. Still not sure how the clip slides but here’s a few pics to illustrate my wine bottle cork removal process."

It was worth a try, but maybe not the best way to remove an engine. The corkscrew also pulled and tore the engine hook down the engine mount tube 1/4".

Friday, July 12, 2024

Razor Saw Quick Tip


I was cutting some dowels and my old X-Acto saw was dragging.
I probably could have used some oil, but that could leave a trace of oil on a surface that would be painted later on.

I remembered using wax paper on out backyard metal slide. Simply rubbing the wax paper on the slide made it very slippery. Almost too quick!

I tore off a piece of wax paper and rubbed it over the sides of the blade. It worked! 
The cutting was smooth and much quicker than before.

Wednesday, July 10, 2024

Enerjet by Aerotech Initiator Build, Part 14, Finished


The aluminum motor retainer is epoxied onto the rear of the motor mount tube.

The shock cord is tied to the nose cone shoulder loop.
The nylon parachute is tied onto the shock cord, one foot away from the nose cone.


Here's the low end with the bold fin graphics.


The mid section with the somewhat tricky stickers as they are pieced together.
The final look has a good flow.


After this picture was taken, I shot the nose cone again with Ace Banner Red to lighten the tone and better match the red on the sticker below it.

The Initiator is an impressive introduction into mid-power rocketry.

Tuesday, July 9, 2024

Enerjet by Aerotech Initiator Build, Part 13, Fin Decor


After trimming the fin stickers,

Place them dry without the backing removed. Mark the corners with pencil for easier positioning.


Here's how the fin sticker was placed. 

Fourteen more to go!


With the backing peeled off, dip the decal sticky side down in water. Shake off some of the excess. 

The water on the adhesive side allows the sticker to be lifted if placement is a little off.

Any water and air can be worked out with a clean cloth, going from the center to the outside edges.


The shoulder lip got a swipe with a red Sharpie. 
The tube edge also got the Sharpie treatment.

This covers any white that could show up at the nose cone/body tube joint.