Tuesday, June 19, 2012

Estes Thor Agena Build Part 15 Half Round Fairings


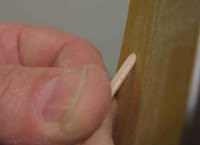
The ends of the fairing tunnels are rounded and tapered.
The silhouette of the tunnel end isn't perfectly round, but more like the top of an egg or short elliptical shape.

Start by rounding and tapering the sides checking the shape from the flat back of the half round tunnel.


Then taper the top.
Turn the half round over and sand the end with the flat side up.


Switch to a finer grit sandpaper and smooth out any hard edges or corners.

You'll need two long fairings for the lower body and adapter. I made four for extras. You'll also need on more fairing, 2 1/2" long rounded on both ends for the upper BT-52 tube.

I made the lower fairings long to be cut to size later on.

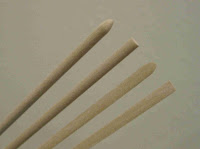
The two on the left show the rounded upper side.
On the right is the flat underside for gluing against the body tube.

Estes Thor Agena Build Part 14 Half Round Fairings

The instructions say to make the half-round tunnels from balsa.
It's easier to form, sand and seal these if made from hardwood dowels.

A 1/8" X 48" long dowel was cut into fourths for easier handling.

When sanding a round dowel to a half-round shape, it can roll. Even the slightest rolling can make the flat back of the dowel crooked.

For a reference, use the side of a pencil and rub a line down the entire length of the dowel. This is the side that will be sanded off.

Look down the dowel to be sure the line (and dowel) are straight!

The dowel was set down on a scrap of corrugated cardboard.
The sanding block is holding 100 grit sandpaper.
Using long strokes down sand off the pencil line.

When the pencil line is sanded off, redraw the pencil line over the new sanded flat area. Sand off the pencil area again. Continue until half the wood is removed evenly down the length of the dowel stick.


To help hold the dowel steady, a "trench" was pressed into a long ridge of the corrugated cardboard.


Four 12" dowels were sanded down.

Set them side by side to check the profile consistency.

Sunday, June 17, 2012

Estes Thor Agena Build Part 13 Vernier Nozzles


1/8" of the paper tip is cut off with a razor blade.
Because the holes I drilled are probably deeper than needed, I cut the nozzles a little longer than the 1/8" length.


When you cut off the tips, the will be smashed flat!
Reopen and re-round the conical shape over the sharpened dowel tip.

Lightly push the tip over the point and turn it against the dowel reforming the cone.


This is the vernier assembly on my index finger tip.
These are small!


I always make extras and pick the best from the bunch.
After a few first tries, the later ones are usually better. 

Estes Thor Agena Build Part 12 Vernier Nozzles


The Vernier nozzles are small!
Small cones are made from 1" square pieces of copy paper.

I pre-rolled the squares with a small dowel.


To get the glue "tab" under the outside edge, a razor blade helps push it underneath and form a sharper tip.

Look close at the tip and you can see the sharpened dowel tip inside the paper cone.


In the picture at the right, the cone is set over a sharpened 1/4" diameter dowel.
Another clean dowel was rolled over the glued seam to set it and smooth over the edge.

Saturday, June 16, 2012

Estes Thor Agena Build Part 11 Vernier Shrouds


This is all four with the small ends facing you.

I've looked at a few pictures of the real vernier shrouds. It's hard to see the actual shape. This is the shape shown on the Estes instructions.


A small hole is made for the small vernier nozzle.

I drilled a small hole to start, being careful to center the drill.


To taper the hole in a conical bore, a sharpened dowel was spun in the drilled pilot hole.

Tapering the pilot hole will give a better fit of the small vernier nozzle.

Estes Thor Agena Build Part 10 Vernier Shrouds


The sides are slightly tapered to the center.
Mark and sand with 220 grit on a block.


The small end is hard to see when shaping.
I darkened the end with pencil to better see the contrast of the end shape.


Here's all four vernier shrouds side by side.
This is a good way to see if the shrouds are the same consistant shape.
The shroud on the right is the finished shape.

The shroud third from the left is a little long.

Friday, June 15, 2012

Estes Thor Agena Build Part 9 Vernier Shrouds


To start the notch, my 2' machine square was set down the length of the stick. This gave me an accurate 90 degree to rest my razor blade against.

The rounded top was scored and the notch cut with an X-Acto knife.


After carving the notch, a square diamond file smoothed out the bottom surface.


After the basic forming, a piece was cut off at 3/8".
I always cut a little long so I can sand and smooth it up to the correct length.

I'm building two models so four were made.