Thursday, February 20, 2025

Estes Star Seeker (Tri-Pack) Kit #0866, Part 5, Fin & Launch Lug Assemblies


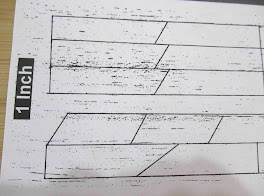
The dowels are glued to the top of the upper (unmarked) fins.


Two launch lugs are glued side by side.
Make two sets. I found it easier to make glue fillets now.


On the left, I've lightly sanded the glue line for better glue adhesion. 
On the right, the dowel fins are glued with that spacing overhang on the outside.

Be sure to make two "mirrored" fins.  

Wednesday, February 19, 2025

Estes Star Seeker (Tri-Pack) Kit #0866, Part 4, Engine Block & Kevlar ShockCord


The original kit had two engine blocks,
one for the engine stop, the second to tie a rubber shock cord. No parachute or streamer, just nose-blow recovery.
Enlarge the picture on the left.

I can't imagine trying to slide in that upper block ring into a ring of glue with a binding rubber shock cord tied around it.

I'll be installing a single lower engine block with a tied on Kevlar line.


The engine block got a notch for a better fit of the Kevlar line tie.


The inside 1/8" (or so) of the tube got a wipe of CA glue. This was followed by sanding just the edge with 400 grit on a block.


I used a spent "T" motor to position the engine block and Kevlar line.

Occasionally your find a raised cut-off burr on the end of the casing. Roll that off with some 400 grit.
This makes for an easier slide into the engine mount tube.


TIP: When installing an engine block, have ALL your parts close at hand. You don't want to be looking for the engine block as the glue in the tube is starting to set.

The glue applying dowel is marked with a pencil ring about 1 1/2" from the top. 
A ring of glue is set around the top of the dowel.
Set the dowel in the tube up to the pencil line trying not to touch the inside walls of the tube. 
Roll the dowel and transfer a line of glue around the inside of the tube.

Quickly set in the engine block and push into position, with 1/4" of the engine casing extended out the bottom of the tube. Remove the casing.

Tuesday, February 18, 2025

Estes Star Seeker (Tri-Pack) Kit #0866, Part 3, Filling Seams & Gluing On Dowels


The body tube, dowels and launch lugs were CWF filled and sanded.
A dowel was slipped in for support while sanding.

A shot of filler/primer followed .
Here I'm sanding the filler/primer to surface with an old piece of 400 grit. Any filler/primer that might collect on the sandpaper can be cleaned off under running water with a soft brass wire brush.
Two of the four fins are marked 1" down from the top edge.
This is where the perpendicular fins will be glued on.

I found it easier to mark a 1" span on a scrap piece of cardboard, then set the fins on the pencil lines.


Here's the first try at the 1" long dowels.
Looking at the instruction drawings, I could tell they were too short. There are no launch lug or dowel lengths listed in the instruction parts list.


Here's the longer 1 1/4" dowels.
I now have the feeling the dowels should be a smaller diameter. Oh well, I'm going with what I've cut. 

Monday, February 17, 2025

Estes Star Seeker (Tri-Pack) Kit #0866, Part 2, Parts Prep


The Star Seeker fins are the 4 parallelogram shapes, fourth row down from the top.

Cut out four from 1/16" thick balsa.
Before the launch lugs were cut to length, 
I filled the seams with CWF. The long lug was held by pushing it onto a Q-tip.


There is a slight flared lip on the shoulder of the nose cone.

Roll down the lip with some 400 grit.


The balsa fins, dowels and launch lugs were filled with CWF and sanded with 400 grit.

All were taped down for a shot of filler/primer.
These are the first, incorrect length dowels and launch lugs. In the end, all were re-cut to 1 1/4" long.

Sunday, February 16, 2025

Estes Star Seeker (Tri-Pack) Kit #0866, Part 1, Parts

 
The dowels and launch lugs (shown above) were cut too short. The build will show the longer and correct 1 1/4" long lugs and dowel pieces. Mistakes can happen when lengths aren't listed in the instructions. I took a guess by simply looking at the instruction drawings.

You might assume a BT-5 is 1/2" diameter and the BT-50 at 1" diameter. That would mean a simple 2x upscale. But, the BT-5 is actually .541" diameter and the BT-50 is .976" diameter - Not a 2x upscale.

I'll be building a original BT-5 version and after that an upscale BT-50 version.
To see Jay Goemmer's "Downscale Chart: CLICK HERE
While Jay's chart says to multiply by 1.79, I'll be using a heavy walled (and slightly wider diameter) BT-50H tube.
Here's my conversion chart. Every dimension of the BT-5 parts was multiplied by a factor of 1.8 to get at the BT-50H sizes.


I drew up decals for both the BT-5 and BT-50 version.
The rounded corner "door" rectangle will be fixed with a narrower line.


Gotta' love a model where the parts fit into a 3" x 5" zip bag.

Saturday, February 15, 2025

Estes Star Seeker (Tri-Pack) Kit #0866, Background


The Star Seeker was part of the new Mini Tri-Pack. Introduced in the 1983 catalog CLICK HERE, it was available until 1990.  Three BT-5 "T" motor models in one kit bag! 

The second model was a two-stager called the Sting Ray. Descriptive copy says it could reach 2,500 feet!
The third design was a multi fin rocket named S.C.R.A.M. Years later, Estes brought back a variation of the S.C.R.A.M. fin design in a larger model called the Laser Lance.
For me, the Star Seeker was the most interesting of the three.

All three models use "nose-blow" recovery. Good luck spotting the two stage Sting Ray during recovery.
I'll try to add some sort of recovery streamer for visibility on descent.

I'll also be following up with a BT-50 based upscale of the Star Seeker after the original size build.
The BT-5 build starts tomorrow.

Friday, February 14, 2025

Donate? Why Not!

I watch a lot of YouTube videos. In every video, producers say to be sure to "Like", visit their Etsy Store or donate to Patreon.
I only bring up blog donations once a year.

If the blog has helped you through a difficult step, if your builds have improved, maybe you've picked up a tip or two - Why not consider a monthly donation through Patreon?
The monthly donations start at $1.00. 
If I find worthwhile content online, I have supported them by sending donations through PayPal. Money raised goes right back into the blog builds.

What are the benefits?
Decals, Templates and Build Books are only available to Patreon Members and those who have sent one time donations. To see what's available, CLICK HERE
Patreon supporters can send PDF requests to oddlrockets@bellsouth.net

If you are a supporter, review the available Decals, Templates, Tools and Downscales.
Email me at: oddlrockets@bellsouth.net and let me know what you'd like!
I also answer email questions from Patreon members - if I have had experience with your build.

I do keep a record of who is on Patreon and who has donated.

Okay, shameless slug over! A NEW build starts tomorrow . . . 

Thursday, February 13, 2025

Estes Black Star Voyager Build, Finished


The upper section with nine basswood strips.


The smaller vanes - 


The large vanes below that.

I took this picture outside to try and show the reflection of the metallic paint. Like I mentioned earlier, probably not worth the extra effort.
Nine more vanes around the engine mount tube.

This is an impressive model and a challenging build.
I've never encountered built up fins like this.
 
A great design from Jon Boren.


Wednesday, February 12, 2025

Estes Black Star Voyager Build, Part 37, Ends & Edges, Finishing Up

The shock cord is tied with a square knot to the loop on the nose cone base.

TIP: Push the loose tail of the shock cord into the open slot in the nose cone base. This keeps the tail from getting stuck between the shoulder and the body tube.

TIP: Tie on the parachute a few inches AWAY from the nose cone. The nose cone won't swing in and out of the shroud lines and get tangled. 

Near one of the joints I had some rough paint.
TIP: Sometimes (and I stress "sometimes") you can use some clear scrap left over from the decal sheet to gloss and smooth out the area.

Cut to size, soak and apply the clear piece over the rough area.  

I don't usually need to concentrate on rounded leading edges of the fins when spraying. On these squared off edges I didn't get a full black coverage.

TIP: Sometimes you can black in the areas with a marker. This only works with a black marker. You won't be able to match the ink shade of other colors.


Some paint did get on the engine hook.
Use the backside (not the sharp edge) of your hobby knife to scrape off the paint.

You can use the Sharpie to black the edge of the motor mount tube where needed.

Tuesday, February 11, 2025

Estes Black Star Voyager Build, Part 36, Dot Decals

A three dot decal is placed on the upper fin leg.
The low dot on the right was placed 2" from the edge of the fin.

I've learned with Estes decals - they are thin! On the plus side, when dry they really hug the surface. 
TIP: Where decals are on both sides of a fin, set one side and let dry. Come back, then set the other side. Too many times my fingers have lifted and moved that (not fully dried) decal on the other side and lifted it.


I aligned the other dot strip by sighting down the leading edge of the fin.


The lower fins get a single dot on both sides.
To make sure of the position, I made a cardstock template and punched a hole to line up0 and position the decal.


Here's the template flipped to align the dot decal on the other side of the fin.
Look close and you can see the dot in the punched hole.


I don't normally add the Estes logo. You are supplied with two Estes logos, one white and one orange on a white background.

I went with the white decal, it wasn't so bright.

Monday, February 10, 2025

Estes Black Star Voyager Build, Part 35, Decals


With the vanes in the way, this is a tough decal to position.
Leave as much of it on the backing paper as you can when rolling it around the tube.


There are two different fin decals.
In the picture, the one on the top is for the upper fin half,
on the bottom is the lower fin decal.


The tip on one lower fin decal stuck and stayed on the backing paper.
It's not too noticeable.


Here's how the lower fin half decals should look.

Sunday, February 9, 2025

Estes Black Star Voyager Build, Part 34, Decals

Start with some smaller decals first. I found the soak times to be 38 seconds until the decal would slide off the backing.

These wrap arounds have nine peaks. The decal start and finish points were in line with the launch lugs. The decal overlap won't be seen in the launcher photos.

I did start the first orange point in line with the basswood strips but they didn't align all the way around.


Here's the upper section.
Notice the white bands are towards the centers. This is consistent throughout the wrap decal placements.


There are two rows of dots to wrap around the top of the lower tube, just below the adapter.
I wish the two rows were connected, without the dashed orange cut lines between them.

Notice how close you have to cut to the decals, just inside the dashed orange line. It would have been easier to see the white ink if the decals were printed on blue backing paper.


The nine white dots wraps should line up with the nine cardstock vanes. 

I placed a wrap of masking tape and made a pencil line using the aluminum angle. The first dot on the strip was centered over the line.

Saturday, February 8, 2025

New 2025 Estes Catalog Is Posted


On Y.O.R.F., 
Turbofireball let us know and Earl posted this PDF link:
Look for the Red NEW 
bullet points to find the latest releases. 

Engines Score!

While I wait for the Black Star Voyager paint to dry - before the decals . . .

I spotted some engines for sale on the Facebook Rocketry Yard Sale...Buy, Sell, Trade
page. Orlando area, local pick-up only. 

I contacted the seller and asked about the 14 packs of "T" motors and one pack of C6-3s. I have plenty of A8-3 and C6-5s. More than half price off!

I don't check rocket listings everyday, only on occasion. The deals are out there! 
I've found motors on sale before, a few years back on Facebook marketplace. Three 24 packs of B6-4s - $25.00 for all three boxes!

Friday, February 7, 2025

Estes Black Star Voyager Build, Part 33, Gloss Black


After waiting 48 hours and some final sanding with 800 grit,
The final gloss black paint was sprayed.
Probably a good thing I blackened the inside surfaces early on. This is a tough one to get an even coat on, lots of inside corners.


The masking tape was removed to see the metallic black on the vanes.
The contrast probably wasn't worth the extra effort. It shows up much better in direct sunlight.

There are a few spots where the tape edge pulled up bits of gloss black. These will require an easy touchup.


The shock cord mount is glued in 2" from the top of the BT-55 upper tube.

I marked the shock cord at the 2" mark and used that as a depth gauge to set it at the proper position, easily clearing the nose cone base.