Showing posts with label E Mini Max. Show all posts

Wednesday, December 21, 2016

Red Max Families


Here's all three of the Red Max models.

On the left is the standard BT-60 based original.
Next to it is the BT-50 based Mini Max.
Laying on its side is a BT-5 carded Red Max. It was drawn up by Bob Harrington.


And the Hello Kitty Pink Max duo.
Decals on the BT-60 standard were done by Excelsior.
Decals on the pink Mini Max were reduced pictures of the Excelsior decals.

I'm not making the Pink Mini Max decals available.
Don't ask - I don't want to hear from the Hello Kitty legal team.
They won't sue me for making a "one-off" personal use model.

Notice how small the iron cross fin decal is on the larger Pink Max model. The iron cross on the Mini Max is the correct larger size. That was fixed in a previous post.

Saturday, November 26, 2016

Estes Mini Max #2445 Build, Pink Max Finished


The "Kitty and Crossbones" fin decal didn't get the white layer underneath, it would be too hard to cut it accurately. It's not really noticeable over the light pink paint.
It's a cute rocket and a good companion to the standard size Pink Max rocket.

Friday, November 25, 2016

Estes Mini Max #2445 Build, Part 10, Streamer


The supplied streamer looks to be cut from table top covering plastic. This plastic sheet is textured.
Usually one side has a rougher texture than the other. Run your fingers down the streamer to feel which side is smoother.
TIP: The smooth side will adhere better to the tape set over the shock cord.


The instructions say to use masking tape to attach the streamer. Past experience has showed that masking tape easily tears at ejection.

I use clear packing tape. Be sure the smoother side of the streamer is facing the sticky side of the tape.  It is cut a little wider than masking tape would be. Packing tape is stiffer than masking tape but will certainly hold better.

Thursday, November 24, 2016

Estes Mini Max #2445 Build, Part 9, Decal Application


I still have some grain to fill after the white undercoat was sprayed.
It was hit with more CWF rubbed in with a finger and sanded to surface.
The model was sprayed pink, the nose cone black, no masking!


The "Hits" decal ended up bit wide. I cut off one vertical row off the right side for a better visual fit.

I use a damp Q-tip to roll the air bubbles from the center out to the edges.


The skull and crossbones upper wrap should have a white layer underneath. I can't print white so a white band will go down first.

It's simply cut from a white decal sheet and set down first before the skull and crossbones wrap.
I cut a piece a little smaller than the outside edges of the wrap.
The wrap pieces were set down dry to make sure of the position before transferring.
The white band is soaked and set down first. Be ready, without a clear coat (not really needed for the white underlay) the white decal feels slimy after soaking.

Be sure and let the white decal totally dry before doing the skull and crossbones wrap. The inset picture shows the finished decals.

Wednesday, November 23, 2016

Estes Mini Max #2445 Build, Part 8, Decals From Decals, Tips Part B

The Excelsior art is good but I didn't like the layout of the "kills" decal. The spacing and art sizing seemed off. I wanted something closer to the layout on the standard Red Max model.
I played around with the "bugs" and came up with the art on the right side. Some bugs were resized, some flipped.

I also played with some of the fin decal sizes to get them closer to the scale of the larger Red Max model.

More decal information: Why are some decals printed on white back paper and others on blue backed paper? Both colored papers work the same when soaking and transferring onto the model. On a blue backed decal paper you can actually see a white ink decal.

On some recent Estes kit decals, you have to hold the decal up to a bright light to find the white decals on the sheet!
The upper part of the picture is the white backed decal sheet in normal room light.

The inset picture shows the white invisible decals are revealed when held close to a light bulb.
TIP: Before cutting up a white backed decal sheet, always do a light bulb scan. It's too easy to cut and ruin a usable white decal.

Tuesday, November 22, 2016

Estes Mini Max #2445 Build, Part 7, Decals From Decals, Tips, Part A

This is one of those posts where I happened on something that could help in making decals for cloned models. Some online decal scans have light blue or discolored backgrounds. Using the "Threshold" setting in your photo software could really clean up your home print decals.

One of the two Mini Red Max kits I'm building will be a Der Pink Max version. I don't have any downscale decals, just the decals that are already on another finished larger Pink Max model. The decals are set down over pink paint.

I didn't really know how to pull the art off the finished model. The original art was produced by Excelsior Decals. Excelsior is no longer producing decals.

I did some experimenting with my GIMP photo editing software.
GIMP is a free photo editing software package. I use it for all the pictures seen on the blog. To get the free software: CLICK HERE 
First a picture of the decaled fin was taken with my digital camera.

Drop the picture into the Gimp screen. Under "Colors", go to "Threshold".


Threshold automatically drops out the pink and white paint colors and leaves just the dark black.
This picture can be copied into Corel Draw to make a decal sheet.

Please note: This "threshold" tool will only separate into a single color, in this case just black. If you are trying to isolate many different colors it won't work.

Monday, November 21, 2016

Estes Mini Max #2445 Build, Part 6, Fin Fill and Glue


After brushing on some thinned CWF the wood grain was raised.
The inset picture is after sanding. Some of the raised grain was sanded off leaving open pores.
More CWF followed and smooth sanding.

I glue on the launch lug before marking the body tube for the fins. It's just easier to line up the lug with the engine hook. Then line up the fin marking guide wrap with the launch lug already in place.

The root edge locations are masked off and primer / filler is shot.
You can see how rough the body tube is in the inset picture. This was taken before the primer was sanded.


The fins are glued on and Titebond M&TG fillets applied.

I had to make some adjustments to the fin lines. The marking guide was a little off.


At this stage,
If the OOP Quest Pipsqueak fins were clipped it would look like the Mini Max!


Sunday, November 20, 2016

Estes Mini Max #2445 Build, Part 5, Ends and Edges


One side of the BT-50 tube was a little out of round.
I decided to glue the engine mount in the ovaled side so the centering rings would form it back to a perfect circle.


To place the glue for the engine mount, cut a strip of balsa from the fin stock.
Always hang onto the excess fin balsa. I have used it in the past for other things like a launch lug standoff.

The nose cone have small nicks along the shoulder edge. These could have been left when the pieces were broken off the molding trees.

I placed a small drop of medium CA glue in the torn hole being careful not to let the glue run down and over the shoulder lip.
The inset picture shows the area after sanding. The nick is filled.

Estes Mini Max #2445 Build, Part 4, Engine Mount


I used the rotary punch to make a engine hook relief notch and a small hole for the Kevlar line in the upper ring.


Here's how the centering rings look after the punches.
The lower ring is on the left, upper ring is on the right.


And, the finished engine mount with the Kevlar line tied on.

Saturday, November 19, 2016

Estes Mini Max #2445 Build, Part 3, Engine Mount

I cut off the finger tab. On a model this small with the finger tab extended far out the back, it might not stand upright on the fin tips.

On the left is the upper bend. The sharp corners have been rounded off with a file. I knock off the corners slightly for easier insertion of an engine. This will be flipped over and be at the bottom of the mount.
The inset picture is the cut off finger tab. This end will now go to the top just under the engine block.


The engine mount tube surface is rough. It doesn't seem to have a glassiene coating.
Here its marked for the centering rings.
This end is the bottom, it got a coat of medium CA glue for strength.


This is two of the lower centering rings.
The one on the left is burnt more than the right side.
TIP: Turn over and use the cleaner, whiter side facing out or to the bottom of the rocket.

Friday, November 18, 2016

Estes Mini Max #2445 Build, Part 2, Nose Cone Prep

At the top is the current version of the PNC-60AH nose cone in the Red (Pink) Max kit at 6.7".
The inset shows the Mini Max nose cone. About 3 1/8" is exposed.

It turns out the Mini Max nose cone is not a true downscale. It should be closer to 4" long.


The nose cone shoulder is different.
The vertical friction fit bands give an adjustable fit allowing you to sand the ribs if needed.

On this nose cone shoulder the ribs are wider at the bottom.


The nose cone tip does need some cleaning up.

The after in shown in the inset picture. There were no side seams on the injection molded nose cone.

Thursday, November 17, 2016

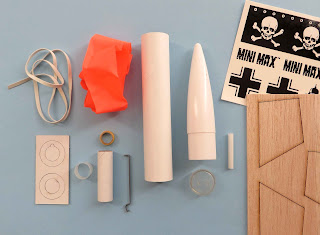
Estes Mini Max #2445 Build, Part 1, Parts

Yeah, I know what you are thinking - Why do a build on such a simple, small rocket?
There is going to be some different decal treatments on one of the two Mini Max models I'll be building.
There will be some tips for home printing from online decal scans. Stay tuned -


How could you pass up a Max kit on clearance for $3.29? I grabbed four!

The BT-50 main frame body tube seems a bit rough for Estes. The BT-5 engine mount tube is also rough, it doesn't seem to have a glassiene coating. Most rough tubes seem to smooth out when the primer / filler is sanded down.

Parts of interest:
The injection molded nose cone and clear base.
The decals! The white X882 nose cone decal isn't there.