Showing posts with label Solar Explorer. Show all posts

Tuesday, November 13, 2012

Custom Solar Explorer Finished


This is a great looking model at a great price.
All was great except for the short coupler and stick on decals.
This should be a good flyer for the soccer field launches.

Lessons learned:
Be careful when spray the inside fin areas. Don't spray too much!
Let the inside surfaces dry, then come back and hit the exposed surfaces.

Be sure the stickons (shown here between fins 4 and 1) are well set in the fillet areas before pressing down the outside of the decals.

Monday, November 12, 2012

Custom Solar Explorer Build Part 26 Loose Ends


The shock cord seemed a little short for me, they usually are.
Rather than cut a new piece of elastic, I simply tied on another scrap piece.

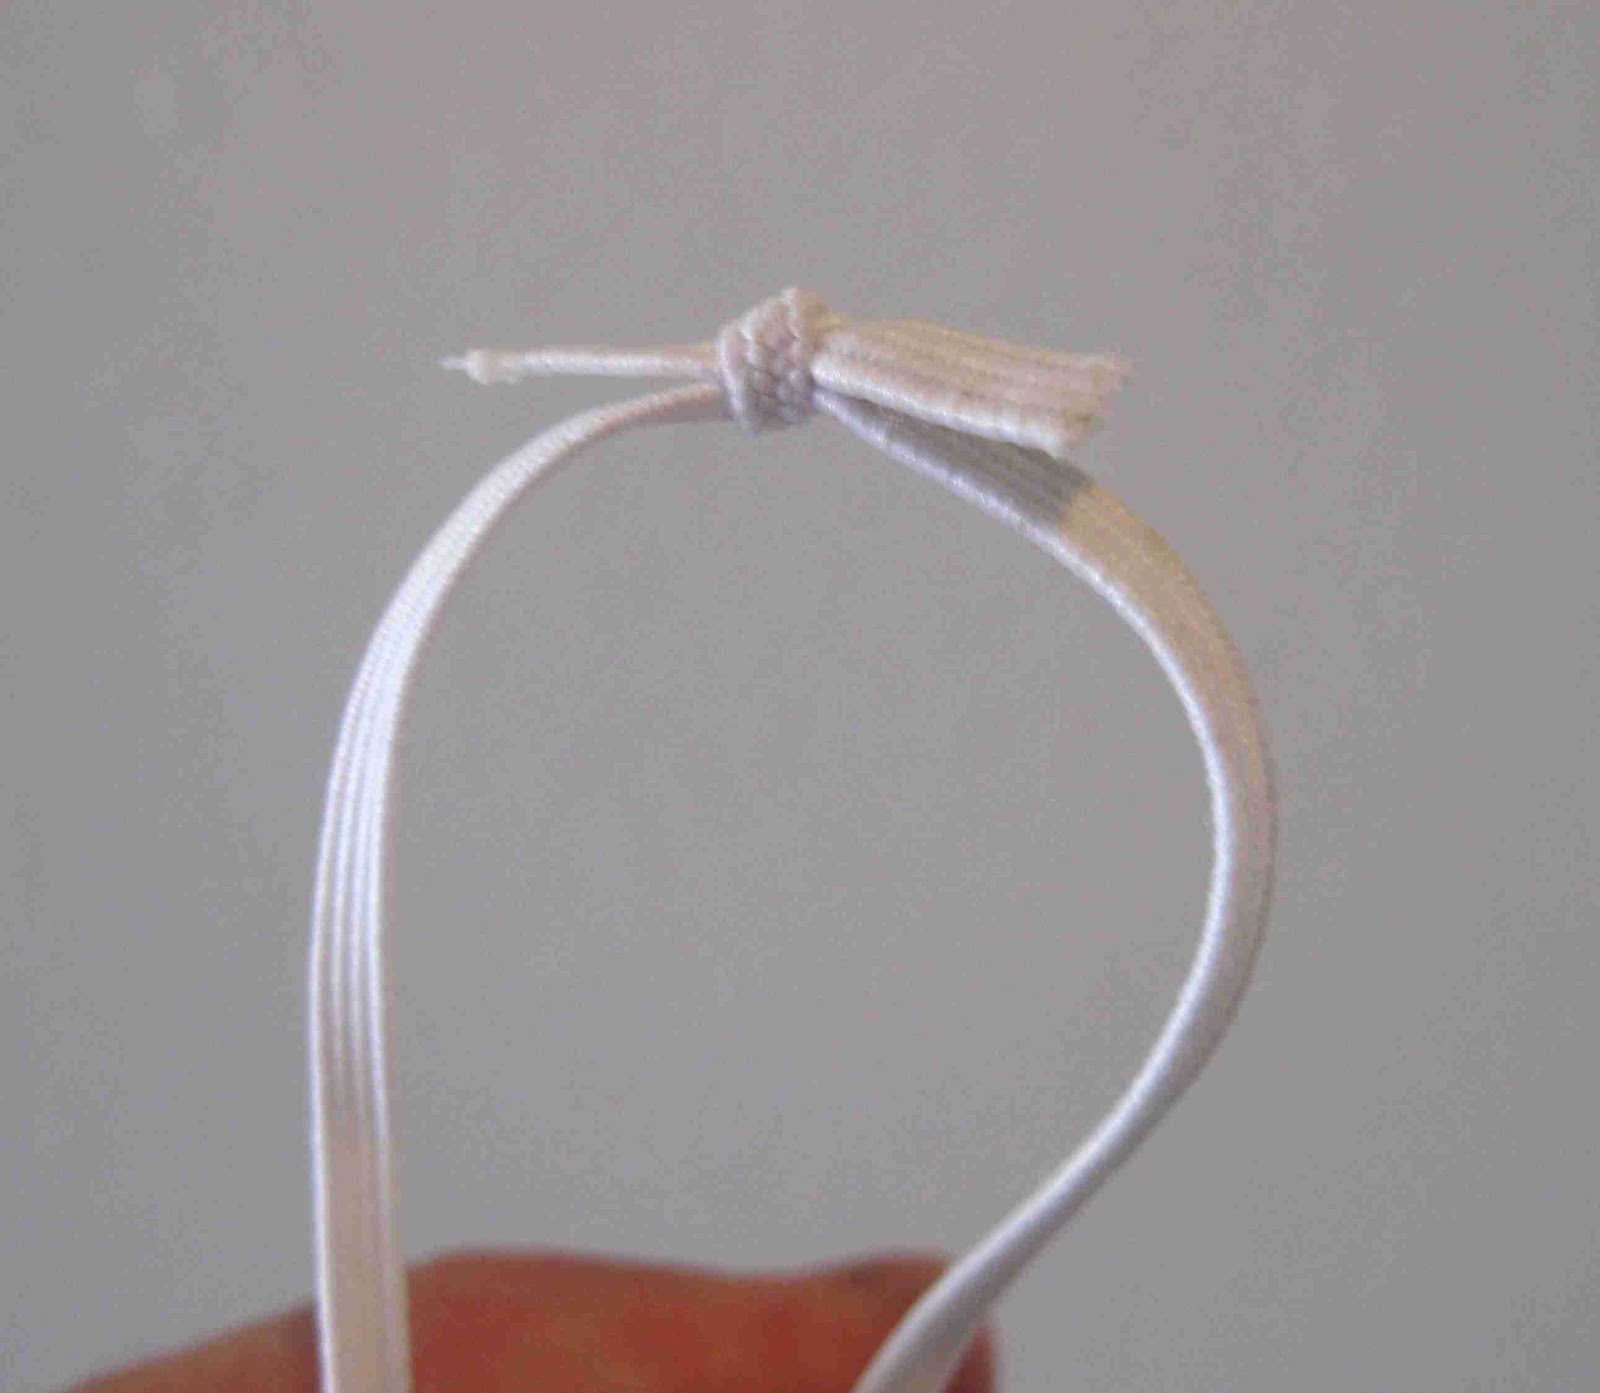
A square knot was tied and with about 3/8" of loose tail on either side.
Don't pull it tight yet!

I attach the snap swivel through the back loop of the square knot.
If you left the knot a little loose it's easy to slide the wire through.

Close up the swivel and it's ready to go!

All knots should be periodically checked before flight to be sure they haven't loosened up.
I don't like using glue on a elastic to "set" the knot. White glue dries hard and could wear down the elastic.


The end is tied off on the nose cone shoulder lug.

TIP: On a nose cone like this, there is an open slot below the tie off loop.
If the elastic were left long it might get caught between the shoulder and body tube.

Leave the end a little long and tie an overhand knot near the end.

With tweezers, force the knotted end into the slot.
The knot will keep the long end inside the nose cone shoulder.

That wrap of masking tape will be replaced.
It still has some red paint dust on it from some wet sanding.
The nose cone was just a little loose in the BT-50 tube and needed 1/2 wrap of tape around the shoulder.

Sunday, November 11, 2012

Custom Solar Explorer Build Part 25 Sharpening the Mask


There was a little bit of white along the body tube edge at the top of the sticker.

When the two tubes were coupled together, you could a bit of the white and the color separation wasn't as sharp as I would have liked.


The body tube edge was blackened in with a Sharpie marker. This covered any white showing along the top of the sticker band.

Here's how the two joined tubes look now.

Thursday, November 8, 2012

Custom Solar Explorer Build Part 24 Sticker Decals


Look close and you can see the center pencil marks.

The upcoming numbered strips are being fitted into some concave joints.
These are the tough ones to place, I saved them for last after getting some practice in on the easier stickers.
My knife blade tip is set right under the center mark on the red band in the center.

Set this center mark down on the center mark already on the BT-55 tube.
Work from the center out, being sure to set the sticker in the deeper fillet areas first.
After the centers and fillet areas are stuck down, work the sticker out to the ends.


Here's how they should line up.

As mentioned earlier, double check the "2" sticker before setting them in place.
It's easy to get this one upside down.

Wednesday, November 7, 2012

Custom Solar Explorer Build Part 23 Sticker Decals

Those wrap around bands were set down first for a reason.
You'll be setting the Solar Explorer name stickers centered between them.


Mark the centers of the name decals before taking them off the backing sheet.
A pencil won't transfer onto the slick decal surface, but mark a crease in the plastic.


Mark the center point between the two fins.
Turn the model over and mark the center between the two fins directly on the other side.

Not shown, but find the center point between the two wrap bands and lightly mark with a pencil.

Again, lay some water down on the tube before setting down the decals.
The water won't allow you to slide the decals around, but it will let you lift the decal if you don't get it right the first time.
The water also lets you press out any air bubbles under the surface.

Use the center marks on the decal and line them up with the pencil marks on the body tube.

Because they won't slide around -
Don't burnish down until you get it right. You'll be glad the center pencil marks are there. 

Custom Solar Explorer Build Part 22 Decals Bands


The decal bands were a little bit of a problem.

I tried to set the lower red band against the joint of the 50/55 tube.
The fillet got in the way! The end of the band wouldn't close evenly.


The decal was carefully lifted and positioned a little higher, away from the fillet.

When wrapped around the tube the ends still didn't meet up.
Is it perfect? No, but a lot better than in the first picture.

I did my best to get the black decal right up against the top of the lower BT-50 tube. We'll cover up the exposed white lip later.

The decal ends did meet up but the spacing of the white bars is uneven.
Again, close but not perfect.

Tuesday, November 6, 2012

Custom Solar Explorer Build Part 21 Stick On Decals!

I hate stick on decals!
It would have been easier to scan and print out a set of water transfer decals, but I went with the stickers supplied with the kit.


These were very well laid out on the sheet.
All the images were in line with each other which cut down on the amount of straight cuts.

With stick-ons, I cut everything right at the printed edge.

While most of the images were squared off, the numbered 1 - 4 panels had rounded corners.

I went back and cut off the corners at a 45 degree angle. These leaves a very small amount of clear around the corner which won't be noticeable when it's in place on the model.
The decals were translucent.
You would have to set them on a bright white surface for them to look good at all!

These fin panel decals were pretty easy to place in the center.
I used my knife tip where I could, rather than get fingerprints on the underside.

Be careful when placing the number 2 panel decal.
Be sure you've got it facing right side up!

You'll find it easier to put some water on the area where the decal will go.
You won't be able slide the decal around on the wet surface, the water just makes it easier to move out any bubbles from under the surface.

These stick -ons are are just that - sticky!
Once they go down, they are there for good. You may not get a chance to lift and reposition them.

Monday, November 5, 2012

Custom Solar Explorer Build Part 20 White Coat Trouble

The  humidity has dropped in Florida! I was looking forward to the cool weather and faster paint drying times.

I had done two light coats of the Rustoleum 2X gloss white.
I was following up with my standard heavier final gloss coat.
The model was set up for drying.

When I returned to check the finish, the paint was wrinkled!
I haven't had this problem in a while, maybe the cold paint cans (they were stored in the garage) contributed to the wrinkles.


This is the upper body tube area where is wrinkled up.

It was wet sanded using 400 grit.
You've got to be careful not to wet sand through the paint and into the brown body tube.


After sanding, you can see the mottled finish and the gray primer showing through.
This was sprayed with more gray primer and sanded smooth.


This is the sanded primer before trying the white paint again.
The thick gray primer has filled the pits and sand throughs.

Sunday, November 4, 2012

Custom Solar Explorer Build Part 19 White Coat Sand


Look at your first white coats under a strong light from all angles.
Any specs of paint or glue blobs should be sanded down now before any more paint coats.

Under the lower 50/55 ring was some glue blobs. Sand these down with 400 grit.

Near the lower fin root edge is another raised piece of paint. This is also sanded to surface.

I was hoping not to have to fillet the launch lugs, but there is some glue and air bubbles showing.
Titebond Molding and Trim Glue will be used for the lug fillets.

The upper surface of the 50/55 centering ring looks pretty good.
All the preparation paid off well here.

Enlarge the picture and you can see the bubbles under the launch lugs.

A light overall sanding now will make for a smoother surface after the next spray coats.

Saturday, November 3, 2012

Custom Solar Explorer Build Part 18 White Undercoat


This is the nearly complete Solar Explorer after the first coat of Rustoleum gloss white.
This is a great looking - LONG - BT-50 based model.

As with most of my models, the entire model gets a white undercoat. If you were to simply spray the final color over the gray primer and brown body tube, the transparancy of the final color could look mottled.
The white undercoat gives an even base and brightens up the other overcoat colors.

The two BT-50 sections are slid together over the coupler, not glued together yet.
This way the (eventually red) upper section gets a white undercoat. I'll separate the two sections, spray the upper section red then glue it all together.

TIP: Notice the nose cone is pulled out and the shoulder is exposed about 1/16".
This allows a small bit of paint in the shoulder. Even if the nose cone is slightly up and over the body tube, the black shoulder won't be as noticeable. How many launch pad pictures have you taken where the nose cone shoulder is exposed and a different color?


There are plenty of inside corners to paint on the fin end.

To get complete coverage, try to spray the inside fin joints first then come back and spray the outside exposed surfaces. This way you are sure to get paint in all the inside angles.

Custom Solar Explorer Build Part 17 Fin And Lug Gluing

The instructions have you glue the two short lugs centered between two fins.
They are glued 1/4" from the top and bottom of the BT-55 section.

I don't see any reason for this, I'd rather have them down a fin root edge.
This probably should have been a single longer lug instead of two smaller lugs.

UPDATE: I figured out later, these are two small lugs that will be outside of the self adhesive decal edges. One horizontal decal stripe goes between the two small lugs. With the lugs set even with the leading and trailing edges of the fins, the stick on decal stripe will fit between them.


I could use one thick glue line but the lugs will go against the root edge of the fin.

Two lines of glue will get a better contact on the body tube and side surface of the fin.


Here's how I ended up gluing the lugs.

Both are out of the way and even with the top and bottom edges of the fin.

As I mentioned before, I would have preferred a single, longer launch lug.

Friday, November 2, 2012

Custom Solar Explorer Build Part 16 Fin Gluing

The fins are glued 3/8" from the front and rear of the BT-55 section.
A straight strip of masking tape was set down at the 3/8" mark for position of the front leading edges.

The front and rear of the fin root edge was used to mark the gluing surface on the BT-55 section. This area will have to be sanded to remove the primer making a better gluing surface.


Here I'm sanding off the primer and pencil line between the front and rear tick marks.
Sand a strip just wide enough to glue the fin on and apply fillets.

Custom Solar Explorer Build Part 15 Coupler

The two BT-50 body tube sections are joined with a 1" long coupler. I thought this coupler was a little too short.

A 2" long coupler was made out of some scrap BT-50 tubing.
That blue piece was cut from a thin Estes engine mount tube. It made a good gluing tab. The ends will be trimmed and sanding flush after the glue dries.


Here's the coupler glued halfway into the lower section of the BT-50 tube.

Don't glue the upper BT-50 tube into place yet. It will be glued onto this coupler after it is painted red. This makes an easy color separation and a no tape mask.

Thursday, November 1, 2012

Custom Solar Explorer Build Part 14 BT-55 Section Gluing


With the BT-55 section in place, slide it to 3/8" from the end and mark with a pencil.
Slide the BT055 section away from the pencil line you just drew.
Run an even line of glue forward of the pencil line.

Slide the BT-55 section over the glue and down to the 3/8" pencil line.

TIP: Twist the BT-55 section as you slide over the glue and up to the pencil line.
The twisting will even out the exposed glue and make for a smoother fillet in the next step.


Smooth out the glue into a smooth fillet.

Apply a fillet to the front end of the BT-55 section and smooth it out.


After the glue fillet dried, there were some air bubbles.

I'll use another fillet of Titebond Molding and Trim Glue to fill it all in.

Wednesday, October 31, 2012

Custom Solar Explorer Build Part 13 BT-55 Section Gluing

In the next few posts I'll refer to the lower body tube assembly (BT-55 and 50/55 Centering Rings) as the BT-55 section.


The BT-55 section will slide over the lower BT-50 body tube from the rear.

You don't want the centering rings to catch and roll over the edges of the BT-50 body tube.
Use a smooth dowel or the back end of a Sharpie pen to roll over and smooth out the rear edge of the BT-50 body tube.


The inside edges of the 50/55 centering rings should be sanded to allow an easier sliding fit over the lower BT-50 body tube.

Take a good look at the inside edges and remove any rolled over edges with 220 grit sandpaper.

I marked the top (T) and bottom (B) of the BT-55 section for reference.

The top end of the BT-55 section was already slipped over the end of the BT-50 tube lower end.

This picture was taken to show an area of concern. This area takes an extra moment to line up the inside BT-50 tube through the rear centering ring.
You may have to sand away some of the centering ring lip forward of the letter "B".


I noticed a crack forming where the filler was in the centering ring seam.
The BT-55 section was removed.

To fill the ring a bead of medium CA was set around the ring and sanded smooth.

Tuesday, October 30, 2012

Custom Solar Explorer Build Part 12 Fin Fillet TIP


A line of Titebeond Molding and Trim Glue was used for the inside fillets.

Lonnie Buchanon gave me this tip:
TIP: Be sure your fingernails are trimmed close when you smooth a fillet in a tight corner.
A long fingernail can easily scar the balsa when trying to smooth out a fillet like this.

Custom Solar Explorer Build Part 11 Fin Gluing

While the instructions don't get into any detail about gluing the outside fins -
Alignment of the top of the "T" fins should be straight and centered.

The masked strip is your gluing surface for the outside fins.

Find the center again and draw a pencil line over the top of the leading and trailing edges of the smaller fins.


Run a thin line of glue down the outside edge of theCenter this pencil tick mark down the outside edge of the larger main fin.
I'm not sanding down the edge here!

I'm just using my sanding block as a flat surface to be sure the ends of the two pieces are even.

Press both pieces down on a flat surface and double check the pencil marks to be sure the parts haven't shifted during alignment.


As a final check, the back of my machine square was set in the corner joint to get the 90 degree angle.

Monday, October 29, 2012

Custom Solar Explorer Build Part 10 Fin Priming

In this picture, the CWF has already been sanded down with 400 grit on a block.
All the flat surfaces and edges were sanded flat.

Here I'm just "kissing off" the rough corners of the leading and trailing edges at a 45 degree angle.
Sometimes the squared edges will be rough, that will show up when the color coats are applied.
This is a very light pass of the sanding block, not
enough to lose the sharp edges.


The two fin pieces are glued together in a "T" shape.
I've been filling the balsa before gluing it all together. It'd be very hard to get filler into all the inside corners if the model were all built up.

Before priming, the center strip (the gluing area to the main, large fins) square of the rectangular outside fins will have to be masked.

Use a ruler to find the center and draw the line with a pencil.

Here's all the fin pieces flat side up ready for the primer.
One side will be sprayed and let dry. The fin pieces will be flipped over and stuck down again to prime the other side.

Look close at the long rectangular pieces. Down the center line is a strip of masking tape to keep the primer off the gluing line for the outside edge of the main fins.