Saturday, August 19, 2017

F-104 Intake Pattern Development, Part 2


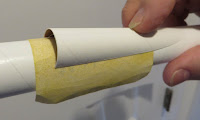
The round intake tube segment was ironed flat. My iron was set on cotton with a little bit of steam.
Here's what I ended up with. The 1" long reference lengths were added so a picture can be copied to Corel Draw and traced at full size.

With the body tube segment ironed flat I was surprised at how thin body tube walls are. Spiral rolling Kraft paper into a tube substantially increases the strength.


Some test patterns were printed up and a few more intakes cut out. The fit was perfect!


Three more edits later I have a good template for the new kit!

Estes Starship Nova #1371 Build, Part 17, Engine Housing Fittling


The split housings were marked for the 3/8" overlap of the card stock fairings.

The engine housing sides were sanded to fit after setting the split tube on the wing and rudder.


Here's a good fit against the wing.


I cut out the curved housing fairing.
When it was formed and curved that crease (already in the kit supplied card stock) really shows.


GOTCHA: A test fit showed it was too short, just like the intake fairings.

Two more will be traced on 110 lb. stock a little longer than the kit supplied fairings.

Friday, August 18, 2017

F-104 Intake Pattern Development, Part 1


The upcoming F-104 Starfighter kit from Odd'l Rockets had some interesting kit design challenges. One is the intakes on each side of the body.
The old Centuri kit folded card stock rectangles. They didn't look like the round intakes on the real jet.


I wish I could say the intake shape was developed using some complex geometry. I took the easy way out - I guessed.

Some BT-20 tube was cut into half wedge shapes. This picture shows how many tries it took to get the best fit.


Final shaping is done by sanding the rough cut edges with 220 grit wrapped around the BT-50H body tube.


Okay, here's a good fit!
To make a paper cutting pattern I could just wrap a paper around this intake and trace, but I wanted something more accurate.
More in next post - 

Estes Starship Nova #1371 Build, Part 16, Fin Gluing and TIP


Glue on the rudder directly opposite the engine hook.

The "Q" piece works well to align the rudder on the body tube.


The instructions have you bevel the outside edge of the wing pieces after they are glued onto the boy tube.

TIP: You'll find it much easier to sand in the flat bevel into the wing edge before gluing it onto the body tube.


On the left is the 3/32" wide bevel.

On the right shows the approximate bevel angle of the fin against the sanding block.


Here's how the mode looks up to this point with the wings glued on.

The wing tips still have to be added.

Thursday, August 17, 2017

Estes Starship Nova #1371 Build, Part 15, Wing, Rudder Dowels and TIP


TIP: Recently I've been cutting off the corner tips on the parachutes. This allows the shroud line knot to be a little closer to the tape disk hole.


Three dowel lengths are cut - Two at 3" long and one at 4 1/2" long.

One end of each dowel is rounded.


TIP: You could simply glue the dowels on the outside edges of the rudder and wing extension piece. Sometimes I'll sanded a slight curve into the outside edges with some 220 grit wrapped around the dowel.

On the right is the is the sanded inside curve. It makes a better fit and a stronger glue joint.

Estes Starship Nova #1371 Build, Part 14, Engine Housing Caps


The inside of the end caps were "painted" with orange fluorescent acrylic paint. It took a few coats to get full coverage.


The outside was blackened using a permanent marker. The inside edges were also blackened.


The end caps are glued on, flush with the ends of the body tube halves.

Wednesday, August 16, 2017

Estes Starship Nova #1371 Build, Part 13, Engine Housings Paint

This is the engine halves after sanding down the interior seam fills. (Yep, I can hear you now - "Why fill the interior seams? Nobody will see them!)
The interiors were spray painted gloss white, then sanded.
TIP: To properly "glow" fluorescent paints require an opaque white undercoat.


I didn't use a spray paint this time. I found some fluorescent orange acrylic at Michael's crafts. It was a good match for the orange decals.

The first coat was brushed on. It seemed a little rough and showed the brush strokes. I lightly sanded with 400 grit.

The next two coats were applied using a fingertip.


That seemed to smooth it out. On the left is the finished interior orange.

On the right I scraped off the edge to glue on the end caps.