Thursday, June 17, 2021

Estes Indicator #7244 Build, Part 4, Fins & Adapter


Here's how the two piece fins will glue up.

There are six fins total, two pieces per fin.

Glue these up against a straightedge. I like to set some small weights on the glue joint seam so both pieces end up flat.


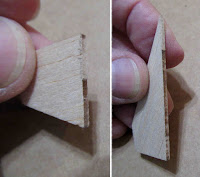
The upper fin root edge is glued to the body tube - 
The root edge on the low fin is angled to fit the 20/50 adapter. 


Speaking of the adapter - There is a tie down loop on the top.
I would think this might stop the ejection charge. Except for an open rectangle space under the tie loop, this seems like a blockage.

This question came up on a forum. Estes replied that it doesn't impede the ejection charge or deployment of the parachute.


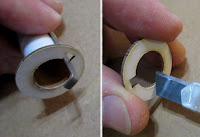
I cut the end off using a razor saw. 

Here's the new open top end after rounding off the rough sawn edge.

Wednesday, June 16, 2021

Estes Indicator #7244 Build, Part 3, More Parts Prepping

Square up the tubes by sanding the ends with 220 grit. You might be surprised by how many kit tubes aren't cut clean.

Pick an end and mark the BT-20 body tube Front and Rear.

You can do a wipe of CA glue on the top (nose cone) end of the BT-20 tube only - All other tube ends will have glue applied later. The CA glue edge would seal the tubes - wood or plastic glue won't soak in.


This is the 13mm engine mount tube.
At the top is the slit for the engine hook.

Notice there are more than one mark going around the tube at the centering ring and Mylar retaining ring locations. I like making three or four marks so I know the rings are perpendicular to the tube.

The fit of the flat 5/50 centering rings were too tight on the BT-5 engine mount tube.

I did some simple scraping to open up the inside diameter.
Uh-Oh!
I've never checked the shroud line length on a premade parachute.
The two adjoining chute "corners" were matched up and the center area of the shroud line loop stretched tight. 
Each shroud line loop was a different length, two are shown here. This could make for a lopsided parachute. 
I cut off the shroud lines and replaced them with #10 embroidery thread.

I know - the parachute would work fine as is, right out of the kit bag.
I'm single and have time for very important rocket nerd things.

Tuesday, June 15, 2021

Estes Indicator #7244 Build, Part 2, Some Parts Prepping


The fins show clean laser cutting but some of the line segments didn't match up.
These should be squared up with a block or you won't have a good root edge bond. 


Here's what I mean - 

This shows the edge sanding about halfway through the sanding. Keep sanding until the burnt edge is nearly gone.


I also like to square up and flatten the engine block and those thick 20/50 centering rings.

A squared up engine block can fit better against the upper bend of an engine hook. 
Sometimes a low engine mount centering ring is set flush with the end of the main airframe tube. Square it up and the joint will be less noticeable on the finished model. 

The finger tab was cut off because I'm a big boy.

Flip over the hook and put the cut end at the top of the mount.

The inset picture shows the bent end of the mount after hitting it with a metal file to roll off the sharp corners. This makes engine insertion easier.

Monday, June 14, 2021

Estes Indicator #7244 Build, Part 1, Parts


I don't know where I picked this one up - it may have been in an Estes Clearance Sale.
This is a good looking model. The design implies it is two stager and some builders have posted that they will make a conversion.

I'll keep it simple and build as it is, with a few minor changes.

This one feels like a throwback to the 1970s designs. 
BT-50 to a BT-20 with 1/16" this balsa fins. These fin shapes are more contemporary.
Mini engine powered. The Face Card says it will get to 200', I would think it would go bit higher.


Parts of interest:
A 9" preassembled parachute.
Large decal sheet. Note: To use the supplied decals, the face card model (almost) shows two black fins and one red fin. I found out I got the paint wrong when the decals were applied.
The 20/50 plastic adapter.
Two short 1/8" launch lugs.

Sunday, June 13, 2021

X-Acto Knife Rolling Off The Table? TIP

In my teens I was fortunate to work at a print shop as a graphic artist doing paste-up.
This involved sitting at a drawing or light table making many long cuts using a straight edge and X-Acto knife. 
One morning our typist Pam was helping with paste-up. We heard a loud scream.
Her X-Acto knife had rolled off the slight angle of her desk and stuck in her thigh.

At one time, X-Acto made a knife handle with a hinge on the top end. You could flip the end making a bend in the handle preventing it from rolling. I couldn't find any of these online.
There is a no-roll handle on this Gripster knife -

On TRF there is a thread on Model Rocket Tips.
Sooner Boomer wrote:
Stick an eraser on the end of your X-Acto handle, this will help keep it from rolling.

GrouchoDuke had the best answer - 
A zip tie works really well too.

I just added a twist tie to the back of my knife handle.

Saturday, June 12, 2021

Old (Original) Mars Snooper Instructions

With the upcoming Super Mars Snooper kit from Estes - you might find this interesting. 
When Estes releases the kit, a build will follow on the blog.

On the Estes Model Rocket Facebook page - 
Mark DiGregorio wrote: 
"When I first got into rockets at 10 years old there were no laser cut fins, you would have to cut a pattern from a piece of balsa sheet! I also remember building escape towers with one piece of dowel glued together on a template in the directions, had to make the spike by hand! Also had to cut chute out and put lines on with a sticker, things have gotten a lot easier since 1966!"

This prompted many responses, one from Mike Meyer:
"When I got into Rockets we had to harvest the balsa wood . . ."

James Zelewski (Jim Z's Plans) proved them right with a link to the original Estes Mars Snooper instructions.
Before it was a kit, The Mars Snooper was just an instruction sheet, Estes Industries Rocket Plan #25. To see the entire file: CLICK HERE 
      

The fin pods in the kit were first cut and formed from a balsa nose cone stock.

Simply cut the block into quarters,


Rough carve,


and sand round. Easy, peezy!


Glue onto outside edges of the two main fin pieces.

Check out the shock cord mount!


Make your own coupler, cut slits and weave the shock cord through the cuts. 


" . . . you may use the standard shock cord mounting procedure familiar to most every model rocketeer"


Glue the mount into the top end being sure to recess it 5/8" for the adapter shoulder. Sheesh!

Friday, June 11, 2021

Estes Antar Leading Edge Trim - TIP

I'm a little embarrassed -
I built a few Antars for Estes and didn't notice the silver line running down the leading edge of the wings. I tend to follow the instructions and plan ahead, but didn't see the silver trim.
The Antar is a difficult model to mask and paint. I wasn't excited about another thin mask down the wing edge so I decided to try something new.
Sprayed decal trim has it's place and has worked in the past. But, this trim strip rolls over the round leading edge of the wing. It'll have to be wide enough to hold on when set onto the top and bottom.

This is not an easy technique and might be avoided if you aren't comfortable using water slide decals.
 
I sprayed silver paint on a scrap piece of white decal paper. White decal paper will show off the silver better than a clear decal sheet.
The spray paint seals the surface, no additional clear coat is needed. After the paint dries, you can go right to cutting and a water soak for transferring.

The strip is about 1/4" wide. The front end is rounded to roll around  the leading edge. I was surprised how the rounded edge of the decal disappeared into the fin tip fillet. 


The decal strip was cut a little long and will overhang the the end.

After the decal is fully dry, the overhang was trimmed off with a new single edge razor blade. Try using a back and forth sawing motion.
The decal strip held well but might curl and lift over time.
I don't like clear coats but used a little Pledge clear acrylic on this one. 
It won't take much. Dip the brush and wipe off the excess.
Run the brush over the edge of the decal, only covering about an inch at a time.


Immediately wipe off the shiny excess. 
There will be some of the Pledge that will run ender the decal edge helping it adhere to the surface.

That silver trim line adds a lot to the finished build.