Saturday, December 18, 2021

Estes Skylab #001973, Build, Part 6, The Vacu-Form Wraps

There are no shortcuts to fitting the wraps.
Wrap around the tube and mark the overlap. Trim a little oversize.
Then sand and check the fit. 
Repeat until both ends match up with (hopefully) an equal spacing between the ribs and very little seam to fill.

Notice on the right side - pencil marks to reference the 1/16" wide edge border cut.

Before spraying the backs with adhesive - 
Double check to be sure you are spraying the back side.
I use a small roll of tape to hold the wrap down on scrap cardboard for adhesive spraying.
Spray directly over the back, not from the sides. You want the adhesive just on the back. It would be difficult to remove adhesive from between the corrugation ribs.

I used the 3M Super #77 permanent spray.

You will be lining up the left edge of the wraps down the vertical pencil line.

GOTCHA: The Upper 2nd Stage Wrap end does not start on the pencil line!
Check the single conduit position on the Second Stage Wrap and line up the conduit top in the upper wrap to find the correct start position.


Be sure to double check the alignment of the conduits. Sight from the rear. 
If they are not in line, the conduits will end up looking crooked on the finished model.


A few points didn't want to stay down on the body tube.
Some CA glue was slipped in on a knife blade.
A smooth pointed dowel held down the raised areas as the glue set up.

Thursday, December 16, 2021

Estes Skylab #001973, Build, Part 5, Third Stage Adapter

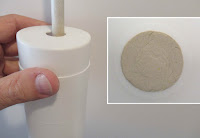
NOTE: Save the centers from the centering ring for Step 5 of the instructions.
Notice the ring in the right picture. The ring is set inside the edge of the 1 3/8" long tube.
 
GOTCHA: The instructions say cut a 5" length of shroud line. In order to double and tie it easily - cut a length of at least 10".

I used #10 embroidery thread which is much stronger than the current shroud lines supplied in the kit.
Use tweezers to make the knot tie easier.

Here's the fit of the adapter of the in the top of the tube.
I did have to sand the adapter for a better slip fit.

The tube seams were first filled with CWF and sanded to surface.

The picture on the right is a fairly thick coat of Duplicolor Filler/Primer in the second step of the seam fill.

This shows the saved ring center glued in place.

I also treat the low adapter corners (at the top here) with some CA glue applied with a Q-Tip.
After that glue dries, round off the edges with some light sanding.
This makes it easier to slide in the upper section later on. 
If the adapter edge is smooth and rounded it won't wear or peel the inside layers in the lower body tube.

Estes Skylab #001973, Build, Part 4, Nozzle Assembly

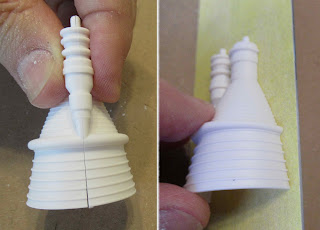
The nozzles have been improved with new molds. Only two pieces, a right and left side. No separate heat exchanger on the side that sometimes ended up being too short.
The halves fit together well but with an extra step  you can make it better.

TIP: One side has pins on the edges, the other side has holes to fit those pin locations.
Lightly sand the holes side flattening it out. Don't sand the pin side.

Check the following two "bell" pictures before gluing - 
I prefer liquid cement over tube style cement.
Brush glue on the top inside edges. You have to work quickly, the liquid glue dries fast.

While pressing the sides closed, you can dab some liquid cement onto the top pin areas.


Double check the large bell end. 
There might be a little bit of "play" in the fit.

Move and line up the sides for the smoothest surface between the bands.


While holding that best match position,
Brush some liquid cement down the inside joints.

Liquid cement almost disappears after it dries. If you don't over do it, it rarely shows up after paint is applied.

Wednesday, December 15, 2021

New Odd'l Rockets F-18 Hornet Kit


Now at (or coming in a few days) to a vendor near you -
After a year of tweaks and test flights,
The third in the Odd'l Rockets Fighter Fleet series is the new
F-18 HORNET!
The kit features a very different fin and faux engine placement, 3D printed missiles, 
water slide decals and a vacu-form canopy.

JonRocket got the first lot of kits and sold out in two days! More on the way -
Sirius Rocketry, Apogee and ERockets should have or be getting their F-18s soon. 

Estes Skylab #001973, Build, Part 3, Gluing On The Centering Rings

Look at Step 1 of the ASSEMBLE ENGINE MOUNT on page 4.
It says to mark the tube at 8 1/8" from the top.

GOTCHA: At the lower right, it says that 8 1/8" mark is from the rear. I think that's a mistake in the instructions. The lengths don't add up.

I glued on the center ring 8 1/2" from the top which left 7 1/2" spacing from the bottom ring.


Use the retaining ring to set the end spacing of the lower ring.

The instructions suggest epoxy, I used Beacon Fabri-Tac to glue on the retainer.

GOTCHA:
It seems the fit of the large centering rings has always been too loose in the Saturn V kits. This newest version has loose rings.
If you were to glue them on as is, too much glue fill could soak into the thin 4" tube and make a "Coke Bottle" pucker seen on the finished model.

I build up the outside ring diameter with small, even beads of yellow glue. 
It took two beads of dried glue to get a good friction fit.

Tuesday, December 14, 2021

Estes Skylab #001973, Build, Part 2, That Darn Reinforcement Ring!

GOTCHA: It seems like the internal reinforcement ring has always been a problem.

Too many first timers (I was a once first timer) assume that it will just slide in after glue is applied.
You will have to cut out a small segment to get a slip fit.

Be sure you have the correct reinforcing ring, it is the 1" length of tube.

Try a dry fit or the ring - it won't easily slide in.
Don't try to force it!

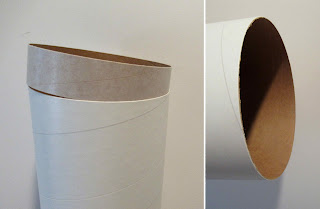
The picture on the right shows the rough edge of the body tube. The larger the body tube, the harder they are to cut clean. Square up the tube edges with sandpaper on a block. 

Cut one straight line through the ring using scissors.

Set the ring in the tube and check the overlap. This is how much will need to be removed for a good fit.

It's best to cut the segment a bit short and sand to fit.


Sand and square up the ends. Check the fit.
Repeat - 
Repeat - 
Repeat - 
Until you get a good fit.

Monday, December 13, 2021

Estes Skylab #1973, Build, Part 1, Parts & Nose Weight

This isn't going to be a detailed build until we get to the painting. I will be touching on steps that might be trouble areas for first timers.
I've built a few Saturn Vs on the blog before. To find those full builds: CLICK HERE 
You'll have to scroll about half way down to find the 70th post, the build is from finish to start.
    

The #1973 Skylab is very similar to the #1969 Saturn V kit except for the upper section.
The highest transition and Apollo capsule has been replaced with the Skylab payload nose section.
Some of the new parts are shown above. 

Each pay of clay weighs around .25 oz. each. 
There are six of them for a total nose weight of 1 1/2 oz.

These have to go all the way into the tip of the nose cone.
I find it eaiser to cut the pat into small pieces and roll them into little balls.
They are easier to drop in a few at a time rather than chase a clay snake around the inside of the nose cone tip.


You will need a long dowel to reach the front end of the long nose cone.

The inset picture shows all the clay in place, tamped down evenly by the dowel end.


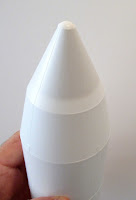
With a bright light behind it, 
you can check how the clay sits in the nose cone.