Wednesday, November 6, 2024

Enerjet by Aerotech Strong Arm Build, Part 7, Engine Mount Fit & Coupler Gluing


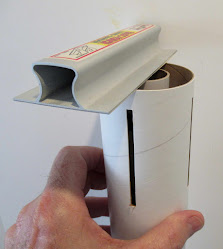
Before setting the engine mount, 
the TTW fin slots are removed. 
You'll want to see the centering rings position through the slots.

Remove the launch lug slots, too.


Slide in the engine mount. 
Slide in the fins, don't fully snap them in place yet. You are just checking that the centering rings are above and below the top and bottom of the fin slots.

The end of the engine mount tube should be even with the end of the main airframe tube.


I set my sanding block onto the end to make sure both tubes were even.

The mount will be locked in place once the TTW tin tabs are snapped into the locking rings inside.
On the left, 
The upper tube is flipped over for the coupler to be glued up to the 3" halfway pencil mark.
The shock cord is draped over the end.

TIP: To keep any epoxy glue off the shock cord, I applied some tape and slid it down the cord to where it might contact any squeezed out epoxy.
 

Tuesday, November 5, 2024

Enerjet by Aerotech Strong Arm Build, Part 6, Fit & Joining Two Tubes


On the left are the two tubes slid together using the coupler inside. No glue yet.

On the right is after sanding the tube ends square, the sanding shown below in the left side picture. Again, no glue yet.
Square up both tubes with a sanding block with 220 grit.

Slide the tubes together using no glue over the inside coupler.
Rotate the upper tube until you get the best, tightest join of the two tube ends.
Mark that best joint with a pencil line. When glue is applied, line up the pencil lines.

Having a tighter joint of the two tube ends will make it easier to fill the seam. 
The seam fill is coming in a few posts.

Monday, November 4, 2024

Enerjet by Aerotech Strong Arm Build, Part 5, Tube Seams


Back to the Enerjet by Aerotech Strong Arm build. 
To see the first four posts: CLICK HERE


I had to go back and do a little more CWF fill where it fell out of the seam. This happens on occasion. I mark them as I find them using pencil.
After sanding the CWF to surface,
The tubes got a shot of filler/primer.
Notice the masking tape set inside the tube end to keep the interior surfaces clean.

On the right is the same tube after sanding. Filler/Primer fills what seam lines were left after the first CWF pass. Only this two-step fill is necessary.


The edges of the tubes got a wipe of CA glue using a Q-tip.

Use your fingers as a depth gauge keeping the CA line even.

The centering ring glue fillets are up inside the tube, not near the CA'd edge. Wood glue or epoxy won't soak into the tube if the CA glue has sealed it off.


The tube ends are sanded after the CA glue dries. 
This gives you a hard, stronger edge tube.

Saturday, November 2, 2024

Newbie TIPS, Part 2

More TIPS for new builders:

 9. Don't "tack" on fins using super glues. 
        Super glues will seal the root edge of the fin. 
        Your wood glue fillets cannot soak into a CA sealed root edge.

10. Use less glue to initially tack on fins and launch lugs.
        Less glue will grab and set quicker. You can always add glue fillets later.


11. Cut out chutes using a metal straightedge and a sharp knife. 
        Don't use scissors as shown on the sheet.


12. PAINTING: 
        Read the directions on the spray can!
        Most brands recommend: Re-spray within one hour or after 48 hours.
        Plastic nose cones take MUCH longer to dry before recoating.
        Spray when humidity is lowest, usually around 2:30 in the afternoon.

13. STICKERS: Don't touch the adhesive on the backs of peel and stick decals. Your fingerprints can show under the clear borders.
        After peeling off the backing paper, hold and place the decal while stuck to a clean knife blade. Wipe off the blade before using it to place stickers.


14. Dip the sticker in water to allow repositioning on the rocket.
        Apply water to the area on the model and leave the surface wet before setting down the sticker.
        Work out air and excess water from the sticker from the center out to the edges.

15. WATER SLIDE DECALS:
        Practice using the vendor name decal (the Estes logo decal or kit number) to get an idea of the soak times before transfer.
        Like the stickers, wet the final decal position on the rocket body before laying down the decal. The water under the decal allows it to be moved around until into final position.

Friday, November 1, 2024

Newbie LPR TIPS, Part 1

For all the new blog readers - 
Some of these TIPS aren't always mentioned in kit instructions. 

1. READ THE DIRECTIONS BEFORE ASSEMBLY. 
        There is a reason why most instructions suggest this.
        You might want to plan your paint patterns before gluing things together. 

2. Start each build with a new blade in your knife and new sandpaper in your sanding blocks. 

3. DRY FIT EVERYTHING before using any glue.


4. DON'T USE INK to mark fin position lines.
         Use pencil to mark body tubes.
         Ink can and will bleed through lighter colors of spray paint.


5. Don't trust kit supplied fin marking guides. 
        To test a kit supplied marking guide - 
        Wrap and mark the fin lines, then rotate the marking guide to the next pencil mark.
        If the new marking guide position and pencil marks don't align, the marking guide is incorrect.

        Go to: payloadbay.com. Go to "Tools", then "Fin Wrap Tool".
        Enter in your body tube size and number of fins and print out.
            

6. Sand body tube ends flat using a sanding block.
        Many tubes (especially larger diameter body tubes) many not have a clean, straight end cut.

7. Change out a wide wood glue nozzle with the
 nozzle  from a white glue bottle. The size of the threads on the base of the white glue bottle nozzle will fit the wood glue bottle.
        You'll have a better control of glue flow.

8. Don't "set" knots with Super Glue. 
        Super glues (CA glues) will harden shroud lines and shock cords. It makes them brittle and prone to breaking.

Thursday, October 31, 2024

Enerjet by Aerotech, Arreauxbee-Hi, Finished


Here's the finished model.

The 30" rip-stop nylon parachute is attached to the long 1/4" wide elastic shock cord, 12" down from the upper body section.

The aluminum motor retainer is adhered to the end of the motor tube using 15 minute epoxy.


The low end with the six AT-022 fin stickers.


The fun part was getting all the pieced runway/tunnel pieces to line up.

The upper body payload section with the Aerotech General and Arreauxbee-Hi decals. Pieces of masking tape were set down as outside edge guides before centering and placing the two stickers.


The long nose cone and upper body painted silver.

Wednesday, October 30, 2024

Enerjet by Aerotech, Arreauxbee-Hi, Part 20, Fin Sticker Placement

If you can, try not to touch the adhesive side of the stickers.
Fingerprints can show under the sticker. I pick up and position them while stuck to the tip of my knife blade.

Before using your knife for this, wipe off and clean the blade. You want to keep the sticky side clean. 


After the backing is peeled off, 
Dip the sticker in water. This allows re-positioning on the fins. Before setting the sticker onto the fin, wet the fin where the sticker will go.


The sticker on the fin. The template window is used to check the position, centering and horizontal alignment.

This is the same method I used when placing decals on the Saturn V fins.


Here's another AT-022 sticker on the other side of the fin.

Work out the excess water using a Q-tip, rolling out the water and air from the center out to the sides.