Monday, November 30, 2015

Estes Honest John, #7240 Build, Part 16, Decals


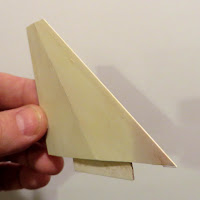
I was curious about the gap between upper fin root and the tail cone. I saw this cover picture on the November/December issue of Sport rocketry.
This is Jon Stenberg's Argo D4 Javelin model.
Enlarge the picture and you can see the the fin root gaps. So maybe I got it right this time.
With the HoJo fins and tail cone you could probably use them on this model.


Here's the model before decals.
It looks pretty good without them.

On this rocket you've got to do a little pre-planning before soaking the decals.


The top edge of a black band wrap is even with the end of the body tube.

Cut close to the black top edge. You can leave a little more clear border on the bottom.


The nose cone decal is set over the recessed line around the cone.
I'll cut this decal in two so there won't be a raised gap over the rut.

From Ted Cochran, NAR President

From the emailed The Electronic Rocketeer - Issue #90- November 2015

Fellow NAR Member,

As I mentioned in the email I sent to all of you on November 21, our hobby has experienced its first on-field fatality. The incident was not associated with the NAR, but it nevertheless affects all us of who deeply care about our hobby's safety. 

In addition, as I wrote in the October eRocketeer, we also had a spectator struck by a land-sharking rocket last month at an NAR launch. These incidents, and some near misses we've also heard about, remind us that our hobby is not without risk. As our launches get bigger, with more flights and more spectators, we need to take more precautions--observing the safety code by itself may not be sufficient, nor the best we can do

We sometimes need to do more than meet the safety code requirements: When conditions warrant, we need to exceed them.

Please take a moment as individuals, and as Sections, to review your launch practices. If you can improve your safety by following any of the suggestions in the next article, please consider doing so. If your section needs funds to update launch equipment, flag lines, PA systems, warning systems, or other safety-related equipment, please ask for a Section grant.The NAR has sufficient funds set aside for just this purpose; no reasonable request will be refused.
 
As always,
Be safe, have fun, and pay forward, 
   
Ted Cochran
NAR President
NAR 69921 L3  

Sunday, November 29, 2015

Estes Honest John, #7240 Build, Part 15, Fin Can Paint


Here's the fin mask for the red.
Each fin side took two separate pieces of Scotch tape because of the wedge taper. Even the bottom of the body below the fin was masked, the trailing edge is a little above the bottom.


I'm building two HoJos, on one - Uh, oh!
The plastic tail cone was too slick and some white paint was lifted.
Be sure to lightly rough up the plastic so the paint has something to grab.
I'll have to sand this, mask and shoot primer and sand that smooth. then more white and red if needed.


The other fin can turned out fine.
This one is up for auction on Ebay right now.


After the red had dried, the black was next.
This is after the black paint was shot, before the mask was pulled up.


After the black mask was lifted I have a small touch up along the red fin root edge.

Saturday, November 28, 2015

Estes Honest John, #7240 Build, Part 14, Nose Cone Paint - Oops!


The paint instructions are vague.
I masked around the circumference of the notched rings.
BIG MISTAKE!
I assumed this was the right height for the black decal squares.


Don't assume -
I should have double checked against the black decals.


The upper square block is just about 5/8" tall.
Check out how close the date stamp is - almost on the decal itself.


Well, it'll have to be re-shot white then masked again for the red.
The pencil mark is 5/8" above the upper recessed ring. I might mask it a hair short of the 5/8" mark so there won't be any white above the black decal top.

Friday, November 27, 2015

Estes Honest John on Ebay


One of the two finished Estes Honest John models is up for auction on Ebay.
This is painted in the face card test round colors. The fins are fully tapered from the root edge to the tip. This is the same model being built on the blog right now.
To see the finished model or make a bid, CLICK HERE
Stop by, make a bid and support the blog!

Estes Honest John, #7240 Build, Part 13, Ends and Edges


I did a tug test on the pre-made parachute shroud lines. They easily broke!
Another kit needing shroud line replacement.


A painting dowel was stuck into the engine mount and some paper towel strips stuffed into the back to keep the paint out of the engine mount.
The body tube was slip over the fin can, no glue yet.
A piece of rolled copy paper was pushed into the front open tube end.
The model got the first coat of gloss white paint.


TIP: Here's one way to knock down any paint inside the lip of a launch lug. Gently turn the pencil in the launch lug end.
The sides of a sharpened pencil are a little rough and just enough to rub off any paint and re-round the lug.

Thursday, November 26, 2015

Happy Thanksgiving, Y'All


Happy Thanksgiving from
TUNA (the overbite dog) Sock Puppet!

This was actually a Christmas project for my Daughter, Whitney. Yes, I made two - socks come in pairs and I hate to waste anything.
RANT: I just had the Macy's Thanksgiving Day Parade on. I'm not Diabetic, but after all the overly sweet patter, lip syncing and fake smiles I might need a shot of insulin.
The Dog Show is on now. A least dog the smiles are real.

Estes Honest John, #7240 Build, Part 12, Gluing The Band Wrap


A wrap of copy paper was taped around the body tube for a base line.
The top of the paper strip is 4 3/8" from the bottom of the tube.
Setting the punched band on the top of the paper strip will center the wrap.
The bottom edge of the wrap will end up 4 3/8" from the bottom of the body tube, not the fin unit.
The wrap band (I made two) was taped down to a piece of card board. It was lightly sprayed with 3M adhesive.
The instructions show white glue being used but the glue might pool up on the punched holes.
Go light on the adhesive, it's easy to spray on too much.


Here's the band in place.
The inset picture shows the kit supplied wrap with the laser cut notches. On the wrap I made the holes are cleaner.
The home wrap holes might not be perfectly in line but sometimes kit upgrades are a compromise.

Wednesday, November 25, 2015

Estes Honest John, #7240 Build, Part 11, Band Wrap Center?

The instructions don't say whether to center the band or set it on the top or bottom of the 5" mark.
The band wrap position at 5" from the bottom looks too high to me.
A quick search online and I found the G. Harry Stine drawings:
CLICK HERE and scroll down.


The kit face card and the Stine plans show the band at the middle of the body tube section.
5" from the bottom would set it up too high.


Even the older Estes Maxi-Brute Honest John (Image at right) shows the band centered in the middle of the tube:

The online Centuri instructions look like it is centered but they are too hard to read. I'll center mine.


TRIVIA: In that same Honest John article is an old Centuri ad showing the Honest John in the Estes kit face card paint scheme.
In a post on TRF, John Boren said that was where Estes got the colors for the new HoJo release.
We've still not found a picture of a real Honest John in these red, white and black test round colors.

Tuesday, November 24, 2015

Estes Honest John, #7240 Build, Part 10, Lug Gluing and Band Wrap


The lugs were glued in place before the body tube was shot with primer/filler.


The laser cut band had small circles cut into it. You have to remove the circles by cutting through the hold down ticks. The problem is getting a clean cut of the small hold down tabs.
No matter how I tried I was left with small rough edges. I didn't really want to glue this onto the model. I wanted cleaner, round cut holes.
I marked off some 110 lb. card stock as accurately as I could.
Before punching all the way through the card stock I pressed the rotary punch just light enough to make a light circle impression. This way I can make small adjustments before punching the final hole.
Here's my first attempt had a few punches that were off. The picture has pencil marks showing the high punches.


More card stock and pencil marks finally gave me a more accurate band.
A third try gave me a usable piece.
I ended up making two by punching through two layers of folded card stock.

Monday, November 23, 2015

Estes Honest John, #7240 Build, Part 9, Fin Primer and Launch Lugs


The fin tabs were masked off and the fins sprayed will filler primer.
After that dried I noticed a laminate edge was lifting.
No big deal, some glue was slid underneath on the knife blade then sanded smooth.

The primer was sanded down.
The fin on the right got some "fine tune" shaping. You can see where more of the grey primer was sanded to straighten out the raised ridge down the center.


The launch lug standoffs are two pieces glued together.
No need to sand off the burnt laser edges before gluing.

A clothespin held them together while they dried.


After the glue dried the standoff sides were sanded smooth.


Two 1/2" long pieces are cut off the 2" long supplied lug.
I'm building two kits so I cut four lugs.

These were slid over a dowel for cutting. They stayed on the same dowel for a coat of CWF filler and sanding.

Sunday, November 22, 2015

Update Information on the Fatal Model Rocketry Accident

An Email from  NAR President Ted Cochran
21 November 2015
Greetings,
As I reported on the NAR Facebook page last Sunday, I regret to have to inform you that a fatal on-field rocketry accident occurred in California last Saturday. I want to bring you up to speed on the status of our investigation.
When I made the first announcement, there were few details available. We have since been working to understand what happened, so that we may all learn from it and prevent it from happening again.  Our Association has no standing in the matter except as concerned and experienced enthusiasts, but I've been in contact with law enforcement and witnesses and have a preliminary set of facts to share.
First, to the best of our knowledge, no NAR or TRA members were involved in this incident, certainly not directly involved. No kids were involved, except, unfortunately, as witnesses.
The deceased, Mike Bentley, a very experienced adult Scout leader, was at an annual BSA Council-sponsored rocketry and camping event for multiple scout troops called Rocket Rave, which has been conducted for at least several years. During the weekend, scouts complete tasks required for their Space Exploration merit badge, which requires two model rocket launches. During the launches, it has also been common for adults to launch their own, larger rockets.
Around noon on Saturday, Mike engaged in a drag race with a second adult. Winds were likely within limits, safe distances were at least close to being met, and both rockets probably met the weight and power limits defined by the NAR Model Rocket Safety Code. The drag race was conducted from a dedicated area, to one side of the primary launch pads for the scouts to use to fly their conventional A through C powered model rockets, and about two dozen people were in the immediate vicinity.

Mike's rocket was powered by a small APCP motor; the other rocket was powered by at least one, and possibly more, black powder motors. Both rockets launched; while Mike was watching his rocket, the other rocket arced over and came down ballistically, striking him in the face and causing severe injuries. Despite the best efforts of scouts, law enforcement, and medical professionals both at the scene and afterwards, his injuries were ultimately fatal.
We know that the rocket that struck Mike was about four feet long and four inches in diameter. It had a cardboard body tube and a plastic nose cone. We don't know much else for sure. It is possible that the rocket was designed to fly on a cluster of motors, but at least one picture of the flight does not clearly show more than one motor firing. No parachute was deployed; none was seen at the accident site. At least one report indicates the rocket was damaged prior to flight. We don't know what motor(s) were used and whether they all ignited and functioned as designed. We don't know if applicable local laws were fully observed.
I do know that the investigating law enforcement authority is not pursuing a criminal investigation at this time. The lack of an investigation will likely leave questions unanswered for some time. We don't know if the rocket would have been allowed to fly at a NAR launch; we can't definitively say whether the NAR safety code was observed or not. We will continue to gather information to the best of our ability, and we'll pass on significant new findings to you.
Where does this leave us? We know that rocketry remains orders of magnitude more safe than any other outdoor activity we can name, provided the safety codes are followed. But it is not without risks; the safety code is our primary means of mitigating those risks.

Everything in the safety codes is there for a reason, and I urge you to continue to observe-and when prudent, exceed-their recommendations every time you fly.
  • Do preflight inspections of every rocket. Be especially careful with complex rockets. Pay special attention to the recovery system. 
  • Tilt your launch guides away from the crowds: Plan to have good flights, but also plan for bad flights to end in safe places.
  • Add to the safe distance standards when lots of observers are present.
  • Make sure launch controllers and ignition methods are appropriate for the motor(s) being used.
  • Have a spotter for every rocket in a drag race, near enough to the RSO to be able to get a warning out if necessary.
  • Have people point at malfunctioning rockets if they see them.
  • Make sure the crowd can hear the RSO.
  • Confirm the stability of untested designs.
  • If rockets are flying over spectators, stop and fix the problem.
  • Offer to help people and groups who are just starting down the path that we have trod. Set a safe, positive, and helpful example.
Please consider contributing to Mike's memorial fund through his gofundme site

I'll continue to keep you informed, so that we can learn what we can from this unfortunate accident, and be safer because of it.
Sincerely,
Ted Cochran
President, National Association of Rocketry

Estes Honest John, #7240 Build, Part 8, Fin Shaping


Look at the final picture in the last blog post. You can see the center line at the root edge isn't very defined. I could have sanded the fin thinner but I decided to build up the center line to make a sharper taper.
Some CWF filler was brushed on the center near the root edge. Don't get any filler on the inside root edge.


After it dried I went back to the block with 220 grit.
You can see the edge being formed. It's just a little higher that the balsa would have been.

Here's a shaped fin.
The raised center line now goes all the way across the fin.
The picture is a bit confusing, the darker area at the leading tip is a shadow, not sanded off filler.


I looked back at the laser cut fin sheet.
You can easily see the angle of the root edge, especially on the low end.

Saturday, November 21, 2015

Estes Honest John, #7240 Build, Part 7, Fin Shaping

If you've never sanded wedge shaped scale fins before, don't start with the kit fins!
Cut some extra fins out of 3/16" thick balsa and practice on those! Trust me, you won't get the technique right on your first attempt.


The leading and trailing edges shouldn't be shaped to a knife edge. This makes them very weak and they won't last through the first rough landing.
The instructions recommend sanding to a 1/32" thickness.
I start by sanding that 1/32" edge width first.

The inset picture shows the contrast of the black ink width.


I use my left thumb as a guide to help keep the block sanding in a straight line.


These fins (and Nike style fins) are thicker at the root edge and thinner at the smaller outside tip edge.

Notice the pencil line to the left of the center. You will be sanding over the center to the lower half of the fin.
When you sand the lower half that (penciled) line will be raised back to the center and the small outer tip edge will end up thinner.
At the top and bottom you can see the middle layer of the fin showing after the outside layer was sanded down.
The inset picture shows the diamond shape of the outer tip edge.

Each fin took me one hour to shape. If you don't have the patience, don't tackle the shaping. Simply round the leading and trailing edges and it'll still be recognized as an Honest John.

Friday, November 20, 2015

Estes Honest John, #7240 Build, Part 6, Fin Shaping

The Great Planes Easy Touch sanding block is indispensable for fin shaping.
If you don't have one - get one!
That, and some 220 grit self adhesive sandpaper.
I've explained this technique before.
When sanding the light beige balsa it's hard to judge the thickness of the leading and trailing edges.
We'll darken the balsa edges for better contrast. But, seal the leading, trailing and outside tip edges first. Don't seal the root edges!

Medium CA glue is applied with a Q-tip. In addition to sealing the edge it also strengthens the fins.


After the CA glue has dried, quickly run a permanent marker on just the edge. Make this a quick swipe, don't let the ink soak in.
The CA glue will prevent the ink from soaking into the wood, but still go quickly with the marker.


Here's the fin ready for shaping.

Now the fun really starts!