Tuesday, November 30, 2021

Estes Tazz #7282, Suggested Decal Placement

A few months back, I built an Estes Tazz using the old Estes Gyroc yellow color and decals. This most recent build will use the current kit decals. 

You should do some dry positioning to get a better orientation of the black "swirl" decal and a centering for the TAZZ name decal.

The top edge of the swirl decal sits at tube/nose cone joint but doesn't go entirely around the body tube.

In the lower picture I taped the swirl decal in place to get the Z in line with the swirl point.


Here's both decals in correct position.
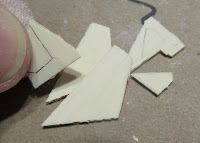
The wing decals are a little confusing. Don't soak them until you are sure of the positioning.

The rear black edges were cut very close to the ink border.
These were set down very close to the squared rear edge. The trailing edge got a wipe of Future with a Q-tip. The excess was picked up with another Q-tip.


Do a dry fit on the vertical stabilizer decals. They probably won't sit as you might first expect.

Monday, November 29, 2021

Quest/Aerotech High Q, #Q5012, Finished


This is a striking model with big graphics. At 2" in diameter, it's about as big as I like to go. Still a manageable size.


Dipping the stickers in water allows for re-positioning and air bubbles are easier to work out from under the surface.
When stickers are done correctly, you really don't notice the edges.

The Metallic nose cone sets it off. 
I like adding some metallic paint as an accent color. It ties in well with the silver print in the stickers
I wish I could have found a candy apple (metallic) purple for the main body.

Sunday, November 28, 2021

So, I'm An Idiot

Today I was called an Idiot on the Estes Model Rocket Facebook page.
Someone posted a picture of a Model Rocket motor taped to a stick. It immediately reminded me of a large bottle rocket.

My response: "In Model Rocketry we try to discourage any resemblance to Fireworks."

What followed were comments: Says who?'
And my favorite: "You're an idiot."

In the late 1960s I got interested in Model Rocketry.
Back then you couldn't get a rocket motor in California unless you secured a permit issued by the State Fire Marshall. Rocket engines were looked on as Fireworks.
It took a lot of work for the NAR, Estes and Centuri to secure the CA Class C Propellant Device designation. Now, the CA State Fire Marshall symbol is printed on all engines.

My past experience led to my response of:
"In Model Rocketry we try to discourage any resemblance to Fireworks."
You might as well light that bottle rocket with a fuse.

Sure I guess I'm the idiot.
I'm the guy who returns shopping carts to front of the store. And, I play the Banjo. 

Quest/Aerotech High Q, #Q5012, Part 5, Ends & Edges

When I can, I like to finish off the edges of a build. 
Years back, my eighth grade wood shop teacher told me: "Anyone can get the flat top surface smooth - a craftsman smooths the corners and inside edges."
 
The clear overlap of the wrap stickers showed some raised lines.

Sharpie to the rescue - 
These lines were easily covered with careful use of the permanent marker. The left picture is the before.
In the right side picture that little white mark is a reflection. Now the overlap is almost invisible.
The ends of the tubes were also painted.

On the left, the black segment was done with the Sharpie pen. The end edge of the motor mount tube also got a Sharpie wipe.

The body tube edge didn't get a good coverage of the sprayed purple paint.
On the right, some purple was rolled on with a Q-tip.
Spray some purple in a small cup and dip a Q-tip. Wipe off the excess paint then roll the purple onto the tube edge.

Saturday, November 27, 2021

Quest/Aerotech High Q, #Q5012, Part 4, Stickers 2

GOTCHA: Here's the upper wrap. The wrap wasn't long enough to meet at the ends.

I didn't want to leave that white gap.
FIX: It was filled with a strip of my "go-to" vinyl, Contact Paper Blackboard Covering.

The vinyl strip isn't a full gloss, but it's better than the white band. The flat surface of the Contact Paper fill strip was "shined up" with some Future floor finish later on.

As I understand it,
TRIVIA: The High Q originally a two stager. The booster (Stage "1') was dropped before it went into production.
The "2" on the fin is left from the two stage version.

Two strips of masking tape helped with the positioning of the "2".
I wanted to be sure it was square and centered.
The tape was set down while the sticker was cut and still on the backing. Set the tape right at the sticker border edge.

With the tape in place, then peel off the backing and set to the edges of the sticker against the positioning tape. Remove the positioning tape.

There are three Quest logos that are spaced evenly around the tube.
I set mine down the fin line and directly above the masked lines down the body. Note the center pencil line on the tape.

Another strip of tape let me line up the left side of the sticker.

Friday, November 26, 2021

Quest/Aerotech High Q, #Q5012, Part 4, Stickers 1

GOTCHA: Some of the die-cut stickers weren't cut completely through the upper layer. It took a few passes with my knife to free the stickers. 
These are plastic stickers, not water slide decals.

TIP: I recommend dipping the stickers in a dish of water and wetting the body tube before setting down  the sticker. 
The water allows lifting and repositioning of the sticker to set them into the right position.

TIP: Wash your hands before handling the stickers. Oily fingerprints will show through on the finished model. It helps to lift and initially set the sticker onto the model when stuck onto your knife blade. Avoid touching the sticky back.
The first sticker down was the large model name. It centers directly over the white fin line.

The low end wrap sits behind the trailing edge of the fins.

TIP: Start and finish all body wrap stickers in a line on the back side (launch lug side) of the model.
Notice the body roll wraps weren't long enough to meet at the back!
The smaller lower wrap doesn't matter with the start and finish points over black paint.
See the next post for a concern with the upper wrap.

Thursday, November 25, 2021

Quest/Aerotech High Q, #Q5012, Part 3, Masking

No CWF and filler/primer steps shown on this build. The grain filling methods were standard.
   
There are four colors on this model - 
White, Purple, Black and a Silver nose cone. It's not an easy mask!
Most of the lower body is purple, one fin was masked off to stay white.

TIP: Most of you know this - Spray lightest colors first. On this rocket the gloss white was first sprayed, then purple followed by the black.


6" down from the top of the body tube is masked off to leave the gloss white.

The nose cone was sprayed off the body with Rusto Metallic Aluminum.
TIP: Spray metallic paints in light coats. Metallic paints tend to be thinner and can easily run.
Here's the confusing black mask. The picture shows the initial line of Scotch tape, then masking tape and plastic bags covering the larger areas.

1/3 of the body is painted black. The black strip runs vertically. The picture on the right side is 1/2 turn to the left.

My confusion was where the 1/3 stripe should fall. The instructions aren't clear. I set the black paint position so I wouldn't have to mask down the middle of the launch lug.
Masking the back of the model gives a better visual spacing for the big HIGH Q sticker over the opposite side purple paint.

My mask wasn't perfect, there was a little of the paint edge pulled up.

On the left is a piece of Scotch tape set over the rough line. Some Black paint was sprayed in a cup and brushed onto the mask area. Be sure to wipe excess paint off the brush before doing a touchup like this.
The picture on the right shows a good blend of the brushed ACE Hardware enamel spray.

Wednesday, November 24, 2021

Quest/Aerotech High Q, #Q5012, Part 2, Shock Cord & Parachute


The Kevlar line is doubled coming off the upper centering ring in the motor mount.

This ties to the 1/4" elastic shock cord using a simple overhand knot.

Note: There is a bit of glue on the end of the cut elastic to keep it from unraveling.


The back end of the 29mm motor mount extends 1/4" out the back of the model.

I glued the motor mount in after the model was painted and stickered.
The Kevlar line was pushed through the inside of the motor mount to keep it out of the sway while the glue sets up.
Here's the parachute and shock cord tie to the nose cone base.

TIP: I tie small overhand loop knots at the center point of the shroud line loops. These were tied together using some 150 lb. Kevlar, then the Kevlar tied to the nose cone lug.
If these lines are placed side by side when tying to the Kevlar, you can end up with a tangle free parachute.

Here's an article I wrote for the Apogee Peak Of Flight newsletter that better explains how to tie Tangle Free Parachutes: CLICK HERE

TIP: Notice the loose tail end of the shock cord is tucked inside the hole at the base of the nose cone shoulder. It's out of the way and won't get caught between the nose cone and body tube.

Tuesday, November 23, 2021

Quest/Aerotech High Q, #Q5012, Build Highlights, Part 1, Engine Mount

Some descriptive copy from the Quest website:

Flies on 'D', 'E', and 'F' motors.

High-Q is a great looking and performing mid-size rocket. Over 30 inches tall, the kit features blow molded plastic nose cone, laser-cut balsa fins and a rugged 29mm diameter motor mount. Flights with an Aerotech F32-6W will go to almost 3,000 feet. Then your High-Q will recover gently on the big 18-inch fabric parachute. Includes big, easy-to-apply self adhesive decals. Also includes 24mm motor mount adapter that allows you to use 24mm diameter motors.

Recommended Motors: D12-3, D12-5, E9-4, E9-6 - Aerotech E20-4W, E20-7W, F32-6W, F20-7W.
This rocket designed by internationally famous designer Scott Branche.
______________________________________________________________________

This won't be a full build, most of the the construction is standard.
I'll concentrate on a few high points, masking, painting and the stickers.

My two kits included a 16" yellow, rip stop nylon parachute.

A 24mm engine mount is included - This is the instruction illustration.
GOTCHA: I would recommend gluing the rear centering ring 1/2" up from the bottom of the motor mount tube.

The Quest engine hook won't spring back if it doesn't have room to flex.
Moving the centering ring forward allows for some movement of the spring.

Monday, November 22, 2021

Rocketship Games MMX Hawkeye, Finished


The stickers look good. They are thin so the edges aren't that noticeable.

I think the gray, white and black trim colors look good and were easier than masking a tiny rocket.

The two black launch lug "guns" are actually even, there is some camera distortion.
The kit supplies two "Hawkeye" name stickers, the Estes kit only had one. I applied one on each side.

In the Estes kit, the red square stickers go on the base of the nose cone. Stickers don't have much "give" and wouldn't probably conform to the NC taper so I set them back on the body tube.

I like MMX models. They are as big a build challenge as larger rockets and don't take up as much space in the Rocket Room between flights.

Sunday, November 21, 2021

Rocketship Games MMX Hawkeye, Part 8, Stickers


The kit supplied stickers are die-cut.
TIP: Don't set these in place using water! The top surface ink isn't sealed and the ink bled on the first decal.
There are extras so this wasn't a concern.


Some of the stickers are tiny!

I found it easier to place them from the tip of my hobby knife.
There is no streamer or parachute, the model uses nose-blow recovery like the larger original Estes kit.

Tie the Kevlar line to the nose cone lug. Stuff the loose end inside the hollow base of the nose cone.

TIP: Here's a general tip for friction fitting some engine applications.

Instead of wrapping tape around the base of the motor, try some thin strips down the casing.
Notice the top of the tape, how it rolls over the casing lip. This prevents the tape from folding over when pressed into the body tube.

In the picture at the right, you can see the tail of the tape strip sticking out at the nozzle end.

Saturday, November 20, 2021

Rocketship Games MMX Hawkeye, Part 7, Paint & Details

Here's the model after an initial white undercoat and sanding down the fillet blobs.

The instructions suggest white fins and a gray body.
I thought that would be some difficult masking as the model is so small.

I opted to paint it more like the original Estes Catalog picture, an overall light gray with a white nose cone.
It occurred to me - Wait to glue on the small faux motor tubes - leave those white. Glue them on after the light gray overall paint dries.
Also, wait to glue on the black plastic launch lugs. 


On the left is the main body painted an overall light gray.
the nose cone was left a gloss white.

On the right side picture you can see some of the gray paint scraped off to glue on the white faux motor tube.
One motor tube is glued on.
The two launch lugs were left black, not painted. These were glued in place using medium CA glue.

Squeeze out a drop on scrap cardboard.
The lugs were held with tweezers and drawn through the CA puddle leaving a thin line of glue on the underside. 
Set the lug in place using the tweezers. Note the scraped line exposing the body tube surface for the second lug on the left.

Friday, November 19, 2021

Rocketship Games MMX Hawkeye, Part 6, Engine Block & Fin Gluing


I made a "Block and Tackle" (Jim Flis idea) to set the engine block in the body tube. 
A simple 1/8" wide wrap of tape stops the engine casing when pressing the engine block in place. This will leave a friction fitted MMX engine with 1/8" extended out the back of the tube.
Here's the toothpick included in the kit.
I measured just below the engine block position so it would hit the glue before ending up in it's location.
The Kevlar line is tied to the loop at the top of the red engine block.

Mark the toothpick with pencil,
A drop of glue is applied to the top of the toothpick and set in the tube using the pencil line as a depth gauge.
The block is slipped in and pressed into place with the taped engine casing.


The wings and rudder fins are glued onto the laser cut lines on the body tube.

The forward small vane fins are glued to the lines towards the front of the tube.

Dry fit the Dorsal Bar piece before applying any glue. You may have to widen the slot to slide over the Rudder fin.
The Dorsal Bar piece is glued over the top rudder fin.

Mine overhang the back by about 1/16". That will be trimmed off after the glue dries.

Thursday, November 18, 2021

Rocketship Games MMX Hawkeye, Part 5, Filler/Primer Sand & Kevlar Tie


This shows the before and after sanding of the filler/primer shot coats. You can easily see the gray filler/primer left in the grain pores when it is sanded to surface.
The CWF filler fills 3/4 of the balsa.
The filler/primer fills any remaining grain.
A simpler two-step process than the old four coat sanding sealer fill.

Here I've sanded the filler/primer off most of the upper end of the main tube. After sanding, the laser cut fin positioning lines were still visible and useable.
This is the 3D printed combination engine block and Kevlar tie point.
This piece has ridges, like most of the 3D printed parts I've seen. The nose cone was much smoother. The ridges won't matter, the engine block won't be seen inside the body tube.

As suggested in the instructions, I applied some glue to the end of the Kevlar to keep it from unraveling.

Wednesday, November 17, 2021

Rocketship Games MMX Hawkeye, Part 4, Dorsal Bar Fill and Nose Cone & BT Smoothing


The dorsal bar is thin and delicate.
I had one side crack and glued it back with CA. 
The original kit didn't have the slot extending to the rear. In the Estes kit the rectangular piece was glued 1/16" forward of the Rudder fin.

I sanded the filler/primer off the top with the piece still taped to the scrap cardboard.


The nose cone is very smooth for a 3D printed piece.

The shoulder was a bit wider than the main body tube. I reduced the side diameter with my sanding block, followed by smooth sanding with 400 grit.
The body and Faux motor tubes had the seams filled with CWF and sanded to surface.

Here I'm ready for a shot of filler/primer. Some Q-tips were folded over to make short painting wands. I used a baggie to cover my hand and keep the paint off.

Tuesday, November 16, 2021

Rocketship Games MMX Hawkeye, Part 3, Balsa Prep and Primer


The balsa grain was filled while the parts were still on the laser cut sheet. I wouldn't normally fill the balsa this way, but the pieces are very small and the balsa thin.

Here I'm breaking apart the the pieces off the sheet.
A bit more CWF was rubbed into the edges and allowed to dry.
On the left, some 400 grit was wrapped around a dowel to sand the round trailing edges of the wing pieces.
The leading edges were rounded.


The pieces were set down on scrap cardboard for a shot of filler/primer.
There is an extra vane piece.
The slotted "dorsal bar" (runway) piece is not shown here.

Monday, November 15, 2021

Launch! Orlando R.O.C.K., November 13, 2021

Our normal First Saturday of the month launch was cancelled because the field was flooded. 
We re-scheduled for the following Saturday. There was heavy rain on Thursday and lighter rain on Friday. Water was in small pools throughout the field. Good thing I wore my old shoes!
Winds above the tree lines pushed a few rockets into the adjacent field. 
I'm a wimp when it comes to losing rockets and wasn't up for long recovery walks in the water. I kept to lower power engines.


Roger Smith (Jonrocket.com) designed some new adjustable launch platforms, cut from ABS plastic on his CNC machine. 
These easily mount on a sawhorse base and accept 1/8" and 3/16" launch rods. Full rotation and angle adjustments.
My BONES rocket didn't get a launch in before Halloween.
The body was made from a Dollar Store candy casket.

Not a good start for the day - 
Check out the flame of the A10-3t engine. It blew off the skull nose cone, catoing right after it cleared the rod.
No real damage, shock cord snapped and the neck body tube dented. It'll fly again next Halloween.


Another test of a possible Odd'l Rockets kit - 
The Bruce Levison designed CORKSCREW with an A8-3.

It hasn't been painted, this is a stability test model. 
Heavy walled BT-20 and a BT-70 sized offset ring provides stability.
The original Odd'l kit was a BT-5 based model.
It did some wiggling on the way up as planned.


The Estes SPACE TWISTER kit had a very weak BT-50 tube. 
I slid in a long 50 sized coupler to strengthen the tube wall. That probably added too much weight.
The A8-3 probably got it to 100', spinning on the way up. It should be a good model at the smaller Soccer field with a B6-4. 


Tom Dennon launched his Estes ARV Condor.
This design reminded me of the old plastic Cox Space Shuttle America.
The Estes design had some plastic "holds" for the two gliders, but most of the build was balsa.


I caught the ejection.
One glider got tangled up in the shock cord, the second glider flew in.

I got two MicroMaxx models in the air - 

The ASP HAWK showed a little wiggle after the boost stage.
Streamer eject after a 80' altitude.

The new Rocketship Games HAWKEYE altitude surprised me, probably reaching 125'. There is no chute or streamer, just nose blow recovery. I was sure to keep an eye on it after apogee.


Last up was my Estes Citation PATRIOT with a B6-4.

This model has a Big Bertha flight pattern, Low and slow to 225'.
I taped the 18" chute closed about halfway down so it wouldn't drift.

Six it the air with one CATO.
Wet field with some winds but it was great to get out of the house.
My old shoes are still drying out!