Saturday, December 31, 2022

Top Ten Builds for 2022, Part 1

An end of the year tradition - 
This annual list puts some of the blog builds in order of favorites from 10 to 1. 
(This annual post it the tough one, it takes a few hours to gather info, pictures and links.)
These are the builds that were the high points this year.

Choices are my own based on the overall build experience and some flight performance.
Your favorites might be different!
No bad builds this year, all kits were well produced. 


10.  ASP Micro Sandia Sandhawk
Another great MicroMaxx model from ASP!
A bit taller than most MMX rockets, still impressive altitude from the 1/8A motors.
To see the complete build: CLICK HERE


9. New Way Squared Red Max 
A great take on the Estes classic.
A bit smaller than the BT-60 model. 
The kit contains the white decals 

To see the complete build: CLICK HERE


8. Quest Enerjet Big Dog
A BIG demo model. Graphics are fun but these are peel and stick. A bit hard to find the right matching shade of "red" for the nose cone.
To see the complete build: CLICK HERE


New Way Mars Snooper II
Another great New Way kit, this time a round tube clone of the second Mars Snooper design. It is on the right next to the Estes original.

To see the complete build: CLICK HERE


Quest Enerjet Minotaur 
Six SRBs on this one!
A few kit pieces may not match the parts list in the instructions. 
A very impressive model, but lots of stickers. 

To see the complete build: CLICK HERE

The countdown continues tomorrow!

Friday, December 30, 2022

Estes Maxi-Brute Honest John (Kit #1269), Part 13, Thinning Down The Fin Sides

You are instructed to thin out the fin edge overhang to 1/2 of the original thickness. This is much like the old two-sided vacu-form fins in the older Centuri style Saturn 1B and Saturn V kits.
   

The big fin plastic halves are flexible.
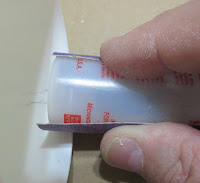
Don't sand like the picture on the right - 
Sand as shown on the left, flat over two sides.
This prevents any scratching (and possible  thinning) of the inside wall.


After some scratching up the interior of the first fin half,

I taped the inside wall to protect the surface. 


Notice the forward fin half. The side edges have been thinned.

Note the inside corners are sharper, more defined than the unsanded fin in the back. 


I ran a Sharpie marker over the edges to show the thickness.

On the left is a fin half, not yet sanded and thinned out.
On the right is a sanded, thinned fin edge.

Thursday, December 29, 2022

Estes Maxi-Brute Honest John (Kit #1269), Part 12, Launch Shoes Undercoat & Tube Seam Fill

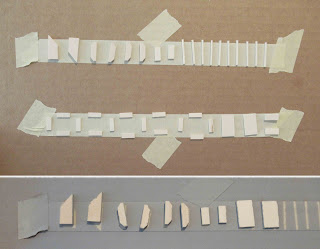
The root edges of the launch shoe assemblies were masked off using 1/8" wide strips of masking tape.
All were stuck down to the sticky side of masking tape on scrap cardboard for a white spray.


The inset picture is after the white spray. There is still some uneven surface and basswood grain grain left. All flat surfaces were sanded smooth using 400 grit on a block.


The body tube and launch lug got a seam fill using Elmer's Carpenter's Wood Filler (CWF).

This was sanded to surface using 400 grit on a block.
These tubes were rolled tight with a narrow seam. I wish tubes were made this well today.

A close scan and I could see where the filler didn't stay in the seam. I mark these with a pencil,

More filler was applied with a knife blade and sanded down. Sometimes a second fill stays in the rut.

Wednesday, December 28, 2022

Estes Maxi-Brute Honest John (Kit #1269), Part 11, Gluing Up The Launch Shoes

The 1/16" thick side strips (Part G) are glued on 1/16" down from the top of the center piece (Part D).

On the left, I used an extra G piece as a spacer so all the strip positions will be even. The extra strip was set on top of the glued piece while the glue was still wet.
I pressed my sanding block until the spacing strip was even with the top of the D piece. The extra spacing strip was removed leaving the glued strip in the correct position.


Here's the view from the top - 
Both G piece strips are glued on, inline and equally spaced.


The overhang on both sides was on purpose.

Trim off the bulk of the overhang with a knife then sand the ends to the front and back faces of the D piece.


Here's the backside showing the strips sanded to surface. 
I tried not to sand into the wood or remove the gray filler/primer.

Tuesday, December 27, 2022

Estes Maxi-Brute Honest John (Kit #1269), Part 10, Spin Nozzles Units, Part 2

Mentioned in the last post - 
The curved top and bottom will be sanded through first.

On the right, the curved edges are trimmed off leaving the straight sides. 

The straight sides are trimmed off with a sharp knife and straight edge. 
Sand and clean up the straight sides with a sanding block.


Do some test fitting on the low nose cone section.

In the top picture, there is still a gap on the straight sides. This tells me I've got more sanding to do on the 220 grit wrapped around the lower nose cone piece.

Here's a better fit, all the way around the piece.


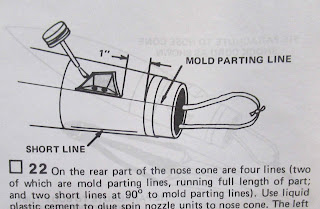
The spin nozzles will be glued on (later) with liquid cement against the molded lines around the nose cone base.

Monday, December 26, 2022

Estes Maxi-Brute Honest John (Kit #1269), Part 9, Spin Nozzles Units, Part 1


Score around the raised spin nozzles leaving about a 1/16" edge. Bend and crack off the sides.
Hang onto the larger scrap pieces. You might need them for patches on the fin edges. Anytime I've worked with vacu-form parts before, I've needed patch plastic.
Looking ahead - 
The instruction illustration shows a spin nozzles being glued in place. The drawing shows a flat edge border around all sides of the spin nozzle piece.

That's not how they end up after sanding in the bottom curve.
I taped some 220 grit sandpaper around the low nose cone piece. 
Go back and forth in a straight line (here going left to right, right to left) over the sandpaper.

The two side curves will be reduced first, the straight top and bottom edges are reached last.

Saturday, December 24, 2022

Estes Maxi-Brute Honest John (Kit #1269), Part 8, Nose Cone Fitting


I did notice a raised area on those sides of the fitted nose cone.
Look inside and find some thicker plastic down the inside seams. 

I wrapped some 220 grit around a small bottle and lowered the bump.


Here's the fitted nose cone - 
IT'S BIG!


The top of the lower NC section is flat. 
Holes need to be made in the bottom to attach the 1/4" wide shock cord.

Notice I marked the hole locations before drilling into the plastic.
TIP: Don't drill the holes on the molding seams. That's a weak point (thin plastic) in the nose cone mold.


The instructions suggest drilling the holes by spinning a knife tip.
Well - 
Use an old knife blades to start the holes. 

Then, I switched over to a half round diamond file. 
You can also use a Dremel tool to make the holes.


The holes are around 1/4" diameter.
The sides should be smooth. A sharp edge could wear through the shock cord.
 

Friday, December 23, 2022

Estes Maxi-Brute Honest John (Kit #1269), Part 7, Nose Cone Cut & Trim


The lower end of the nose cone and the tail cone are molded in one piece.

Cut them in two around the deep indent line with a razor saw.


You are left with a rough ridge on both parts.

I sanded down the lip using 220 grit on a sanding block. Follow with 400 grit to smooth it out.

The low section of the nose cone won't fit into the upper section without trimming the inside molding lip down. 

The instructions recommend sandpaper, but I chose to do some careful shaving with a new #11 blade.


Almost all the molding lip is trimmed and sanded.

Slide on the upper nose cone section and check the outside seam for any raised areas. A raised spot might require some more trimming of the inside lip.

Thursday, December 22, 2022

Estes Maxi-Brute Honest John (Kit #1269), Part 6, Truing Up & Filler/Primer


Here's a Part A after truing up with a sanding block.
Make sure all the sides are square and flat as you can get them.


All the launch shoe pieces (and some extras) were stuck down to a spraying cardboard. One (heavier than normal) spray of filler/primer followed.


These pieces were flipped over and sprayed on both sides. Both sides of these parts could be seen on the finished model.

Basswood is smoother than balsa, but will still show a grain.

On top is the piece sprayed with filler/primer.
Below is a piece after sanded to surface using 400 grit on a block. Note the gray filler/primer left in the shallow grain and smoothing out the surface.

After all parts have the primer sanded to surface, the assemblies will be glued up in a later post in this series.

Wednesday, December 21, 2022

Estes Maxi-Brute Honest John (Kit #1269), Part 5, 1/16" Thick Launch Clip Pieces


Here's all the pieces cut from the 1/16" thick basswood.

I ended up cutting extras and will use the best  parts.


I'd recommend storing all the small pieces in small bags. You can find the bags in Craft Stores as Jewelry bags.


One the top is how I first cut out the long side pieces.

On the bottom is after I sanded down the wide side making the sides even and square.

Tuesday, December 20, 2022

Estes Maxi-Brute Honest John (Kit #1269), Part 4, 1/8" Thick Launch Clip Pieces


If the launch clips were assembled as shown in the instructions, it would be very difficult to fill all the balsa grain pores. I elected to make the pieces out of basswood.

There are two "Part D" pieces cut out of 1/8" basswood.
Note these two pieces are not "square", the top line tapers down.  

There is one disadvantage to using basswood.
It can break in the corners down the grain line if you haven't made a complete cut. 

Four of the Part A pieces are cut out of 1/8" thick stock.
I cut out the rectangles, then cut off the corners using a single edge razor blade. The template was set on the piece to get the correct angle.

Monday, December 19, 2022

Estes Maxi-Brute Honest John (Kit #1269), Part 3, New DIY Centering Rings


I made four centering rings to double them up.

All four were stacked for sanding and fitting.


On the left is a good slip fit of the rings in the main BT-80 body tube.

Two sets of two rings will be laminated and glued to the main tube at the dimensions in the instructions. Not yet - For right now I'm prepping parts that will be needed for the build. 

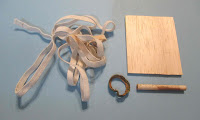
This may have been the 1/8" thick balsa piece supplied in the original kit to make the scale launch shoes. It is water stained and will be replaced.

The instructions have you assemble them out of 1/16" and 1/8" thick balsa.
Looking ahead at the complexity of the assemblies - It'll be much easier to cut and assemble them out of smooth basswood. Balsa grain would be difficult to fill.

Sunday, December 18, 2022

Estes Maxi-Brute Honest John (Kit #1269), Part 2, New DIY Centering Rings

This may not be a complete build and finished model. This big build has a pretty big footprint, I'm am running out of storage space. 
I will be concentrating on the fine details - 
The multi-piece launch shoes, two piece nose cone fit, gluing up and smoothing the vacu-for fin edges  and the cardstock ring wraps.

 
Most of the kit was in great shape - The centering rings weren't useable.
There was some water damage and delamination.
I could order new ones, but what fun is that? Sometimes it's quicker just to make my own.

I used the old rings to trace onto some white mat board. I traced four, two pair will be laminated  together. The original rings seemed thin if I decided to go with anything more than a D12 engine.


The centers are cut out using a new #11 blade. 
TIP: You'll find it easier to cut the centers first, then the outside of the ring.

Go slow, making the circle arc as smooth as possible.


Dry fit the ring onto the BT-50 tube.
The first cuts usually give a tight fit over the tube. Use some sandpaper around a fingertip to widen the hole to a good, friction fit.


After the centers are established,

Cut the outside line using scissors. More in the next post - 

Saturday, December 17, 2022

Estes Maxi-Brute Honest John (Kit #1269), Part 1, Parts


The BIG parts - 

The BT-80 body tube
The tail cone and lower half of the nose cone
The upper end of the nose cone. 


Two new Centering Rings (See the next post to see why I made new centering rings.)

BT-50 engine tube and stuffer tube

The vacu-form fins with nose cone spin rocket nacelles. 
These sheets were cut half to fit into the smaller box.


Stickers!
I'll come up with something better than the thick, glossy stickers.
These parts weren't usable and will be replaced - 
1/4" wide elastic shock cord
Engine Block
3/16" launch lug
1/8" thick balsa for the launch clip/lug details. I'll make those parts out of basswood.

Not shown:
Two 24" parachutes
1/16" basswood