Showing posts with label Tools. Show all posts

Tuesday, August 4, 2026

School Supplies - Rocket Supplies


An annual reminder - Back To School Supplies are on sale!

I don't use school glue. I use wood glue.
But - the wood glue nozzle is too wide! 
Buy a bottle of school glue, and change the two nozzles.
The threads are the same.


At the Dollar Tree store - 
Clay nose weight for $1.50.

It's also good for trimming boost gliders.


Occasionally I can use glue sticks.

They are great for paper body wraps.


Another buy at the Dollar Tree store.
Mylar table cover sheeting for streamers and parachutes.

Also available in a chrome finish.
This sheeting is pretty thin, it's more prone to ejection charge  damage. 
So, be extra careful when packing the wadding: CLICK HERE


Tuesday, April 14, 2026

White or Yellow Glue?


When I starting building model rockets in 1969, 
white glue was recommended in the Estes kit instructions - that was all we had in our house.
Centuri recommended white glue or their own "Superbond" yellow glue. Centuri Superbond was actually rebottled and relabeled Titebond.

When I got back into the hobby in 2005, I started back building with white glue. Over time, I switched over yellow glue. I still use white glue for carded rocketry where outside fillets are visible.

I copied the following information after an internet search:
__________________________________________________

Key Differences Between White and Yellow Wood Glue

Setting/Working Time: Yellow glue sets faster (5-10 minutes) than white glue, making it better for quick clamping, whereas white glue allows for longer, more complex assemblies.

  • Sanding/Finished Texture: Yellow glue dries harder and is much easier to sand without gumming up the sandpaper. White glue stays slightly softer and can become gummy, making it harder to sand properly.
  • Heat Resistance: Yellow glue has higher heat resistance, which is beneficial when sanding, as the friction from sanders can cause white glue to soften and turn sticky.
  • Cleanup and Water Resistance: Both clean up with water, but yellow glue is generally more water-resistant (often water-resistant rather than water-soluble) compared to white glue, which is generally water-soluble.
  • Color/Appearance: Yellow glue dries slightly translucent (often a yellow-tinted amber) whereas white glue dries clearer.
  • Application: Yellow glue is thicker, which helps with gap-filling, whereas white glue is often thinner and is commonly used for school projects or hobby work.

Monday, February 9, 2026

New Hole Punch


I just got a new hole punch. 
The punches get dull after a few years of use and it's hard to find replacement parts that fit. This is heavier duty and replacement hole punch tubes are included!
Also in the box: A wrench to tighten or change the cutting tubes and a 6" long metal ruler. 

To see it, CLICK HERE
For $13.99 it's probably the best available.

Centering Rings: I use hole punches for engine hook relief notches in centering rings and launch lug holes.
Launch Lugs: Rotated to the largest punch (4.5 mm), it's a perfect friction fit for sliding in a 1/8" diameter launch lug.
Parachutes: Instead of tearing holes with a pencil tip, the smallest diameter punch works perfectly for shroud line holes in a plastic parachute. 
TIP: Be sure to use thin cardstock under the thin chute material for a clean punch. 

Rotary punches are handy for belt holes and many other household uses.

Thursday, February 6, 2025

Using Scissors On Kevlar? TIP

There's some talk on the forums about scissors.

Some builder have mentioned using common household scissors to cut Kevlar! Household scissors are meant to cut paper and fabric.

Growing up, I can remember hearing may Mother saying: "Where are my good scissors?" They wouldn't remain the "good scissors" for long after cutting a few lengths of Kevlar. Kevlar is said to be five times stronger than steel!

After some effort, you can cut through Kevlar using scissors. But, the end cut could be unraveled and frayed.

For a quick clean cut, buy a wire cutter. Or as shown here - a wire sidecutter.

Tuesday, February 4, 2025

New Painting Wands


I'm overdue for some new painting wands! These are painting handles that slip into an engine mount and lock in the engine mount.

You'll need dowels, 7/16" in diameter to slide into used 18mm engine casing. Cut the dowels to about 15" long.

No reason to knock out the clay nozzle, the dowel end rests against the nozzle.


The dowels will be friction fit inside the engine casing.

Draw a pencil line as a start point and to count the winds of tape. Do six wraps of tape and test the fit in the casing.


After getting a tight fit,

Sand and round off the upper end of the casing to make it easier to slide into the engine mount tube.


Done! 
Four new 18mm painting wands.

When spray painting, I hold the models horizontally, and turn the models after each spray pass.
Sticking the wand in the ground and spraying the rocket vertically is inviting paint runs.

Wednesday, December 4, 2024

Ultrasonic Knife?


Hanboost C1 True Wireless Ultrasonic Cutter
Ultrasonic 40,000 Vibration - True Wireless - LED Light - 3 Power Mode - Full Metal Body
Lightweight & Portable - Fast USB Charge

To see it: CLICK HERE

I wonder how well it would cut balsa?
Are the replacement blades easy to find?
Could come in handy cleaning up 3D prints.

Tuesday, October 18, 2022

Good Sanding Blocks?

On YORF, Don A. asked:
"I have two Great Planes Easy-Touch hand sanders that I use all the time.
I would like to get some more but it appears that these are OOP now.
Any ideas for anything similar? Something that has a smooth metal surface that self adhesive sanding paper can be attached to and that has a comfortable handle."

Tigerhawk answered:
"The DU-BRO company sells the aluminum sanding bars."


CJU gave a link:


These look identical to the OOP Great Planes Easy Touch Sanders. 
On the right is the profile view. That raised hand grip is comfortable and affords a lot of control.
For me, they are the best sanding blocks out there.
I have two - one loaded with 220, the other with 400 grit. If I don't have adhesive backed sandpaper, I can adhere it to the flat bottom with an even coat of a glue stick.

For a post about good, cheap self adhesive sandpaper rolls - CLICK HERE 
Making sandpaper last much longer: CLICK HERE

They are twice the price of the older, OOP Great Planes blocks, the 5" X 2" long block at $14.99, before shipping! But I would pay that much for them without hesitation.
These blocks are that good!

Thursday, October 8, 2020

X-Acto Knife Sharpening?

You can sharpen a #11 X-Acto blade. 
I used to do it all the time on a sharpening stone and oil. The blade was usable, but not as sharp as a new blade.

I picked up a hand held knife sharpener on Amazon. This is actually a Sharpal Survival Tool. I like it because it is quicker and doesn't take up much space on my workbench. 

There are other features on the tool - a Ferro Rod for fire starting, a fish hook sharpener and an emergency whistle. I only ordered it for quick knife sharpening. 

Simply draw the blade through the carbide V notch a few times, then through the white ceramic notch.
It did a great job honing a dull #11 blade. It's not quite as sharp as a new X-Acto blade, but it does extend it's usable life.

My (cheaper) break off blade knife is still used most often, but once in a while you need an X-Acto style #11 blade for tight, precision cuts.

Monday, December 30, 2019

Tools, The Essentials - Q-Tips

If you've followed the blog, you know I go through a lot of Q-tips.
I buy the cheap ones at the Dollar Tree Store, 350 for $1.00.

* I use them to pick up glue blobs, where my finger can't reach. They can only be used once, after the glue dries.
* Q-tips are great for working water and air bubbles out from under water slide decals.
* They make great touch-up brushes. Maybe not as good as a decent brush but do work in a pinch.
* The middle tubes are hollow plastic. They work as Micro Maxx launch lugs. These are plastic, so use an appropriate glue to attach to a body tube.
* I use them for the Kevlar shock cord guide tube on replaceable Kevlar engine mounts.

Wednesday, December 25, 2019

Tools, The Essentials - Sharpies!

Sharpies have turned out to be a valuable multi-purpose tool.

Fine Point Sharpies can be used to outline difficult black masking jobs, like the corrugation on the Saturn V.
If your sprayed black paint didn't quite cover the leading edge of a fin, you can run a wider point Sharpie over it. You'll only see the touch-up in bright direct sunlight.

The back white barrel of the pen body is a perfect burnisher. It's great for pressing down detail parts and forming card stock shrouds. (Just be aware of the black print on the white barrel - It could rub off on your finish!)

Saturday, December 14, 2019

Tools - The Essentials, Diamond Needle Files


Small diamond files come in handy when forming details, filing engine hook slots in centering rings,  opening up nose cone eyelets, spin drilling holes and filing down seams on plastic nose cones.

After I bought diamond dust files, I got rid of my old X-Acto metal files.The diamond dust doesn't wear down or load up as fast as the X-Acto files did.
I picked mine up at Harbor Freight: CLICK HERE
10 piece file set, $6.99

Wednesday, December 11, 2019

Tools, The Essentials, Long Tweezers

Long tweezers come in very handy -
Tying shroud line knots in parachute reinforcement rings,
Fishing Kevlar through engine mounts,
Holding small pieces for gluing,
Shoving shock cords into small diameter rockets,
Reaching things you can't get to using your fat little fingers.

I picked mine up at Harbor Freight: CLICK HERE 
6 pieces, $5.99

Wednesday, November 20, 2019

Tools - The Essentials, A Decent Sanding Block, Part 2


Here's the bottom plate.
I wish there wasn't holes in the bottom, these didn't seem to effect the tools use. The sandpaper is stiff enough that it didn't "dimple" into the holes.

The pressure clamps hold sandpaper fairly well, not as good as the older wing nut clamp.
But - Using the sticky back sandpaper from Home Depot, the sanding block works very well. It easily peels off!

Without the open ends of the sandpaper wrapped around the edges and under the top clamp, the red handle top wiggles a slight bit.
I took two strips of the sticky backed sandpaper and set them under the clamp top. The top is snapped in place and the handle doesn't move.


If I didn't have the OOP Great Planes blocks, this would be a good second choice. I would probably have two - One with the sticky backed 220 grit sandpaper and a second block with 400 grit.

Tuesday, November 19, 2019

Tools - The Essentials, A Decent Sanding Block, Part 1


Here's the sanding block I used for a few years before finding the Great Planes Easy Sander. This is the Warner #436, made for drywall work.
The upper block and wing nut clamped down and tightly held a quarter piece of sandpaper.

They don't make the wooden blocks anymore.
This is the new Warner block, #34436. It's plastic now, the wing nut is replaced with black plastic clamps.
I picked this one up at Lowe's for about $3.00.


The two black clamps are pinched towards the center and the top lifted about 1/4". The sandpaper sheet can be slid out and replaced.
That weird shaped red knob at the top fits the hand comfortably.
More in the next post - 

Wednesday, November 13, 2019

One Dull - One Sharp! TIP


I have one #1 X-Acto handle.
I usually keep two blades handy, one dull with a broken tip and a second, new sharp blade.
I switch back and forth between the two blades.

The dull one on the left is used for scraping and laying CWF in the seams on body tubes.
The sharp on to the right is used for fine cutting.
I still use the break-off blade for the majority of cutting jobs. I switch to the X-Acto #11 blade for tight, exacting cuts.

Monday, November 11, 2019

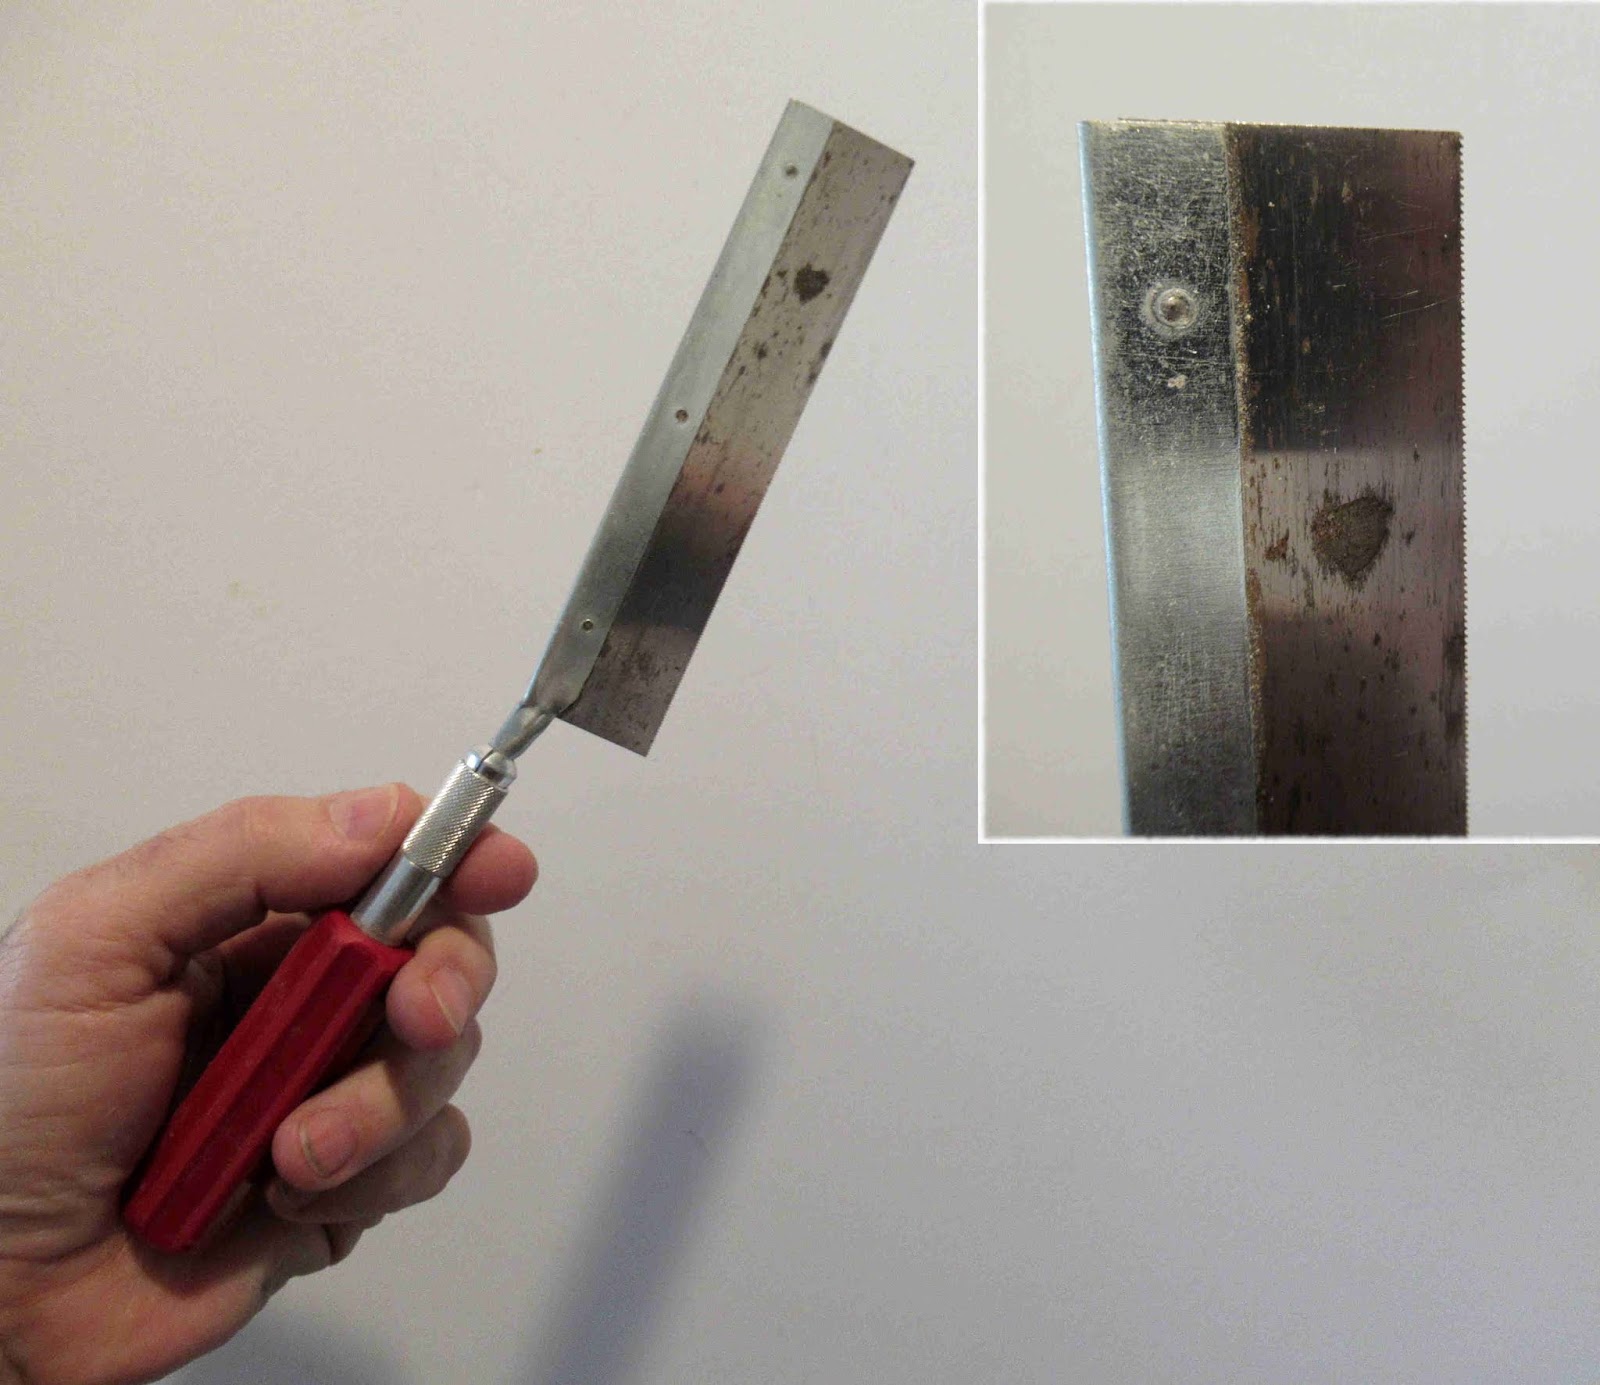
Tools - The Essentials, Razor Saw

Not much to say about this one, it does come in handy.
The red plastic handle is an X-Acto #5.
Buy a blade with the finest, smallest teeth you can find. A good blade can last for many years.

I've used a razor saw on thick balsa, balsa bulkheads, nose cone shoulders, basswood detail pieces and an occasional coupler. A razor saw is not the best tool for cutting thin body tubes.

Monday, November 4, 2019

Tools - The Essentials, Hole Punches

The rotary punch is one of the handiest tools I own. These are normally used to punch holes in leather belts.

Spin the spoke to pick the right diameter. On the right is a typical punch for an engine hook. You can also use this to punch small hole for altimeter vents. But, you are limited how far down the tube you can place the holes.

TIP: Don't just blindly punch a hole. Set the punch at the hole location and lightly squeeze the handle - don't punch through the card stock! Release the handle and check the embossed circle impression. If it is centered, set the cut tube over the ring and then punch all the way through. If it isn't right, adjust the position of the punch tube.


Another handy tool is a standard office hole punch. These make a clean 1/4" body tube hole, sometime used to vent off ejection charge gases.

TRIVIA: How do you think Estes punched all those holes in the old Scout kit body tubes?

Saturday, November 2, 2019

Tools - The Essentials, Aluminum Angle


Here's how the old instructions would have you mark a body tube fin locations. Set the tube into a door frame and draw a straight line with a pencil.
For ease and more accuracy, buy an aluminum angle. This one is 3/4" on one side.
CLICK HERE

They are sold 36" long. cut it into two 18" lengths.

I've used an aluminum angle like this to mark BT-5s all the way up to the 4" diameter Saturn V tube.


TIP: You can also check the alignment of launch lugs if the lug is glued on before the fins.

Thursday, October 31, 2019

Tools - The Essentials, Sanding Blocks Part 3

After some sanding you should check for build-up on the sandpaper.
These little nubs of filler/primer can get large enough to scar your balsa when sanding!

On the right is a soft brass wire brush I picked up at Home Depot. Be sure to look for a soft brass brush like you could use on suede shoes.
Budget TIP: In the sink, run some water over the sandpaper. Using circular motions, brush off the loaded up gunk.
Your sandpaper is as good as new! Well, close to new and reusable anyway. Each time you clean off the surface the sandpaper becomes a slightly finer grit. You can also wear down the brass bristles over time. My first brass brush lasted for years.

After removing most of the filler/primer from the tube or fins with 220 grit on the block, I lightly sand and smooth out any scratches with a small piece of 400 grit. (Shown below on the left.) This takes off most all of the gray filler primer filling any remaining balsa grain or tube seams.

Here's the same piece of filler/primer loaded 400 grit before -
and after brushing out the filler primer.

These new premium sandpapers are more expensive than the old black sandpapers. But, the new stuff can be brushed off and used over and over again. I'll probably use one single small piece like this to sand a Big Bertha sized model, brushing it off every time it gets loaded up.

OPINION: CWF does not seal the wood! Old style Sanding Sealer does seal the wood surface. Sanding Sealer or Balsa Fillercoat is hard to find today and expensive when you do. Body tubes are rarely sealed before spray painting. Why bring this up?
I sand my models dry - no wet sanding (if I do it at all) until the model has a fairly heavy, dried coat of enamel.
CWF is water based, the balsa can still absorb water when wet sanding and swell up. Kraft tubes will absorb water. Wet sanding will slow down the "loading" of sandpaper with filler/primer. If you decide wet sand, do it only after color coats are sprayed using very fine sandpapers. Keep the water away from the open ends of the body tube and engine mount.
Watch a video of someone clear coating a guitar or piece of furniture. The wet sanding is only done after a few color or clear coats have dried. Be very careful not to sand through the color or clear coats.

Wednesday, October 30, 2019

Tools - The Essentials, Sanding Blocks Part 2

Here's my favorite sanding block - The Great Planes Easy Sander. It's made of aluminum, the top fits your hand very well.

The problem - 
Hobbico hasn't sold them for a while. Remember that bankruptcy? CLICK HERE
EDIT: Dubro is selling these sanding blocks. They seem expensive, but are worth it. CLICK HERE

If you find one at your local hobby store - BUY IT! I liked these enough to buy three when they were still available. Two new 5.5" long Easy Sanders are still in the package.

You can still find the adhesive backed sandpaper rolls made for the sander. Their 220 grit seems a bit finer than what you'd find at Home Depot. Home Depot does sell sticky backed sandpaper rolls:
220 grit CLICK HERE, 400 grit  CLICK HERE
25 yards for $20.00 seems very reasonable.
The Great Planes rolls were 12 feet for $11.00.
The inset picture shows the overlap when the sticky strip is set down on the flat bottom plate. This overlap is cut off with scissors.


When I sand I set a old towel in my lap.
One pass is made on the primer/filler sprayed balsa, then the bottom of the block is wiped off on the towel. This prevents build-up of the primer on the sandpaper. I am dry sanding here.

More on this in the next post -