Saturday, June 30, 2018
Apogee Mini Condor Boost Glider Build, Part 8, Pop Pod Details
Here's a picture from the Apogee website.
That pop-pod tube seems very long!
The front end of the launch lug got trimmed at a 45 degree angle for less drag.
I cut about 2" off the pod tube. I would think it'll still be stable a little shorter. I'll be using this in 1/2A BG competition, a full A engine is heavier.
The blue plastic nose cone has a slight burr at the lip. 400 grit was used to sand it down.
The outside diameter of the nose cone now matches the body tube diameter.
The shoulder is loose though.
It took two wraps of masking tape to bring it up to a good fit.
The overhanging tape edge was slit with my Army knife scissors. Those pieces were wrapped over the rounded shoulder.
Friday, June 29, 2018
Estes 2018 Catalog PDF Online
From John Boren on the NAR Facebook page:
The PDF version of the New Estes 2018 Catalog is now on the Estes Web Site.
To see the 2018 catalog, CLICK HERE
Estes Dragon Ship 7 #1345, Part 21, Nose Weight
Here's an example of what can happen when trying to research a complex clone build -
I knew there was clay weight added to the nose cone, but didn't know how much the kit clay weighed.
I went to the old Semroc.com website and clicked on the "Classics" button on the right side.
Scroll down to 1980 - 1981 to find the Dragon Ship 7.
If there is small parts icons in a blue box to the left, click on that and you'll get a parts list.
To see the parts page - CLICK HERE The clay weight is near the bottom -
Semroc says the part name is CB-M4. Apparently "C.B." is an abbreviation for Clay Balance. The CB-M4 clay weight shown here is 6g or .21 oz.
Next, the old Estes Custom Parts Catalog CLICK HERE but couldn't find any clay weights. There are lead weights and washer weights with the prefix - NCW-1, 2, 3 and 4. If the numbers are still consistent, the clay CB-M4 weight should be .354 oz.
On the left is the 6g or .21 oz. clay weight. It seems pretty small.
There are small forward fins on this model, I'd feel better if there were more nose weight.
On the right is the NCW-4 weight equivalent of .35 oz. I'll play it safe and go with the larger nose weight.
The current Estes Clay Nose Cone Weight package #3180, contains 10 pats of clay, each one weighs approximately .25 oz.
Sometimes cloning is a guessing game. You hope the parts list and online scans are correct. Maybe the Semroc parts page listed the wrong nose weight?
EDIT: Check BAR Geezer's comment below. The #82560 clay weight ends up being 6 grams or .21 oz.! After the finished weigh-in, I may launch this one with a C6-3.
Apogee Mini Condor Boost Glider Build, Part 7, Wing Gluing
A bead of medium CA is run down the flat glue surface of the dihedral support. The root edge of the wing is pressed into the glue.
With the angle I cut into the wing front, the corners of the dihedral support piece stick out the front. This was sanded even with the wing.
Here's the finished glider. The wing assembly is slid onto the boom.
And, the more interesting bottom surfaces.
Thursday, June 28, 2018
J & H Aerospace Boost and Rocket Gliders
On TRF, Rktman posted a Swing-Wing boost glider build (CLICK HERE) from a vendor I didn't know about.
J & H Aerospace produces swing-wing boost gliders, standard boost gliders and Micro R/C boost gliders. To visit the website: CLICK HERE
"J&H Aerospace was founded by Joshua and Hope Finn in March 2015. We specialize in model airplane designs and components of unique design that are not available from any other supplier. Our products are proudly made in the USA from top quality materials.
In addition to the products offered here, we take custom orders including new product design. If you see something here that interests you but doesn’t quite fit your needs, please contact us!"
Estes Dragon Ship 7 #1345, Part 20, Fin Decals, Fin Fit and Parachute
The removable fin was slipped on to align the rivot decal lines with the other fins.
I used a dry strip to check the angles so they were consistent with the other fins and straight out from the lines on the body tube.
In a June 15 comment, Scott Johnson asked for pictures of the detachable fin off and on the body.
Here's the hook fin by itself, it was masked off to allow the gloss finish to remain. The smoother paint makes it easier to slide on the fin.
The bottom in place. Decals and a dull coat applied.
I took an 18" parachute from one of the Estes clearance kits I bought a year ago. These newer parachutes have a vintage look.
This model might be entered in the NARAM Classics event. Even though the original kit had a 1980s print chute, I wanted the parachute to look more traditional.
Wednesday, June 27, 2018
Estes Dragon Ship 7 #1345, Part 19, Engine Mount and Nose Cone Paint
I took a longer than normal dowel to apply a glue bead for the engine mount gluing.
Towards the bottom of the dowel is a pencil mark for a glue depth gauge.
From the rear, the engine mount is glued in place.
The engine hook is in line with the bottom removable fin.
This picture was posted earlier showing the difference in opacity between the black nose cone and the black wrap decal.
I wanted both of these blacks to match in density.
A mask template was cut out of paper, traced from a decal print.
This crescent shape follows the half wrap decal at the black / maroon color decal separation.
No sticky tape was used at the mask line, just the paper wrap. Sticky tape might lift the decal. Note the paper wrap mask is a double thickness. The Metallic Black Rusto paint is thin so two layers of curved, cut white paper were used. The mask edge is almost a very small blend.
When spraying the paper mask I was careful to shoot the paint directly above the paper line so no paint could go underneath.
This mask was a risk but it turned out better than I thought it would.
The Metallic Black also matches the black on the guns half way down the body.
Tuesday, June 26, 2018
Apogee Mini Condor Boost Glider Build, Part 6, Tail Gluing, Wing Airfoil
I did round the edges of the tail surfaces. Go light with the sandpaper, there isn't much balsa thickness.
The horizontal tail glued over a tab on the back of the boom. The fit was tight and once set in place was perfectly aligned.
The rudder is glued on one side of the boom with the back edges even.
The instructions say you can airfoil the wing for a better glide. I used my sanding block with 220 grit for initial shaping. After that, 400 grit was used to smooth the surface.
The inset picture shows the airfoil profile from the outside edge.
Here's how the dihedral support piece sits on the fuselage. The pre-set angle is molded into the bottom slot.
The forward end is to the right of the picture. The dihedral support piece is not glued in place yet, it is adjusted forward and back when doing test glides.
Monday, June 25, 2018
More New Estes Catalog News -
On YORF, JediBoss got the new Estes catalog:
"Just got mine today. A few surprises in there, the return of the Multi Roc (CLICK HERE & CLICK HERE), the Explorer Aquarius, and the #2157 Apollo XI Saturn V with some kind of a mystery bonus! The Little Joe I is on the back cover and inside too. Listed at $32.99."
Apogee Mini Condor Boost Glider Build, Part 5, Marking The Tail Pieces
The horizontal tail piece was also marked on the bottom.
Here I'm tracing the middle line of the forward red area. The upper line was already traced and the template cut down for this second line.
This is the small rudder, it was inked on both sides.
The instructions say to apply some CA glue to the outside of the rudder to protect it when it skids on landing.
The tail surfaces are thin at 1/32" thick. I ran a wipe of CA glue all the way around the edges of the tail pieces but not near the wood glue areas.
Here's all the marked bottom surfaces.
After the model was assembled I realized the colored areas were probably not large enough to be easily seen. More on that later.
Estes Dragon Ship 7 #1345, Part 18, Back To It! Fins and Guns
Before masking off the removable fin root edge, the raw edge balsa got a "sealant" wipe of medium CA glue and very light sanding.
The bottom removable fin had the curved root edge masked off for the gray spray paint.
Before spraying the model an overall dull coat, The "hook" fin was masked off, leaving it with a gloss finish. I figured the smooth paint would allow an easier slip fit of the removable fin.
This mask line at the root isn't really critical, I used regular brown masking tape.
After the dull coat dried -
The launch lug guns had the paint scraped off for a better bond on the stand-offs. These were glued on to line up with the flame decals coming off the front.
Before gluing in the engine mount, the back end of the main body tube got some black applied with a Sharpie.
The rear engine mount centering ring is recessed about 1/16".
Sunday, June 24, 2018
Apogee Mini Condor Boost Glider Build, Part 4, Marking The Underside
The wings and tail pieces are pretty plain. The wings are chunky rectangles, the tail pieces are also squared off. I decided to round things off hoping for a lighter model with less drag.
The pieces are shown here trimmed. Underneath the balsa is a tracing showing how much wood was removed.
The span of the pieces is still the same, things have just been tapered and rounded off.
I wanted to color the bottom surfaces so the flight duration tracker can see it easily in the sky. Some builders use markers to darken the wing bottoms without adding any real weight to the glider.
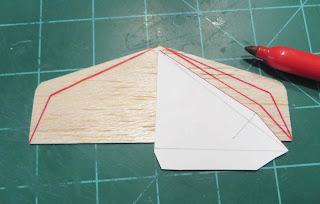
I did a card stock drawing of a color template. Colors will be red and black for a good contrast against the sky.
While holding the template steady a sharp marker was traced around the sides.
I went back and filled in the outlines. A ruler was used and many straight lines drawn to fill it in. I wanted the color as even as I could get it using markers.
Here's how it turned out with the wing halves butted together. The root edges are not glued together.
NARAM Memories, Transporting Rockets - Old School!
In 1975 I was on the way to NARAM 17, getting on a connecting flight from Atlanta to Orlando. Across from me was a guy sitting with a cardboard box with body tubes sticking out of it.
I asked: "Are you going to NARAM?" His response: "How'd you guess?"
That was the infamous Bob Bruce.
Under the seat in front of me was the same range box I use today. Smaller rockets were in there along with plenty of black powder engines. Getting on the plane I wasn't even questioned about it. Airport security was more lax back then!
One NARAM participant would fly his rockets in a chip board guitar case. I commented on the interesting rocket box. He said: "The airlines think it's a guitar and they treat it more carefully."
Saturday, June 23, 2018
Apogee Mini Condor Boost Glider Build, Part 3, Pylon Fit
The 1/16" overhang of the white plastic pylon overhang was sanded even with the front angle of the hook plates. That left a flat front and high drag.
The hook plates and fuselage front were rounded. The front of the pylon was also re-rounded.
The resin pylon is almost 3/16" thick. The instructions don't mention doing this, but I sanded a curve into the bottom to better fit and better adhesion to the small diameter BT-5 tube.
The pylon is glued on with medium CA glue. CA glue can get brittle over time and I wanted the best bond I could get.
The bottom of the pylon got a swipe of a Sharpie. 220 grit was wrapped around a 13mm T engine and the bottom curve sanded. The ink lets you see what is removed and visually helps you keep the line straight.
The pylon is glued on 3/8" from the rear of the body tube.
A bead of medium CA was applied to the round recess. Set the back of the pylon at the 3/8" mark and rock it forward to seat it on the tube.
Quest Q-Jet Fit and Comparison, Part 2
The Estes A8-3 engine weighs .60 oz.
The Quest A3-4 engine weighs a bit more at .63 oz.
Even without the paper label wrap, the fit was tight. On the left is the engine in the Dragon Ship 7 engine mount. The engine stops about 1/2" out where there is a slight compression swelling.
The fit was also too tight in a F-104 Starfighter. I didn't want to force it and risk crimping the engine mount tube.
The slip fit was fine in my payload altitude model.
Fit was also easy in my Saros clone. The engine slid in and stopped at the engine block. Both these rockets are friction fit (tape wrap retention) with no engine hooks.
Again, this single sample engine doesn't have a paper label wrap. A engine with a paper wrap probably wouldn't easily fit in any of the models I tried.
Some have peeled off the label, but mentioned a lot of sticky adhesive was left. Quest has said the next run of engines will have a slightly smaller outside diameter.
Friday, June 22, 2018
Apogee Mini Condor Boost Glider Build, Part 2, Fuselage Front Hook
This is a dry fit showing how the hook pieces are glued to the side of the fuselage boom front. The plastic pylon piece was slipped onto the fuselage to check the position before gluing.
With the hook plates even with the front of the fuselage, the pylon piece overhangs the front by less than 1/16".
The hook pieces were glued onto the sides of the fuselage using the pylon piece to help with alignment. Two clothes pins were used as a clamp as the glue dried. Son't let any glue get into the pylon joint.
On the right the pylon was slid back after the hook pieces were in the right place.
After the glue dried it only took some light sanding to even up all three layers. Don't sand too much off - just even it up.
Thursday, June 21, 2018
New Estes Scale Offering -
I had a feeling this one was coming up! Hey, that capsule should be black . . .
I built a Mercury Little Joe two years ago. A quote from the August 20, 2016 blog build: "With the success of the recent Estes scale model releases, I wouldn't be surprised if Estes came out with a MR Little Joe I using the 2" diameter Centuri capsule and tower."
Here's my earlier build: CLICK HERE
From the Estes Facebook page:
"Product Development Director, Mike Fritz, loads a production model of the NEW Little Joe 1 kit due to be released soon. Witnessing the launch are Estes team members (left to right) Dave DelVecchio, Mary Roberts, Chandra Serfoss, and Angela Everhart."
Wait a minute - Angie Everhart works at Estes?
This kit looks like it is based on the ST-20 based Enerjet News Little Joe I using the old Centuri plastic capsule and tower.
Get ready for lots of Facebook and forum complaints about how hard the tower is to assemble.
Here's the easier assembly links to the capsule and tower assembly: CLICK HERE A, CLICK HERE B
The new 2018 Estes Catalog is available by mail order from the website. An online version should be out in a week or so -
Apogee Mini Condor Boost Glider Build, Part 1, Parts
Here's another build for contest flying at the August NARAM. There aren't many competition boost glider kits available. This one fits the bill for a 13mm A engine model.
This Apogee produced kit is a downscale version of the Chinese Sky Condor boost glider. I have built and launched the larger Sky Condor with good success. The larger Sky Condor B/G kit has tung wood parts instead of the traditional balsa we know.
This picture from the Apogee website.
All the parts:
The instructions are very well drawn and the steps well explained.
The BT-5 pop pod tube seems long.
An engine block is included but not really needed for a competition model
Parts of interest:
The boom (glider body) is laser cut from spruce.
The white parts are cast at Apogee from urethane resin. They are well molded with no bubbles.
3 feet of 100 lb. braided Kevlar shock cord.
2" X 18" Mylar streamer
1/32" thick (actually thin) balsa horizontal and vertical tail pieces
Subscribe to:
Posts (Atom)