Sunday, December 31, 2017

2017 Top Ten Builds! Part 2


5. Goony X-15  
BT-60 based, the decals and fins were from the Quest X-15 parts pack. The canopy was hand carved. Stubby and stable!


4. Estes SKY DART II 
You've gotta' love a classic pop-pod glider, especially when they go on clearance!


3. Estes STARSHIP NOVA
Another classic re-issue kit. All black, no masking! Too bad the BT-50 tube was wrong . . . too thin to be used. 

2. Odd'l Rockets F-104 STARFIGHTER
Shameless plug for an upcoming kit. If I didn't produce the kit I'd buy a few! Very sleek and stable.


And the #1 BUILD / KIT OF THE YEAR -


A reissue of the old Centuri Little Joe II with new fins and details.
This is the one we all wanted but couldn't afford the first time around.
You can see all the TOP 10 lists from 2017 back to 2010: CLICK HERE

Saturday, December 30, 2017

2017 Top Ten Builds! Part 1

I only had 53 launches this year, many club launches were cancelled because of rain soaked fields or burn bans.
Here's my picks from all the 34 builds from this last year. Many of the builds were done two at a time. 

There is actually 11 models, no real dogs this year. Most shown here are from Estes.
We're going from 10 to 1, from the good to the best.
Click on the BOLD TYPE NAME to go to the builds.


10. Apogee/Shrox SKONK WULF
This one would have been higher on the list except for the thin tube. Shrox designs are impressive but sometimes difficult to mask if you try to match the face card picture.


9. Estes CURVILINEAR
One of the better clearance sale kits. Both were built with 18mm engine mounts so a B6-4 could be used.
Sturdy, stubby and perfect for the schoolyard launches.


8. Goony G-16
The same fins from the Odd'l kit just glued onto a BT-60. New decals with some inside humor.


7. B-32M SPIKE
Kitbash from the clearance sale ST-012M kit. My design took design cues from the Madcow Pike.


6. Estes GALACTIC TAXI STAR SPEEDER 
Two clones are in the #6 position - these could have been sister ships. Both are about the same size, BT-20 based with rear canopies. Plenty of detail and re-drawn decals for both.
More Top 10 tomorrow - Counting down numbers 5 to 1

Friday, December 29, 2017

New Saturn V Fins


I'm building an Estes Saturn V for a client.
The new plastic fins are strong! Well, compared to the old Centuri vacu-form fins.

The hard plastic fins strengthen the entire fairing assembly. This is a BIG improvement over the previous versions.

Kevlar Fraying and Knot Setting

From the NAR Facebook Page:

Bill Lindsay Jr asked:
What are the disadvantages of twisted Kevlar thread, compared to braided? I know the big thing is fraying. Can you heat it up enough to keep it from fraying?

Wallace McDuffey responded:
I use Dritz Fray Check for cloth. It works great on Kevlar and reinforcing knots. It is flexable enough that it wont make it brittle when stressed.
http://www.joann.com/prym-dritz-fray-check-sealant/1052851.html

This Fray Check should work very well. I also use white glues on frayed lines.
TIP: Never use Super Glues (CA) to stop a line from fraying. The thin glue will run up the line making it hard and brittle.

Thursday, December 28, 2017

3D Printed Parts?


On the Model Rocket Fanatics page on Facebook, Mark Foster provided a link to a Shapeways 3D rocket parts vendor - CLICK HERE

The work is impressive but I have mixed feelings about 3D printed parts. If you've seen the 3D print process you know production is slow. The parts are expensive.
3D parts have their place but I prefer a building challenge, not total pre-fabricated parts. On the forums a few posts infer; "Look what I built!" Well, you assembled a rocket. You didn't actually "build" something. I have built rockets from scratch and from kits.

3D parts do require cleaning up, there are ridges left from the plastic layering. The few 3D parts I've worked with required too much time to file and fill. Detailed fin cans (with bolts and straps) are difficult to smooth out without sanding down the bolt heads.

Like I said, these have their place but I won't pay that much for something I can do myself.
15 years ago I was building banjos. The resonator and metal parts were pre-fab. I still had to design, cut out and set all the inlays. Binding, fretting, sanding, filling and assembly were all part of the process. Even though I've played banjo for years I learned more about the instrument by building one. I think the same thing applies to rocketry.

Frank Burke's Newest - B.G Viper

Frank Burke has built some amazing R/C Rocket Gliders. He sells kits at http://dynasoarrocketry.com/
Here's a recent build posted on the NAR Facebook page, the Battlestar Gallactica Viper
"Wish me luck, will try to maiden this today, wings are oversized and without anhedral, but it has the "look" of a viper, eventually I will paint the portion of the wing outside the black outline of the scale wing flat black so it will look like it has a much smaller wing, and Mark at Stickershock is working on the engine detail wraps for the motor tubes. It's 2.6" diameter, 29" long, 23" wingspan, and just under 12 oz rtf, with 2 channel elevon control...."
To see the flight videos: CLICK HERE
Here's the same model after the outside edges were painted flat black - a clever and effective camouflage.
"Finished the black paint to hide the oversized wing and just accent the scale wing outline. Didn't turn out too bad."
Very cool! If you squint your eyes you don't see the oversize wing!

Wednesday, December 27, 2017

THE BIG FIX! B32-M Spike, Part 2


Some CWF was brushed over the fill piece.
Sandpaper was wrapped over the fin so I wouldn't sand into the original leading edge.


Here's the patch after sanding.
The decals were peeled up without any problem. Home print water slide decals didn't stick very well to the aluminum paint.

The upper body was masked off at the halfway point between the two fins.

I shot the repair and surrounding area with Duplicolor Filler/Primer. Two more coats were shot and sanded to surface.


After the tape was lifted the mask line was clean and sharp.
There is still a dent in the body tube and some minor scratches. I was more concerned with the fin repair.


Instead of printing up more fin decals, I cut some strips of black and red trim Monokote. They ended up sticking better to the aluminum paint and were much more opaque.


The red bands on the payload section were replaced with trim Monokote. On the left is the translucent decal before, on the right is the new red trim.

Ready for the next NEFAR launch with a D12-5! 

Tuesday, December 26, 2017

THE BIG FIX! B32-M Spike, Part 1


This is the B-32M Spike I kit-bashed from the Estes STM-012 kit. I took some design cues from the Madcow AGM-33 Pike.

I like how it turned out - too bad it didn't stay shiny for long.


I've only flown it once, last July with a D12-5. How it got this lower fin damage I'll never know, probably a snap-back of the upper section. The hit was strange, a chunk taken out of of the lower fin, scratches and a dent in the tube. The fin right above it had no marks.


This missing chunk was larger than what could be filled with putty.
It's easier to plug in a rectangular piece of balsa.

The rough edges were squared up with a diamond file.


3/32" thick replacement balsa was set behind the area and the edges traced.


The new piece was cut out and sanded to fit, then glued in with yellow glue.


After the glue dried, a rounded leading edge was carved following the original fin.
The leading edge was matched and smoothed with 400 grit.

Monday, December 25, 2017

Merry Christmas Y'All!!!


Merry Christmas 
(or whatever you do) from the Model Rocket Building Blog and Odd'l Rockets!

True Modeler's Rocket Kits NASA Scout, Finished


To be honest, I wasn't overwhelmed with this OOP kit. The short shock cord, weak shroud lines, shock cord mount and snap swivel couldn't be used. The fin alignment guide and wrap around sticker didn't fit the BT-60 tube.
I wish the smaller card stock adapter was balsa. It is very tall rocket at 30.25"!

For a sport scale model, the finished look is pretty plain. It could end up being a good schoolyard rocket with a B6-4 engine. A build on RocketReviews.com says not to use the recommended A8-3.

Sunday, December 24, 2017

True Modeler's Rocket Kits NASA Scout Build, Part 14, Tying It All Together


A line of glue was set inside the body tube and the mount slid in place.
The instructions say that the rear ring should be flush with the end of the body tube, but pictures of the LTV Scout show the rear plate slightly recessed. This allows you to add a glue fillet in the centering ring/body tube joint. This engine mount bond has to be strong, the engine is a friction fit.
The snap swivel was very small and replaced with a larger one.

The 1/8" wide elastic shock cord was too short at only 15" long. I replaced it with some long 1/4 rubber. A short shock cord would allow the upper and lower sections to hit each other on descent.

The shroud lines easily broke with a pull. Those were replaced with all cotton embroidery thread.


The black nylon parachute was a nice bonus, not your usual plastic sheet parachute.


The balsa adapter turned out fine.

The small card stock adapter was a different story. Even after putting in the extra time, the fit and joint weren't great.

Spray Paint / Coat Hanger Hack TIP


I like the Hack videos on YouTube. Once in a while I find something I could use in rocket building.

For a good spray painting small parts hack - CLICK HERE and go to 7:45 -

This could be used for some small parts spraying. You can spray all sides without holding the part with your hands. The cardboard box makes a small paint booth.

Saturday, December 23, 2017

True Modeler's Rocket Kits NASA Scout Build, Part 13, Roll Pattern Wrap


The roll pattern is a peel and stick. With the black band at the top and bottom you won't see the edge on the model.

I wanted to play it safe when positioning the wrap, you never know if there will be any play after placement. It could stick and not allow you to lift it to make adjustments.

TIP: Wrap a thin strip of card stock around the tube to line up the bottom edge of the wrap.


Another surprise - the wrap ends didn't meet up!
I'll just hide the gap beneath the launch lug.


Here's how it looks in place.
The wrap was sticky and grabbed strong! The top and bottom lines are close but I didn't want to risk lifting the wrap and pulling up paint.

How Many Sheets Of Balsa?


I remember opening up the Estes Mega Mosquito kit and counting all the 3/32" balsa sheets - 9 in total!


Here's the parts for the upcoming Super Big Bertha kit. Go ahead . . . count the balsa sheets.

The Super Big Bertha is sort of a stretch Mega Mosquito. Same nose cone and tube diameter.
The tube was slotted on the Mega Mosquito - not on the Super Big Bertha.

Friday, December 22, 2017

True Modeler's Rocket Kits NASA Scout Build, Part 12, Nozzle Mask

The instructions say the nozzle and 20/50 ring are painted silver. How do you mask around the ring base?

I found an extra 20/50 ring. Clear Scotch tape was set on my patio door glass. A little more than half the outside ring was traced on the tape with a pen.

TIP: Notice the tape was set on the glass at an angle. This made it easier to cut the curve with a knife.
The two half circles were cut in half.
The curved tape edge was set against the outside of the ring.

After all four pieces were set down the rest was masked off. Even thought the tape mask above the ring looks messy, the seal around the 20/50 ring is clean and tight.


After the tape was pulled the mask was pretty clean. I did do a bit of touch-up with some gloss white and a small brush.

True Modeler's Rocket Kits NASA Scout Build, Part 11, Paint!

Crap!
I've been able to live with the inconsistency of the Rusto 2X Gloss White. Lately I've had too many bad results.

Because of my recent California trips, this model had three weeks to dry before I tried to apply a finish coat. Enlarge the picture and you can see the wrinkles.

I like that the Rusto 2X paints cover quickly without too many coats. Have they changed the formula again? Luckily it sands easily.

Thursday, December 21, 2017

New Estes Patriot Comparisons


Mentioned in yesterdays post, Estes is bringing back the Citation Patriot.

Looking at the Coming Soon page on the Estes website, I thought something looked different.
The new kit is on the left, the original on the right.

Check the height of the gold eagle decal. There seems to be more white area below it and the top of the red and blue wrap.  The eagle decal doesn't look as tall as the original. The nose cone also looks longer. This might be a pre-production prototype build or a CG rendering.

A moot point and not a deal breaker. I'll probably buy and build a few. For me, it needs a 24mm engine mount.

Wednesday, December 20, 2017

New Estes "Citation" kit?

On TRF, JBlatz posted he was looking forward to the upcoming Super Big Bertha kit.
To see the thread, CLICK HERE

Fred Shector responded:
"We have two. And two of several other new kits (including another exciting classic kit with wondrous decalsSent to us (NAR Section 430) for the volunteer helpers at the AMA Expo West. We staff a Make & Take that is very popular."

Bob Sanford (Initiator001) added:
I hope you don't get a "citation" for mentioning that classic kit.

Let's look at the clues - 
Wonderous decals, a "Citation" kit? Here's my guess . . .


To see more of the Estes Citation catalog, go to Ninfinger's - CLICK HERE

EDIT: I posted this at 10:30 a.m. this morning, it's now on the "Coming Soon" page on the Estes website: CLICK HERE
True Modeler's Rocket Kits NASA Scout Build, Part 10, Fin Gluing


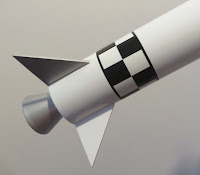
As with most kits, the fin marking guide ends didn't match up! It wasn't used to mark the fin locations.

The primer/filler was scraped down where the fins will glue.

These fins are small, another reason for the nose weight.


With the trailing edges even with the tube edge the bottom edges weren't flat! The trailing edges were sanded flat and even with the end of the tube.