Monday, September 30, 2024

Enerjet by Aerotech, Arreauxbee-Hi, Part 9, Engine Mount, Launch Lug & Screw Eye Fitting


With the lower body tube turned over - 

Here's how the engine mount sits, recessed into the body tube.
Note the centering ring is right at and even with top of the fin slot.

With the fin locks in line with the fin slots, test the position by sliding a fin or two in place. You don't have to snap the fin tabs in place yet, just be sure the fins project straight out.


It could be difficult to apply CA glue to the rear fin tab/fin lock joint.
TIP: As shown in the last build, set a toothpick tip into the joint. Drip the CA glue onto the toothpick, enough glue so the drop runs down the toothpick and into the joint.   
The paint was scraped off around the launch lug slot.
Notice the low end of the raised alignment tab stops at the bottom of the lug. 
DON'T SCRAPE the the paint past the bottom end of the slot. The raised lug base sits down to the bottom of the slot.

The picture to the right shows how the CA glue was applied. The glue is applied towards the center so it won't squeeze out beyond the edges of the lug base.


The screw eye is turned into the coupler bulkhead.

TIP: On the right, notice the screw eye isn't screwed in beyond the threads. If turned in past the threads, the screw eye will be loose. The threads help lock it in place. Apply glue on both sides of the screw eye.

Sunday, September 29, 2024

Enerjet by Aerotech, Arreauxbee-Hi, Part 8, Launch Lug Prep

The kit includes both rail guides and launch lugs. The square launch lugs are for a 1/4" diameter rod.
     

These are molded in black plastic. I wish they were molded in white. They will require a white undercoat for color coats later on.

There was some flashing that needed filing. 


I used a sanding block with 400 grit to square up the sides. 

This isn't a required step, I just wanted flat sides.


The lugs were set down on cardboard for white under coats.
The lugs will end up orange to better match the color on the main body tube.

Saturday, September 28, 2024

Enerjet by Aerotech, Arreauxbee-Hi, Part 7, Engine Mount - Gotcha!


The fin-lok rings were very tight - 
too tight to slide onto the motor mount tube.

The inside walls were shaved wider using a #11 blade.
Shave a bit, test the fit.

You want a tight fit on the engine mount tube.


The fit of the plywood centering ring was tight and needed to be slightly widened. 

I shaved a bit off the inside diameter for a tight slip fit.


The rings were slid into position at the recommended measurements and glued on using medium CA.

The third upper ring was glued over the face of the baffle plate.


The fin tabs wouldn't fit into the fin-lok rings with the rings at the recommended positions.

The instructions say the front edge of the rear ring should be 1 1/4" from the rear end of the tube.
GOTCHA: The front edge of the rear ring should be 1 1/16" from the rear end of the tube.


Look to the inset picture at the upper right.
I had to cut and extend the lower notch up about 3/16" for the fin to snap into place.

Friday, September 27, 2024

Enerjet by Aerotech, Arreauxbee-Hi, Part 6, More Fin Prep


I've done some prep work on this build, but it's not unusual for me. 
The key to a clean build is spending some time preparing kit supplied parts.

The three fins had molding seams on the outside edges.

The seams were sanded flat using 220 grit on a block, followed by 400 grit.

There were molding dot recessed on all three fins.
These were marked with pencil.

Some medium CA was dropped onto scrap cardstock. The glue was picked up on a toothpick and transferred into the dot recesses.

After drying the CA was sanded to surface with 400 grit on a block.

Thursday, September 26, 2024

Enerjet by Aerotech, Arreauxbee-Hi, Part 5, Tube Prep


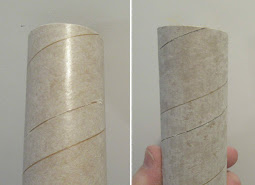
The lower tube had some raised overlaps under the glassine wrap. There was what looked like a dent that was filled with CWF.


Under the surface were some overlaps that looked like a raised spiral running down the tube. 
These raised spirals were carefully sanded with 220 frit on a block.


After filling the normal seams with CWF and sanding, 

I followed with some Duplicolor Filler/Primer and sanding.
You can still see the raised overlaps. The filler/primer helps, but this will need another shot and sanding. 

On the right is the upper body tube section.

Wednesday, September 25, 2024

Enerjet by Aerotech, Arreauxbee-Hi, Part 4, Plastic Parts Prep


There are mold lines on either sides of the nose cone tip.

Sand the high spots first while maintaining the roundness of the cone taper. Don't sand flats into the curved sides. You'll be left with the lower seams below the surface.
These dips were lightly marked with pencil.
I used my Dollar Tree CA glue as a filler.

Draw a bead of glue down the line and let dry. Only use the glue on one side and let dry before using on the other side. Set the nose cone on its side for the glue to dry. Bear in mind, the glue can and will run if it is not allowed to dry horizontally. It will take a while for a CA glue bead to dry.

After one side dries, turn it over and apply to the other side.
Sand the dried glue with 220 grit then 400 grit to smooth.


There were some molding lines on the flat faces of the fins.

Sand with 400 grit on a block.

Tuesday, September 24, 2024

Enerjet by Aerotech, Arreauxbee-Hi, Part 3, Channel Tunnel Prep


The channel tunnel stripes are cut from 3/16" basswood. 
The laser cutting leaves black ash on some of the sides. This should be cleaned off with 400 grit sandpaper on a block.

On the right, notice the top is cut at an angle. All ends will need to be squared off as you'll be joining two strips on the longer, lower tube. 


All six tunnels are held down on masking tape with the sticky side up for spraying with filler/primer.

The filler/primer will seal the wood and after sanding will fill any small pores.


Here's a before and after light sanding with 400 grit on a block.

The sanded tunnel is on the right. Notice some of the filler/primer is left on the surface filling any recesses. Sand too far and you'll end up with a rough surface when shooting the white undercoats.

Monday, September 23, 2024

Enerjet by Aerotech, Arreauxbee-Hi, Part 2, Parts


All the parts were clean, except for the lower airframe tube. More on that later.

This kit includes plywood centering rings and an aluminum 29mm screw on motor retainer.
Both square launch lugs and rail guides are included.

Note the basswood channel tunnels in the center of the picture.


Here's the stick on decals. Black and white ink on clear plastic.

Sunday, September 22, 2024

Enerjet by Aerotech, Arreauxbee-Hi, Part 1, Background


From CSRocketry kit description: 
"The Arreauxbee-Hi kit pays homage to the beginnings of the model rocketry hobby by recalling the first mass-produced model rocket kit, the Aerobee-Hi. Manufactured in 1958 by Model Missiles, Inc., the Aerobee-Hi model brought the hobby industry into the space age." 

In an Apogee video, Tim VanMilligan pointed out that the "Arreauxbee" spelling probably refers to the Aerotech Arreaux kit. 

Designed by Bob Sanford, who also developed the Aerotech Initiator. 


The new box uses quotes from the original Model Missiles kit box from 1958:
Scientific
Easy To Build
Beautiful To Fly

Saturday, September 21, 2024

Upcoming Estes Kits?

Yesterday on YORF,
Turbofireball found the Estes 2024 Summer-Fall New Products Catalog!
New kits and some bring-backs.

His post requested that the images not be copied, so -
Here's a link to his post: CLICK HERE

Friday, September 20, 2024

A New Take On Tissue/Glue Putty TIPS

If you built a cluster rocket in the 1960s, you are probably familiar with "Tissue/Glue Putty". 
It was an effective way to block ejection gases from escaping out the back end between engine mount tubes. 
Here's an example from the Astron RANGER instructions, courtesy of Jim Z's.

TIP: If you ever need a tissue/glue putty fill, it helps to tear the tissue paper into very small pieces before mixing with the glue.


This Super Glue and toilet paper method showed up on my Facebook feed.
This wouldn't work in place of white glue and tissue paper on a model rocket - but you might find it useful for some home repairs. 

To watch the video: CLICK HERE

Wednesday, September 18, 2024

Airflow Video Using Computer Modeling


From the NASA Aeronautics Facebook page:
A fascinating video showing airflow around wing and the jet engine.
Reminds us how smooth glue fillets can improve airflow at the fin/body tube, trailing fin edges and launch lug joints. 

Along with international partners, we're using the same generically shaped wing design to create research models that will help us better understand how air moves around an aircraft during takeoff and landing.
Learn more about how we’re using computer modeling and wind tunnel tests to ensure the aerospace community gets accurate answers: https://go.nasa.gov/3zaI682

To watch the video, CLICK HERE

Monday, September 16, 2024

Bad Tubes?

If you ever built a vintage kit from the 1970s, 80s or 1990s -
You probably noticed the body tubes were of higher quality than what you find in kits now.
Tubes felt stronger and the diagonal wrapped seams were narrower and tighter.

Euclid Spiral Paper Tube company is now under the Paramount Tube name. The older, experienced tube maker employees have probably retired.
Some of the newer tubes have more than one outer seam to fill. 
Layers underneath bulge at overlaps. The outer glassine layer sometimes shrinks into the wide seams underneath. On some tubes, the glassine layers didn't get enough glue and look like they can easily be peeled off. 

I've heard stories of vendors refusing orders of bad tubes.
Some of the crap tubes have showed up in kits.


Here's an example - 
The clear outer glassine was sucked into a seam gap underneath.
It was wide and deep and would have shown under final paint. A coat of filler primer won't fill this spiral recess. I ended up cutting through and removing the glassine strip. 


On the left you can see the layer removed over the seam gap.
On the right, the tube has been lightly sanded and the usual joint seam marked with pencil.
Both seams have been filled with CWF.

On the right is after sanding the CWF to surface. Notice the irregular tube surface that shows when the tube is sanded.

I followed up with a coat of filler/primer and sanding to get the tube smooth for color coats.

This is not the fault of Estes or other vendors. The quality of some Paramount Tubes is just poor.

Sunday, September 15, 2024

Enerjet by Aerotech, Astrobee D Build, Finished


I've never assembled a rocket this tall before! I had to take the finished picture outside in the patio.

It's an impressive model with a good amount of scale detail.


The upper section with the antennas and antenna shoes. The long antennas are friction fitted for display. Remove them for flight.

The metal wrap really adds to the grays surrounding it.


The fins - 
and the gold lower scale launch lug.

Saturday, September 14, 2024

Enerjet by Aerotech, Astrobee D Build, Part 33, Ends & Edges


The inside of the interior ring can be roughed up before epoxying to the engine mount tube.
I used one of my diamond files. 

On the right side is the interior ring slid onto the engine tube.


The main body is tied to the larger of the two parachutes.

The upper body gets the smaller chute.

You could do the "loop tie" like on LPR kits, but I tied the shroud lines to the elastic with some doubled Kevlar.

Wednesday, September 11, 2024

Fabri-Tac Drying UP? TIP

My bottle of Fabri-Tac glue was drying out and quite thick. I could barely shake it down to the nozzle tip. When new, the glue is a bit thick, like the old plastic model cement I used in the 1960s.

One of the ingredients in Fabri-Tac is Acetone. The acetone breaks down and allow plastics to be joined. 

I simply poured a small amount of 100% acetone into the Fabri-Tac bottle and shook it up to mix.

Fabri-Tac is a great glue for joining plastic adapters to body tubes. It is not a good glue for a delicate Apollo or Mercury Redstone tower.

Tuesday, September 10, 2024

Enerjet by Aerotech, Astrobee D Build, Part 32, Gluing On The Rear Lugs


Check the scale data sheet for positioning of the rear launch lugs. One goes on each side, centered between two fins.


A positioning template is supplied.
I cut out the sides and the center.

Double check to see if the lug fits accurately in the center area. 


A pencil line was drawn, but inside the edges of the paper template. I didn't want a pencil line that couldn't be erased being so close to the edges of the glued on lug.

Two pieces of tape were set down for a positioning aid. The centers were marked.


I applied medium CA glue to the underside of the lug, not to near the outside edges. 

The lug was pressed in place and held until set. The masking tape pieces were removed.

Monday, September 9, 2024

Enerjet by Aerotech, Astrobee D Build, Part 31, Gluing On The Forward Lug


The two side pieces of masking tape are more alignment tools. Using CA glue to attach these details doesn't give you much time to reposition once you set the piece down.

Notice the medium CA glue beads set on the back of the forward lug base. I keep the glue away from the outside edges. There will be some "squeeze out" of the glue. Keeping the glue towards the center doesn't allow glue to go beyond the edges when pressed in place.


Here's the forward launch lug in place, centered over the aluminum band. 

It's a good looking scale detail piece.

Sunday, September 8, 2024

Enerjet by Aerotech, Astrobee D Build, Part 30, Setting The Aluminum Wrap


Scale drawings are included in the kit.
This shows the two possible build variations, a Flight Configuration (with three bands of screws) or the Launch Configuration with the aluminum band.

I ended up using the aluminum band after peeling up the two lower rows of sticker screws.


The scale drawing says the aluminum band should be 1.31" wide. The supplied self adhesive strip is around 1.25" wide.


I was concerned the raised color separation line might show under the thin metal band.
The paint line will be covered with the wrap, so the mask line was sanded down and smoothed out.

Note the white strip of paper above the the top of where the strip will be placed. This gives me a straight reference line for placement.

The strip was rolled around the tube, smoothing as you go, using the paper edge as a top guideline.

Saturday, September 7, 2024

Enerjet by Aerotech, Astrobee D Build, Part 29, Oops!

I wanted to show the "Launch" version with the shiny aluminum wrap. 
The screws sticker strip was carefully removed.
    
It happens to all of us! I screwed up.
I don't think I've ever had a perfect finish. I know where the flaws are.

On the left you can see some rough finish with some white undercoat peeking through.

I held the upper body with a paper towel as I sprayed a dull coat acrylic onto the glossy gray. Some of that clear dull coat landed on the paper towel I was holding onto. It soaked into the paper towel and into the paint already on the tube.

After the clear coat dried, some light sanding followed with 800 grit.

I resprayed with what was left of the Tamiya International White. Let dry, lightly sand to help fill.
One more spray coat covered the mistake.