Tuesday, June 30, 2020

Estes Mars Longship Build #7296, Part 1, Parts


Here we go - now on sale on the Estes website,
One of the more anticipated new kits, the very detailed
Destination Mars - MARS LONGSHIP.

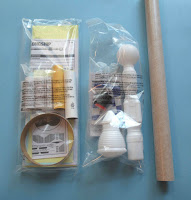
The kit parts are packaged in a tall box.


Two bags of parts and one long BT-55 tube.


The bag on the left contains:
The plastic details that glue onto the tube
The large, thick walled tail ring
Laser cut card stock details
Engine mount tube
Laser cut balsa
Two sheets of decals.


The bag pictured in the middle:
The big plastic nozzle
The one big ring again (repeated)
Separate instruction sheet showing decal placement
Long molded nose cone


Additional parts:
Engine hook, Engine Block, D/E spacer tube
Engine hook retainer ring
Launch Lug
18" Parachute
Shock Cord

Monday, June 29, 2020

Semroc Andromeda Chrome Wrap Fix, Tips, Part 2


Here's the original Estes instruction illustration showing the spacing of the chrome bands.

The low wrap is 1 1/2" above the centering ring joint. The second wrap goes 1/4" above that.
On the left, the first wrap is in place, using the top edge of a masking tape wrap for a reference line. Why use a tape wrap? Getting a sticky wrap to meet up at the start point never seems to happen on the first try. The tape wrap gives you a straight around the tube reference.

After the first chrome wrap is set, a 1/4" wide masking tape strip was set above the lower wrap.
The upper chrome wrap is set down above the tape strip.


Here's the final decal art using the widest black band decal from the first three draws.

This decal print is available as a PDF if you are a Patreon blog supporter.


Here's the overlay decals on top of the chrome trim.
This is the same technique I've used in the past to "print" over chrome.

The width of the vertical bar wrap worked and is even all the way around. Sometimes things work out, it just takes me a year and a half to fix it.

Sunday, June 28, 2020

Semroc Andromeda Chrome Wrap Fix, Tips, Part 1

My Semroc Andromeda was a pre-production kit, given to me to help produce the instructions. I got the kit at NARAM 60, almost two years ago.
I built the kit without problems as I did the line drawings. All went great, until I applied the (laser burned) chrome wrap. The black striping was cut a little to deep. I couldn't transfer the wrap onto the model without it breaking up into many strips.
The model sat finished, without the chrome wrap for quite a while. I finally got around to making a wrap yesterday and applying it tonight.
I've used this technique before when a printed chrome piece was needed.

I drew up three roll bar rectangles. The middle set was drawn to the width of the kit supplied wrap. Past experience has taught me to make a few more, one a bit narrower and a third wrap a little wider. The width difference was almost 1/16".
This gives me some room to play with and adjusts for tube diameter and paint thickness.
These were printed up on to clear decal paper.

I first cut Monokote chrome trim piece to the width of the wrap supplied in the kit. It turned out to be about 1/16" short! Maybe the third, wider decal wrap will fit.

A second test piece of chrome trim was cut to allow a slight overlap. When a  chrome wrap overlaps itself, it's very hard to see the seam.
Notice in the above picture, a wrap of masking tape is set around the tube for a straight, around the tube reference line. The upper side of the tape is 1 1/2" from the top of the centering ring.

When rolling on the chrome piece, leave most of it on the backing. Try not to touch the sticky underside.
Roll the chrome on, smoothing out any trapped air as you go. Keep the bottom edge of the chrome wrap on the top of of the tape.

More tomorrow-
Estes M.A.V. #7283, Finished


For a "Beginner" kit, this one has a lot of interesting features.
Lots of detail and enough assembly for a beginner to have a good feeling of accomplishment.
I installed the pre-assembled 18"parachute. Is that too large for a 12" tall rocket? Probably not - the fins could break on a hard landing.

Saturday, June 27, 2020

Estes M.A.V. #7283, Build Part 6, More Stickers!


The hatch stickers are clear, fingerprints will show if you touch the back sticky side.

Hold and position the stickers with the tip of your knife blade.
Before placing the sticker on the knife, wipe off the blade to be sure it is clean.


On the left, is a placed sticker using a wrap of masking tape for height and pencil marks for the centers.

On the right, the fins and retainer ring are in place. The hatch stickers centered pretty well.
Over the launch lug is a clear reinforcement sticker.
The plastic launch lug strip was glued in place and feels strong. It probably doesn't need the reinforcement, I went ahead and used it anyway.

I marked the center of the sticky square with some pencil tics. The pencil marks were centered over the lug strip and the sides pressed in place.


With the pencil marks rubbed off, you can't even see the clear sticker!
It's there -

Friday, June 26, 2020

Estes M.A.V. #7283, Build Part 5, Stickers!


GOTCHA: The instruction shows but doesn't say it - You've got to place the launch lug strip somewhere between two fins.
The illustration shows the launch lug strip set between two fins, but this is a beginner model kit and could be more explicit.


The hatch stickers are centered between the fins.
The die cutting is a little wide for me, the fold shows the separation cut.
I cut the hatch stickers out on the border lines.
I was concerned the stickers might grab before they could be centered. I needed some reference points.
I found the center by cutting a piece of paper the width of the area between the slots. Folded it in half and marked the center.
The center mark was transferred to the fin can at the top and bottom.

A strip of masking tape 7/16" tall was wrapped around the bottom for a bottom edge reference.

Thursday, June 25, 2020

Estes M.A.V. #7283, Build Part 4, Fin Can


The instructions show tube type plastic cement. I used brush-on liquid cement.

The fin can halves were pressed together dry.
The internal joints were brushed with the liquid cement while holding the joints closed and tight. Just the internal joints and at the top and bottom of the fin can got brushed on glue.


The fins slide into the bottom of the slot and are pressed up, locking them in place.
TIP: You really don't have to glue these fins in place. With the fins off you could easily fit this rocket in your range box. Slide in and lock the fins in place with the retaining ring at the flying field

On the left, the black ring isn't screwed all the way up yet. Notice the little bit of the slot still showing.

On the right, with the ring tight the fins are locked in place! They can't move up or down.
You could glue the fins in place but why? If a fin were to break, you've got a much easier fix.

Fill & Finish Questions From TRF, Part 2

Here's the fill and finish process I use:
Filling the grain and tube seams:
1. Thinned Elmers Carpenter's Wood Filler (CWF) from the orange lid tub.
1A. On balsa: Sand leaving a very slight beige skin of CWF on the surface with 400 grit.
If you see the "pink" balsa showing through you may have sanded too much.
Tubes get the CWF sanded to surface pretty much all is removed leaving the CWF in the seams.
2. Fairly thick spraying of Duplicolor Filler/Primer
2A. Sand filler/primer to surface with 400 grit.

Spray Painting:
3. Gloss white undercoat light spraying
3A. Lightly sand any rough spots with 800 grit. Look close at surfaces in direct light and smooth out leftover any 400 grit scratches.
3B. Second gloss white undercoat, heavier sprayed if first undercoat is good.
The heavier final coat is tricky. Heavy enough to really cover, not so much as to create drips.
4. Let dry for a minimum of 48 hours, longer if you can still smell the paint.
Plastic nose cones and plastic parts require longer drying times!
Mask and follow with secondary colors.

I hope that answers your questions. I would never say: "It's my way or the highway."
Everybody has a different method. This is what works for me.

Here's a bunch of posts about filling balsa and tube seams:
Previous Post about some BAD filler:

Wednesday, June 24, 2020

Estes M.A.V. #7283, Build Part 3, More Interesting Things


Continued from the last post:

Here's the top of an engine sitting in the motor mount/fin can. Notice how it is centered, just inside the upper centering ring hole. The ejection charge would clear the plastic lip of the ring.


I did a dry fit of the fins.

Against a back light you can see the airfoil taper.

Here's the launch lug again.
The left side of the base is right down the seam of the wrap.
Usually on a factory installed wrap, the detail lines don't match. On this one - everything lines up!

It looks like the lug was glued on with a hot glue. There is a little clear glue squeezed out on each side.

Fill & Finish Questions From TRF, Part 1

On TRF, Neil W had some questions about how I fill and finish. I tried to  answer all his questions. Neil's quotes are in italic -

I am mostly using the finishing strategy that hcmbanjo has documented on his blog. In this strategy, filler/primer is functioning primarily as filler. So you sand off just about all of it except what remains in the various cracks and indentations, and then it has done its job. The reason to remove as much of it as possible is.... well, I guess it's mostly about weight, but perhaps also a bit of thickness, although I can't attach any numbers to either of these. A good area for experimentation."


Hi Neil,
I do a two step fill. First is the CWF to fill 80% of the balsa grain and tube seams. The second step Duplicolor Filler/Primer fills any remaining grain and seams after sanding.
Removing most all of the filler/primer is not for weight reduction. I'm a sport flyer, a little extra weight doesn't bother me or my flights.
This two-step fill process is something that works for me - In my teens, I hated the four passes of brush on and sand steps using sanding sealer. I read about some multiple step process some builders employ and wonder how long it takes them to finish a rocket.
My fill and finish steps are probably quicker. What slows things down is the paint dry times between finish colors.
I have used every available filler/primer out there and have found the automotive Duplicolor Filler/Primer to be the best. Some filler/primers sand like rubber!

"In general, I'm not as obsessive about removing filler/primer as Chris is; his body tubes in particular have *very* little grey left on them when he's done with them. I tend to run out of patience before I get to that point, but my mindset has still been to remove "most" of it."

You probably don't have to take it down to the tube and balsa surface like I do, but this works for me. When you sand to surface you will see gray filler/primer left in the remaining seams and balsa grain.

"I am definitely leaning towards the idea of leaving a bit more primer on in areas where scuffing is a danger. That might help avoid problems. However, sand-through is still possible at high points. I guess if I can just minimize them, then a bit of touch-up here and there with CA is no biggie."

Occasionally I do sand too much and can scuff the surface. This shows up when I shoot the first gloss white coats. I usually do a gloss white undercoat. Take the undercoated model out in the direct sunlight and you'll see the rough spots that require smooth sanding. There are always some rough areas and glue boogers that need to be smoothed out.
If an area was rough or sanded through, I do some light sanding of those areas of the white base coat. These (sanded) rough areas disappear with the second white undercoat.

"I can't imagine leaving filler/primer unsanded. After a heavy coat, it's usually quite rough and bumpy. However, the idea of performing minimal sanding only to smooth it out definitely is something I'll explore, rather than trying to remove most of it."
"Are you talking about filler/primer or regular primer? As mentioned above, I find it hard to envision leaving filler/primer unsanded. Regular primer, though, I usually don't sand (in fact I usually apply it in the same painting session as the base coat).


The Duplicolor Filler/Primer I use drys dull and slightly rough. At a minimum you do have to lightly sand to smooth it out.
I only use the CWF first, then the Duplicolor Filler/Primer (FP101) and sand to surface. No other "Primer" after that, just the white undercoats.

Tuesday, June 23, 2020

Estes M.A.V. #7283, Build Part 2, Interesting Things


The shock cord is already installed!
This is a different attachment - the low end goes through a slit in the body tube, then folded up along the outside. The launch lug strip is glued over the shock cord holding it down against the tube.


The nose weight is already in place.
Under a bright light you can see the clay weight inside the nose cone.

The nose cone weighs just over one ounce.
The engine mount doesn't have a traditional motor mount tube.
On the left is 1/2 of the fin can/motor mount assembly. Notice the two central vertical ribs. There are two more ribsi n the opposite half of the fin can.
When the engine is slid in from the bottom - the wedge shaped ribs direct the top of the engine to fit and "lock" into that circular groove in the upper centering ring.

Monday, June 22, 2020

Estes M.A.V. #7283, Build Part 1, Parts


Here's probably the most interesting of the "Beginner" rockets, the new Estes Mars Ascent Vehicle or MAV.
It has a Space X Dragon style nose cone and fins that look a little like upside down landing legs from the old Mars Lander kit. The tube wrap is already applied.
In the center are the three stickers that go on the lower fin can, placed between the fins. 
The yellow square is a clear sticker that goes over and reinforces the installed launch lug strip.
This one is heavy at 3 ounces! Somehow I would expect it to get higher than 250 feet on a C6-3 engine. The parachute seems large at 18" diameter.
This same design will be available in the "Colonizer" Starter set with red fins and nose cone trim.
Why feature a "beginner" build? There are some new manufacturing twists that make it very interesting.

Sunday, June 21, 2020

Older Centuri Kit - First Impressions

The first rocket kit I ever ordered was from Centuri.
Why didn't I order from Estes, like the other kids in the neighborhood? I liked the Centuri print ads better. The art layout was more visually appealing to me.

My first order was for the Centuri Javelin. (The fins and guides pictured below are from the Centuri Honest John kit.)
While watching a few Estes kits being assembled by friends, I did notice some differences in the way Centuri produced their kits.
The small notches at the top and bottom of the Centuri fin positioning guides made it easier to mark body tubes.
The fin alignment guides helped coax the fins to a 90 degree spacing. Both the guide pieces were printed on card stock, not 20 lb. paper.
Then there was the fins.
The cut lines were silk screened onto the balsa sheets. No cutting out of a template and pencil tracings needed. I do wonder now if the printed ink might bleed through a light color paint.

ASP MMX Micro Corporal Build, Finished


Another good addition to the Micro-Maxx Fleet!
These are always good "first launch of the day" rockets.
Small and still a good challenge.

Saturday, June 20, 2020

ASP MMX Micro Corporal Build, Part 8, Paint & Decals


The model gets an overall shot of gloss white paint. No masking!

The painting wand is a plain 1/4" diameter dowel.


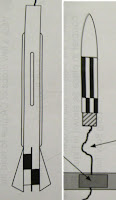
Here's how the instructions show the decal placement.


The roll pattern decal on the upper section doesn't extend the whole length of the upper tube as shown in the drawing above.


This shows cutting the low end of the decal -

The top side should be cut close to the print so there won't be any clear overhang over the nose cone seam gap.

Friday, June 19, 2020

ASP MMX Micro Corporal Build, Part 7, Streamer & A Fix

I find it easier to lay the Kevlar line over the center of the streamer then tape the line in place.  This holds the streamer and line still while placing a piece of Scotch tape over the Kevlar.

It's hard to see, but the tape is placed while on the tip of the blade. This keeps fingerprints and skin oil off the sticky side of the tape.


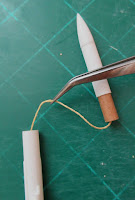
It's hard to get the shock cord into a small body tube.

TIP: Use some long tweezers to get the line inside.


I looked down the body tube and realized on tunnel was glued on crooked.

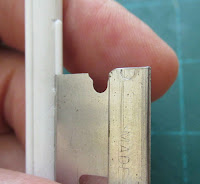
I carefully cut it off the body tube with a single edge razor blade. It was glued back on straight, filleted, sanded and painted.

Thursday, June 18, 2020

ASP MMX Micro Corporal Build, Part 6, Tunnel & Launch Lug Gluing


You can still use the plastic angle to glue on two opposite long tunnels, or tunnels 1 and 3. After 1 & 3 are in place, the smaller 2 & 4 will be too close to use the angle reference. 


I used the Beacon Fabri-tac again. Some small beads of glue squeezed out and were carefully removed with a single edge razor blade.


This shows the pool of medium CA used for the "drag" fillets.

The Q-Tips are close at hand to quickly soak up any extra glue.


Here's the tunnel fillets being applied by dragging the CA toothpick down the fillet joint.

Evening out the CA glue and picking up any excess. Once CA glue hits the cotton tip the Q-Tip is thrown away. It quickly hardens and can't be used a second time.


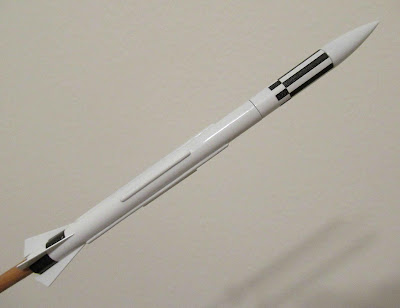
The launch lug looks big on the model.
It is glue beside on of the smaller tunnels so the launch rod can easily slide through.