Sunday, July 31, 2016

Original Goony Designs

In a comment, Naoto Kimura reminded me of the Goonybird posts on YORF from 2007.
CLICK HERE

al packer
Old Fogey
Gooneybird Originals

"A good friend of mine slipped the attached sketches under my door. These are indeed the original sketches by Mike Dorffler and Wayne Kellner. I'm looking forward to seeing your reactions!"

Copied from that post, here are the original drawings for the Goonybirds. To the right is what was eventually produced.
I can imagine the Damon Corporate upper management had reservations about the politically incorrect first draft designs.


The MatterVerkens became the Missile Toe.


The Sopwitter ended up as the Sky Shriek. The smaller red drawing on the upper right has the scalloped wings of the Sky Shriek.


The Russian was softened into the Zoom Broom.


The Saki Bomb morphed into the Cloud Hopper.


The Star Snoop and Galaxy Guppy drawings weren't shown in the YORF post. Who knows what those first proposals were. The Galaxy Guppy could have been a Zeppelin.
Personally, I like the originals shown on the left.
I remember going through the 1973 Estes catalog, seeing the Goonybirds and thinking: "Really?" But, they could be popular with the kids dragged along to a launch.
To see the Estes 1973 catalog pages, CLICK HERE


Someone mentioned in the thread the old Car Toons magazines may have had an influence. That and the Ed Big Daddy Roth designs.

A few years back Semroc brought out larger "Growny" models of the original Russian and the Saki Bomb.

Saturday, July 30, 2016

Estes Red Max Hello Kitty Version Finished


These Hello Kitty decals take the Red Max decor down a softer path. Excelsior Rocketry made these, I've probably had them for two years.

The Iron Cross and "kills" decals are smaller in area when compared to the Red Max equivalents.
The nose cone finish is a little softer, still shiny not a full gloss. The satin sheen seemed more appropriate.
This one will be auctioned off on Ebay. It would make a perfect rocket for a wife or daughter.

Friday, July 29, 2016

Estes Red Max Build, Here Kitty, Kitty!


What the Hello?
If I have two of the same kit, I'll build both at the same time. Sometimes the two identical models will get a different decor.
These Hello Kitty decals were offered by Excelsior, Sandman Decals. Gordie is limited in his decal production now, the Alp printers are problematic. He might still have some of these in stock. Sorry, I don't have this art available.

That little decal at the center right shouldn't be in this picture. That's actually the small white decal Gordon made up for the Mini Max nose cone. The Estes Mini max kit doesn't include the white decals.

Alps printed (and home printed decals) require a clear coat before transferring. Home print decals seem thinner and a bit harder to position than kit decals.
TIP: Where I can, wide body wrap decals are cut in two for easier placement.
I've heard of problems placing the Mega Red Max (bigger, Pro Series II) skull and crossbones decal. On the new Little Joe II I would probably cut the large wrap into easier to place smaller pieces.

You Know You're A Lazy Model Builder When . . .


. . . cutting out fins the knife slips. You've cut your finger.
You're too lazy to go upstairs to get a real Band-Aid.

Thursday, July 28, 2016

Estes Red Max Build, Background


The Red Max first showed up in the 1971 Citation Catalog. To see it, CLICK HERE
The Citation line were boxed kits meant for sales in department store shelves. Bagged kits were more suited for hobby shops.
While you're paging through the Citation catalog, take a look at the pop pod gliding Bomarc and the chromed Quasar and Star Port launcher.
This Citation lineup also introduced the classic Patriot and Starship Vega.
The Citation engines were designated A-3 (A8-3), B-2 (B6-2) an so on.


The Citation rockets were integrated into the regular Estes lineup in the 1973 catalog.

TRIVIA: The Quasar was a essentially a chromed Alpha III. As the story goes, the Quasar fins were Alpha fin cans, the tips clipped off with scissors. I don't know if that is true or not.


I checked the old Red Max instructions at JimZs - CLICK HERE
I remembered painting my first Red Max orange. It doesn't make too much sense, but it was suggested in Step 11. The nose cone can be left white? I don't think so -
I would think most builders painted the lower body the obvious red color.

Wednesday, July 27, 2016

Estes Red Max Finished


If anybody was bored by this 3FNC build - too bad! Once in a while I like building something simple.

Simple with lots of goofy decals, and a classic to boot!
I understand some Red Max kits don't have the X882 white decal for the nose cone. The Mini Max (BT-50 downscale kit) doesn't include them.


I already have a Red Max in my active flying fleet so this new one will be sold on Ebay.

The back end is clean, no paint inside the engine mount area. On the last post I touched up the rear fin edges with red paint. The rear edge of the body tube also got some red rolled on with a Q-tip.
The replaceable Kevlar mount works best on BT-50 and larger models.

Tuesday, July 26, 2016

Estes Red Max Build, Part 9, Touch-Up Paint - Tip

I didn't get an opaque red on the trailing edge of one fin. The decals were already placed when I noticed it.
Not wanting to mask and re-shoot red paint, I did an unnoticeable touch-up.

A small plastic mixing cup was lined with a sandwich bag. Press the bag all the way down into the cup. Do your best to roll it over the sides. Spray the red paint close and into the cup

Dip a Q-tip into the paint. There's probably too much paint on the Q-tip so roll some of the excess off on a paper towel.
Simply roll, (don't brush) the paint onto the edge.
A rounded surface like this is easiest to touch-up. Flat surfaces (fin faces and body tubes) are harder to fix.
The Rustoleum 2X paints I use have more pigment than other brands and should only require one coat to cover this area.

In the picture you can see half of the fin has been touched up. The edge above the Q-tip still needs paint.

Monday, July 25, 2016

NARAM Live Site is Active!


NARAM 58 is up and running!
The NARAM Live website is starting to post some great pictures from Saturday:           CLICK HERE
In addition to pictures, look for "YouTube Playlist". The Manufacturer Forum videos are there starting at Video #15..
For those who can't make the meet, it's the next best thing to being there!

Estes Red Max Build, Part 8, Paint and Decals

The great thing about the Red Max is there's no masking. The body is red, the nose cone is black.
You could just leave the nose cone as is, it's molded in black. I sand down the seams and fill the ruts. Primer/filler gets rid of any remaining seam.
The decals (with bad German accents) make the model!


Be careful as you cut out the decals. The clear coat on the big skull and crossbones decal should have been extended out, not so tight against the black outline - possible tears there.
The white decals (bottom piece) are almost impossible to see against the white backing paper. Hold up against a strong light to see the reflective coat.


TIP: I stacked up some CD cases to get a baseline that is parallel to the table top.
Set the decal so it is on top of or evenly spaced (side to side) above the CD case reference.


TRIVIA: I always thought this "TOP SECRET" decal was interesting. The current instructions don't show it on the model. That decal was used on a DOM entry called the Top Secret. Check out the post: CLICK HERE
On the decal sheet the "hit" decal (placed on the fin) is designated as optional. I prefer this funnier decal over the Top Secret decal.

Sunday, July 24, 2016

Normal Stats!


It looks like the page views sources are back to normal again!
Russia is a medium green. Whew!

Estes Red Max Build, Part 7, Undercoats and Wet Sanding


TIP: The fin positioning line is carried under the back edge of the body tube.
With the fin positioned onto the body tube, the line would be completely covered. With the line continued over the back lip you have another alignment point.


The last post mentioned how little glue is used to first position the launch lugs. The same goes for the fins.
A very thin line of glue is applied. After I'm sure the fins are in line additional fillets will make a stronger bond.


The first white coat showed the raised fin grain on a few fins.
I did some some damp sanding with 400 grit. I hope these will disappear after the next white coat is applied.
The 400 grit I use now is the Norton Premium sandpaper.
It doesn't load up like the older black 400 grit did. Any paint that does stick is easily removed under running water with a soft brass brush.

Two 1" x 2" pieces were all that was needed to wet sand two Red Max kits. After brushing off the crud, the small pieces of sandpaper will be used again.

TIP: Don't use large pieces of sandpaper to wet sand your models. If you cut a larger piece (maybe 4" x 4") you'll probably sand using the just edge areas leaving the center clean. Cut that 4" square piece into smaller pieces to use the sandpaper more efficiently.

Saturday, July 23, 2016

Estes Red Max Build, Part 6, Launch Lugs and Primer


The launch lugs are short, shorter than I remember.
After they were lightly tacked down and the glue dried, a rod was used to make sure they were in line.

TIP: When gluing lugs and fins try using very little glue initially.
It doesn't take much glue to tack them on. If they dry and end up out of line, it's easier to remove the parts and try again.

The fins and body tube will be shot separately with primer/filler.
A strip of masking tape the length of the root edge was set down the fin position pencil lines.


After the primer/filler dried you can see some raised pore lines.
The was also some open pores. The open grain got a rub of CWF and smooth sanding.


The primer/filler helps to fill whats left of the nose cone molding seam. You won't see this until the primer/filler is sanded down.

Friday, July 22, 2016

Russian Hits - What?

Today the blog got over 3,500 hits!
Sure I should be excited, but maybe not.

Over 2,700 hits from Russia?
Typically the blog gets anywhere from 750 hits to 1,500 a day. It varies, weekends get more readers.

These have got to be some sort of robotic hits but I'm not seeing any questionable sources like "Vampirestats".

I've cracked the country of Moldova this month! Great, now I have homework. What's a Moldova? 

EDIT: I just did a search. The first listing that came up was for Anatasia Date, a Moldovian Marriage site. Hooray! Rockets are finally a chick magnet with single Moldovian women!
The second listing: "Moldova, officially the Republic of Moldova, is a landlocked country in Eastern Europe, bordered by Romania to the west and Ukraine to the north, east, and south. The capital city is ChiÈ™inău."
See what you learn on a nerdy rocket blog?

Estes Red Max Build, Part 5, Nose Cone and Fin Marking


One of the nose cones had "scars" on it.
It looks like some plastic flash was cut off at the factory.

It looked worse than it was and sanded smooth with 220 grit sandpaper. 400 Grit was used before any spray primer.


This was one of the first kits to use this style of card stock fin marking guide.
I did have trouble getting it over the BT-60 tubing. The center hole was slightly enlarged with some 220 grit.

TIP: The engine mount was glued in first before marking the fin lines. Sometimes it's easier to glue in the mount first. You avoid any trouble lining up the engine hook under the launch lugs as the glue is quickly setting up.
So the engine mount goes in first, then mark the tube for the launch lugs and fins.

Two guides are used. Set both the "flats" on a table and mark with pencil in the V notches. Line the launch lug line directly over the engine hook.
Extend the notches down the tube with an aluminum angle.

Thursday, July 21, 2016

Vintage Rocket Retrospective Blog


Here's a great blog from Zurich, Switzerland -
VINTAGE ROCKETRY RETROSPECTION
"Incoherent reminiscences and images of building and flying A to N motor powered model rockets in Switzerland and elsewhere since 1975."

Lots of pictures and history. To check it out, CLICK HERE

Estes Red Max Build, Part 4, Fins Prep

The balsa density is really hard!
I would think - the harder the wood, the harder it is for the laser to cut through it. The top cut was burnt and wide. The cut didn't go all the way through to the bottom.

I took some passes with a sharp knife to get through it.
I don't mind hard balsa fins, They'll hold up better on a hard landing.


With laser cutting there is no real need to gang sand fins to get them all the same shape.
Hand cut fins should be stacked and gang sanded to get them a consistent shape. With laser cutting, you draw one then copy and paste it two or three more times. It's the same fins profile over and over.


When sanding off the burnt edges at a 90 degree angle you can see the wedge angle of the laser cut.
I've read instructions where you are told you can leave the burnt edges as is. They say glue will still hold on the charred edge.

Not me. I remove it and square up fin edges with 220 grit on a sanding block.

Wednesday, July 20, 2016

Estes Red Max Build, Part 3, Engine Hook Retension

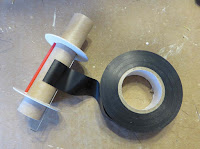
I won't be able to use the Mylar retention ring with the Q-tip tube on the other side. I'll use black electrical tape.

I prefer doing 1 1/2 wraps of tape with two wraps over the engine hook.
Start the wrap halfway between the Q-tip tube and the engine hook.
The tube and engine hook are directly opposite each other.


Continue all the way around, over the Q-tip tube then back over the starting point.
Continue around over the hook a second time.
Mark the tape on the opposite side you started from. Lift the tape wrap and cut off the tape. Press the tape down - done!

The engine block is recessed about 3/4" inside the top of the engine mount tube. Sometimes a loose block can get glued in crooked when it hits the top bend of the engine hook.

TIP: Apply glue inside the tube and press the block in place with an engine casing. The casing will keep it straight all the way onto the engine hook bend.

Tuesday, July 19, 2016

Estes Red Max Build, Part 2, Engine Mount


After applying some CA glue to the inside top and bottom of the engine mount tube, the tube edges got some CA, too.
The edges will be squared off with some 400 grit on a sanding block.

Before applying CA to the inside tube, look ahead in the instructions. Be sure that nothing will be glued over the area that got sealed with the CA glue.
Here's a before and after punching of the centering rings.
(The top two rings should be flipped, the one on the right should be on the left. It's the lower ring.)

Pencil lines were drawn through the centers.
The right sides get a punch for the Q-tip tube that'll be part of the replaceable Kevlar line.

The ring on the right got a small "divot" punch to go over the upper end of the engine hook..


The lower ring (on the left) is placed lower than the instructions say, 1/2" from the end of the tube.
The upper ring is set farther down and over the top end of the engine hook, again for more strength.

The red tube is a hollow plastic Q-tip tube. With the rings dry fitted I can cut the tube to size. It'll end up just a little longer than the space between the centering rings. The ends of the tube will stick out the holes on either side, about 1/16"

The upper ring ended up about 1 1/8" from the top of the engine mount tube.

TIP: If you have a ruler that has the measurements starting even with the end, use it to check the ring depth three or four places rotating it around the tube. This will get the ring placement 90 degrees to the tube.