Showing posts with label E Delta Wedge. Show all posts

Friday, March 18, 2022

Estes Delta Wedge Clone #1931 Build, Finished


When I make a clone, I usually try to match the catalog colors and decals. The original kit had some white decals, I couldn't see how to reproduce those on my ink jet printer. So I compromised and went with silver instead of the recommended dark blue color. Home print decals would not have shown up on that dark color.

The lightning bolt decal on the short fins is a bit corny.


I added leading edge decals to the bottom of the wing. It looked sparse with only the "84" and ring of stars.

Visually, there's not much going on at the nose of the rocket! 

The wing seems wide for a BT-20 sized rocket. 
A very different build and a good exercise in card stock forming.

Estes Delta Wedge Clone #1931 Build, Part 10, More Decals


Here's a good fit of the forward wrap decal.

Look close at the second picture - you can see a light pencil line beneath the decal.
Set the decal edge in line with the pencil line. It is very important to get the initial placement straight or the decal won't match up when the remainder is rolled around the tube.


Here's how the roll decal looks from the side.
A home print decal set over silver paint gives the red ink a candy color look.


This USA decal struck me as being too wide. It crowds the leading edge decal and the fin on the right side.

On my decal re-draw I made the USA decal a bit narrower.


I used two shorter scrap lengths of 1/8" elastic left over from other builds. These two lengths were tied together and joined to the Kevlar line from the motor mount.

A 12" Odd'l Rockets chute was tied onto a shock cord loop a few inches away from the nose cone. Normally I'd use a snap swivel, but didn't have any close by.

Thursday, March 17, 2022

Estes Delta Wedge Clone #1931 Build, Part 9, Paint & Decals


NO masking!
The entire model was spray painted with Rustoleum 2X, Metallic Aluminum. 

These days I don't like using Rusto 2X, but have had good results with their metallic paints.


These long leading edge decals were tough to apply.
I set the decal in place (dry, before soaking) to get an idea of the spacing from the leading edge.


These decals didn't go well!
The long leading edge decals curled onto themselves.

The forward body tube wrap red color cracked.
It was also too long and the overlap didn't match up. 
I tried cutting the wrap decal shorter but took off too much!

I went back and copied a few of the leading edge decals to have some extras.
To get the right size, I made three different wraps, each one a little different width. All three were tried - #2 will end up on the final decal sheet.

Wednesday, March 16, 2022

Estes Delta Wedge Clone #1931 Build, Part 8, White Undercoats, More Fillets & Cleaning Up


After the white undercoats are shot - 
All the imperfections show up!

Fillet bubbles around the launch lugs and another bubble at the body tube/wing joint.

More glue applied and smoothed. Another coat of white is shot.

Some of the folds raised fibers on the canopy card stock.


The wing edges are also fuzzy.

TIP: Run some medium CA glue over the fuzzy edges. Lightly apply the CA with a Q-tip. After it dries, the glue stiffens up the fuzzies and allows it to be smooth sanded with 400 grit.

Tuesday, March 15, 2022

Estes Delta Wedge Clone #1931 Build, Part 7, Canopy Gluing


Set the canopy over the center raised crease line 3/4" forward of the top wedge fin.
Trace around the edges with pencil.
Again, it doesn't take much glue to adhere cardstock to cardstock. After applying a line of glue around the inside edge, remove any excess and even out the glue with a Q-tip.

Using the pencil line, center and press the canopy onto the wing. Hold until dry making sure the sides stay down against the wing surface.


On the left is the glue applied.
On the right is the finger smoothed fillet.

Monday, March 14, 2022

Estes Delta Wedge Clone #1931 Build, Part 6, Lug Fillets & Engine Block


After the glue dried, This shows how little was used in the rear plate fillets.

No glue on the lugs yet.


I ran a line of glue down one side of the lug.

The lug is turned from the back pushing the glue line into the joint.
Now you can add some glue to the back end of the lug/plate joints.
I didn't like that there was no engine block. I'd rather use some Kevlar tied to the block than have a tri-fold shock cord mount blocking the parachute.

A notch was cut in the block and Kevlar tied on.
The block will be slid down from the top of the tube dry, and meet the glue line applied in the next picture. 
For now, position the block in a "ready" position to be slid down using a dowel.

Using a dowel, a line of glue was set in the tube just above the upper bend of the engine hook.

The block was pushed into the glue, down from the top using a dowel. Keep sliding the block down until it rests against the upper bend of the hook.

Remove any excess glue using two Q-tips taped together for the extra length needed to reach it.

Sunday, March 13, 2022

Estes Delta Wedge Clone #1931 Build, Part 5, Gluing It All Up


Here's a good fit of the wedge fin in the triangular slot.

This is still a dry fit - no glue yet.


Before the wing is glued on,
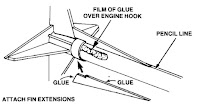
Apply some glue over the engine hook.

This could help as there isn't an engine block.

I added a glue tab to the cockpit. The original kit has you butt up and glue just the edges together. Notice I don't put glue on the tab, but inside the opposite edge. 

On the left you can see very little glue applied.
On the right, the glued area is held with long tweezers.


I didn't apply any glue until after with wing was slid on.

Fillets were applied and smoothed with a Q-tip.
Glue was also applied and smoothed around the narrow end of the wing/body tube joint.
 

Saturday, March 12, 2022

Estes Delta Wedge Clone #1931 Build, Part 4, Fitting The Parts


Note the glue line down the tube in front of a wedge fin. You really don't need much glue to adhere the internal fin extension ribs.
The instructions better show this part of the build.
Before the ribs are glued in, the engine hook was placed and a retainer ring glued on top.
The notch under the long support ribs goes over the Mylar ring.

There isn't an engine block, some kits from this era didn't include them.


Here's the view from the back plate.

The wedge fins are glued to the tube and overhang the face of the rear plate.
The tabs on the plate slide into the wedge fins.


Another test fit of the large wing before gluing.
This model required a lot of fitting and adjustments before glue is applied.


On one side, the cut out for the wedge fin had to be widened slightly.

Friday, March 11, 2022

Estes Delta Wedge Clone #1931 Build, Part 3, Engine Mount & Wedge Fins

With this build first attempt a year ago, I can't find some of the pictures. The Estes instruction illustrations will help here.

Draw a line between the two outside points of the back plate for alignment.


Use a four fin alignment guide to mark the body tube.

The back plate lines align with the lines drawn on the tube. Glue the tube end flush with the back plate.


The two wedge shaped fin fold lines are embossed with the butter knife and straight edge.

On the left, you can see how little glue is needed to assemble cardstock. 

The leading edge is burnished shut.


Here's probably more glue than is needed to set the two wedge fins.
Placement is shown in the next post.

Thursday, March 10, 2022

Estes Delta Wedge Clone #1931 Build, Part 2, Gluing Up The Big Wing

I used a glue stick to join the two wing halves.
The glue stick goes on purple and lets you see if you have a complete, even coat of glue. You have to move quickly though - when the color changes from purple to clear, the glue is drying.
TIP: Glue sticks aren't as watery as bottled glue and can give you more control in certain applications. 


I used my favorite burnishing tool, the back end barrel of a Sharpie pen.

Be ready, the two halves can get slippery and move as you burnish. Press and check, press and check the alignment.


After the glue stick dried, I tried some test fits over the BT-20H tube.
The slightly wider diameter of the 20H heavy wall tube required some trimming of the front end to fit.

The templates I drew up should fit a standard BT-20 tube pretty well.

Wednesday, March 9, 2022

Estes Delta Wedge Clone #1931 Build, Part 1, Forming The Big Wing

The cardstock pieces were printed on some white file folders cut down to 8.5 x 11 inches. The file folders are a little thicker than most 110 lb. cardstock.
NOTE: The file folder stock is thicker, but really soaked up the spray paint. It took some sanding between coats to smooth it out.

I embossed the dashed fold lines using the tip of a butter knife and metal straight edge. 
The initial folds were made by pinching the embossed lines over the edge of an engineers scale ruler. Go slow and check the alignment over the ruler edge at the top and bottom before running your fingertips down the fold line.

On the left you can see the fold lines. Check the Jim Z's instructions to see the fold directions.

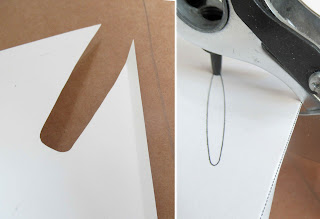
The launch lug ovals are different. I can never get my knife blade to cut around the tight oval ends.
I turned my rotary punch to the smallest tube. The folded wing sides had to be sharply bent for the punch to reach to oval ends.


On the left are the top and bottom punched holes.

It's much easier to connect the curve with a new knife blade.

Tuesday, March 8, 2022

Estes Delta Wedge Clone #1931, Build, Background

This was an interesting build!
I started it two years ago, but set it aside after having problems getting a good wing fit around the BT-20 main body tube.

Because I started with the wing fitting, I didn't assemble everything for a "parts" picture.

Above is the catalog picture when the kit was introduced in 1984.
The picture below right was provided by Gerry Fortin 
from the instructions at JimZ's: CLICK HERE 

Here's the parts list from Jim Z's:

The main wedge body and wedge shaped fins were die-cut from heavy cardstock. I re-drew the templates and cleaned things up for my second try at the build.

While the available templates I drew up fit a standard BT-20 tube, I made some adjustments on this blog build to fit my heavy walled BT-20H tubing.

The kit supplied white decals set on the overall dark blue painted model. The face card picture looks more like a solid black, but the instructions suggest dark blue. I can't print white decals so I re-drew them and will paint the rocket a metallic silver.

If you would like to build this model (and like a good challenge) -
The templates and (home print) decals are available to Patreon supporters.
Email me at oddlrockets@bellsouth.net and ask for the Delta Wedge PDFs.  
Off we go . . .