Showing posts with label Centurion Project. Show all posts

Saturday, August 15, 2020

Clear Tape Over Leading Edges? TIP

Something I hadn't thought about before -
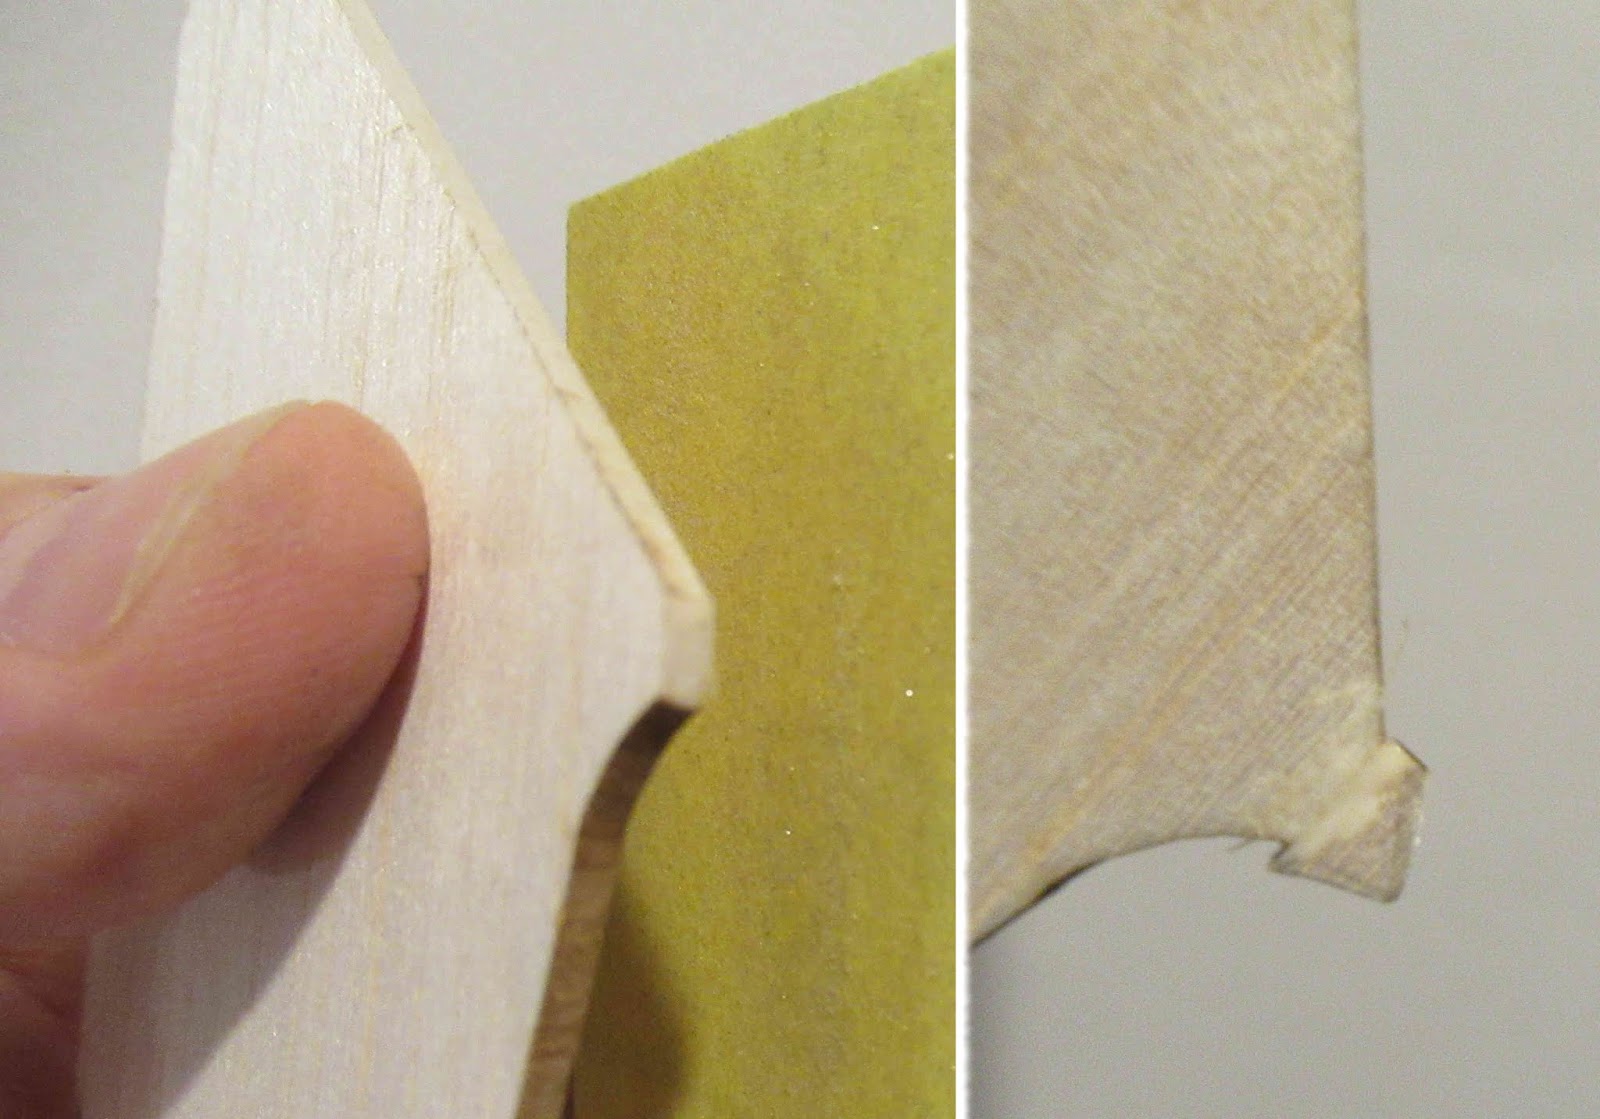
A protective cover over the leading edges of fins. Here, TRF posts are talking about the fins on the Estes Ascender splitting down the leading edge glue seam during a strong boost.

Thirsty Barbarian posted:
"You could wrap a strip of electrical tape over the leading edge if you go for more aggressive motors.

5X7 added:
"I think clear packing tape would be effective and won’t ruin the great graphics. I have made home decals with good packing tape overlain that are still good now after 25 years."

Neil W answered:
"Even plain old cellophane tape (i.e. Scotch tape) does the trick just fine. Dunno if it lasts 25 years though. "

Thirsty Barbarian then finished:
"Clear tape sounds like a good option. The point is to seal that glued joint from the air stream, so I'm sure a lot of different products would be good for that."


My thought:
This might be good for a LPR model with soft balsa.
The balsa on my Centurion Project (Centurion with interchangeable engine mounts) had soft balsa fins. I'm still kicking myself for not cutting new ones from stiffer stock. A shock cord "snap back" could do some damage to the leading edges. The clear tape (or packing tape) reinforcement might just be the answer.

To read about the Centurion Project and interchangeable engine mounts (single 18mm, two 18mm and single 24mm mounts in one rocket) CLICK HERE

Saturday, July 20, 2019

Centurion Project, Finished!


For comparison - 
This is the Estes Cosmic Explorer - leaner, longer nose cone and a bit shorter. 1.35" diameter, BT-55


Here's the (Centuri) Semroc Centurion, the real subject piece for this build.

Stockier, shorter nose cone and taller. ST-16 tube at 1.64" diameter.
This is probably the better demonstration bird of the two.


These last five pictures are of the Semroc Centurion.


Here's the two different interchangeable engine mounts.

On the left - the two 18mm cluster mount. This model should be good with two C6-5s.
On the right is the single 24mm mount for a D12-5.
By the looks of the picture I'm going to lightly ream the rough launch lug end with a sharpened dowel.

And the top!
I'm glad to finally get back to and finish this Centurion Project.
I hope to launch the two engine cluster version after the new NEFAR field is established.

Friday, July 19, 2019

Centurion Project, Part 13, Tying It All Up!


CENTURION:
I glued the baffle into to the (shown upside down here) upper body tube. There is a pencil mark at the halfway point. The other lines are leftover paint lines when the model was spray painted white.


CENTURION:
The 1/4" wide shock cord was tied to the screw eye using a Duncan Loop Knot.


CENTURION:
The parachute shroud lines were laced through the latch end of the snap swivel. This method was suggested by Ed Mitton.
The other end was tied to an overhand knot in the shock cord with a double loop of some scrap shroud line.
COSMIC EXPLORER:
The 18" parachute seems a big large for this size model, a 15" chute would be better.
TIP: You are better off cutting out the spill hole before assembling the parachute. I had already assembled the chute.
On the left you can see a shroud line running underneath the spill hole location. Be sure to clear the shroud lines outside the perimeter of the spill hole before cutting the chute with your knife.


CENTURION:
I don't like overall covering a rocket with Future or acrylic finishes. Rockets can get sticky in humid weather.

TIP: I will roll a little Future over the open ends of the decals - just the joints and cut ends.

Thursday, July 18, 2019

Centurion Project, Part 12, More Decals and Trimming


Here's the decals from the Semroc Centurion kit - not nearly as many as red stripes as supplied with the Estes Cosmic Explorer.


CENTURION:
The original Centuri kit did have a red stripe running down both sides of the body. The Semroc reissue kit only gives you red stripes for a single fin stripe (both sides) and a horizontal stripe below the black upper section.


CENTURION:
GOTCHA: One single horizontal red stripe isn't long enough to reach around the body tube! This wrap was made from two separate pieces, there's another overlap around the right side.

I decided to use the two remaining stripes on one side of two opposite fins.

The ends were pressed down over the rounded leading and squared trailing edges.
The picture on the right shows the tops after trimming with a razor blade. The decals are thin, it only takes a very light pass with the blade to cut through the ends.


CENTURION:
GOTCHA: I don't know why the decal has two Centurion name decals. This makes no sense. You can apply one on the open side, but the launch lug would get in the way of the second decal.
I would have rather had more red stripes on the decal sheet.

Wednesday, July 17, 2019

Centurion Project, Part 11, Edges and Decals

I'll be bouncing back and forth between the finishing and decals on the Semroc Centurion and Estes Cosmic Explorer. If you see the model name at the top of the paragraph, that's the model I'm working on at the moment.


CENTURION
I ran a Sharpie around the shoulder lip so you wouldn't see the balsa shoulder if the nose cone wasn't all the way in.


CENTURION
The upper black body tube edge got a swipe of a Sharpie to make a sharper color separation when the tubes are joined together. This is a dry fit.


COSMIC EXPLORER
Decals - The vertical red stripes that run up the body tube have to be pieced together. Sight from the rear to make sure they are straight all the way up the tube.

COSMIC EXPLORER
I had a crack and break on the horizontal red stripe. Sometimes you can salvage a broken decal, but not this time.

TIP: Keep old decals! I found decals from an old Estes kit. Who knows where I came across this decal. The red color and width were very close.


COSMIC EXPLORER
The start point of the decal is on the back, in line with the launch lug.
Nobody will notice the decal patch on the launcher.

Tuesday, July 16, 2019

Centurion Project, Part 10, Black and White Paint

This is a very easy model to paint, the low end is white, the upper tube and nose cone are black.
TIP: Always think ahead when assembling a rocket. The instructions tell you to glue the two body tube sections together with a coupler before finishing. Wait to glue the two body tubes and spray them separately - no masking!
After you are happy with the upper and lower sections in their different colors, then glue them together.


Here's one of those examples where the paint can help fill some low areas, here on the launch lug glue fillet.
Sanding with 400 grit took some paint off the fillet . After the final coat of paint you probably won't even notice the dips in the glue line.
On the upper body, I did do an overall white undercoat and followed by light sanding.
There is no need to get a consistent, bright white cover on the upper section - it will end up being black.

Go right to the gloss black!
If the final colors are light colors, you do want a even, bright white undercoat. This isn't needed when spraying the dark black.

Monday, July 15, 2019

Centurion Project, Part 9, Ends & Edges

The larger Centurion has two 3/16" launch lugs.
On the left is a typical applied line of glue.
TIP: On the right I've placed my thumb and index finger into a "V" shape. This V is run down the glue line evening it up and removing excess. This helps get a cleaner glue joint before fillets are applied.
You can also use the V shaping of glue lines on the root edges of fins before setting them on the body tube.


The lower body is ready for the white paint.


TIP: Try not to let the sandpaper roll over a squared fin edge.
My middle finger is rolled over the outside edge of the fin and acts as a "bumper" preventing the sandpaper from rounding off the sharp fin edge.


This Centuri style baffle was already assembled from a few years back.

I didn't like the 1/4" elastic shock cord, it was an open weave when stretched out. It didn't look as strong as normal kit elastic.
I had to slide a single edge razor blade under the cap piece to remove it. Some new, stronger 1/4" black elastic was tied on and the cap glued back on.

Sunday, July 14, 2019

Centurion Project, Part 8, Fin Gluing

These pictures are of the Estes Cosmic Explorer, the slightly down scaled version of the Centuri Centurion.
The Estes Cosmic Explorer (BT-55) has through the wall fins, the root edge of the fins glue to the engine mount tube.

Looking inside the pre-cut fin slot you can see the black electrical tape I used around the engine hook. The black tape also holds the tube for the replaceable Kevlar mount.

In the above left picture the fin doesn't quite seat against the outside body tube. The electrical tape is wider than the slot recess that would have fit the Mylar retention ring.

I've marked the tab with pencil where the notch needs to be wider. I carefully shaved off the pencil area to fit over the tape wrap.

The right side of the first picture (above) shows a better fit of the root edge.


Back to the larger Centurion:
These fins are surface glued onto the body tube - no fin slots.

After the fin lines are drawn, the primer paint is scraped off a little wider than the 3/32" thick fins.
The pencil line is scraped off, but redrawn before gluing the fins on.


From the back end - 
At the edge of the fin you can see a pencil line drawn around the end of the body tube.
These fins totally cover the pencil line at the back. The small pencil "tic" mark gives you something to center the root edge on when you can't see the line.

Inside is the engine lock strip, centered between two fins.

Saturday, July 13, 2019

Centurion Project, Part 7, Fin and Body Tube Fill


The body tubes got the standard CWF seam fill and sanding.

On the left is the rough cut body tubes joined by a coupler. The tube cuts aren't great. True it up with a sanding block.
The picture on the right shows the new joint after sanding the ends with a block.

Here's the body tube after the CWF and sanding, then filler/primer and sanding.
You can see some of the gray filler/primer left in the tube seams. The filler/primer fills any recesses left after the first CWF step.
On balsa fins - I prefer a two-step CWF, sanding then filler/primer and sanding over four applications of sanding sealer and sanding.

The body tube will look mottled after sanding down the filler/primer. Most tubes are not perfectly smooth.


Here's a good example of filled balsa.
Again the filler/primer can be seen left in some of the balsa pores.


The old original nose cone also got CWF and filler/primer and sanding.

Friday, July 12, 2019

Centurion Project, Part 6, Fin Fix

One fin had a broken tip on the trailing edge!
The old Centuri instructions suggest sanding an airfoil shape to the fins after they are glued onto the body tube.
The Semroc instructions say: "Round all edges except the root edges (which will be glued to the body tube). The trailing edge and tip edge can be sanded to a taper for more aerodynamic fins. Be careful that the curve at the end of the root edge does not get broken off. It is fragile until glued to the body tube."
The Estes Cosmic Explorer say to round only the leading edge. Because that trailing edge is delicate, I'll only round off the leading edge.

That broken tip edge was ragged.
FIX: For a flatter gluing edge, the tip was squared off using a sanding block.
Save the leftover balsa from the laser cut sheet for moments like this. A small triangle was cut and glued onto the tip.


After it dried, the tip was shaved down closer to the root edge line of the fin. The root edge was evened up with a sanding block.

Sanding this inside curve could be tricky, you don't want to break it off again.
TIP: Stack all three fins with the repair fin in the center. the outside fins will support the tip and give you a sanding template to follow.

Wrap some 400 grit around an dowel and carefully sand the tip down to the other fins contour.

Thursday, July 11, 2019

Centurion Project, Part 5, Single 24mm Engine Mount


I only had a Estes style BT-50 sized engine block. It was too loose a fit in the Centuri ST-9, 24mm engine mount.
The outside diameter was built up using a copy paper wrap strip.
Glue was applied with a glue stick.


The strip was wrapped around the block and allowed to dry.
The overhang edges were sanded off with a block.


Here's the locking wood strip.
It is glued into the rear of the body tube, recessed by 1/4" inside the tube.

A very slight glue fillet was set into the sides, the excess wiped away with a Q-tip. Don't end up with much glue on the sides, it might get in the way of the sliding centering rings.


This shows the 24mm mount being slid into the main tube.
The upper centering ring slot slides over the locking strip. The mount is slid in until it stops against the lower ring.
Turn the engine mount and it is locked over the wood strip.

Wednesday, July 10, 2019

Centurion Project, Part 4, Dual 18mm Engine Mount


The inside edges of the engine mount tubes got a wipe of medium CA glue before assembly.
Notice here I am also applying CA just over the edge of the tube. Light sanding follows with 400 grit.


On the left is a dry fit of the dual 18mm mount parts. Be sure the tape retention piece is just below the upper centering ring.

On the right the mount is flipped over to see the orientation of the engine hooks.


Before gluing the rings in place, check the fit of the basswood locking piece. It should slip in but not allow much movement between the rings.

Monday, July 8, 2019

Centurion Project, Part 3, Semroc EM Instructions


In order for the locking basswood strip to work, the positioning of the centering rings is critical.
Here's step nine from the Semroc instructions.
The rear ring is glued 3/8" from the rear of the tube. The upper ring is 2 1/4" from the rear.


The lower ring has the larger notches for movement of the engine hooks.
The upper ring has the larger rectangle notch for the locking basswood strip that glues inside the body tube.


The Centuri style mount uses the appropriate ST-7 tubes. The fit was tight so I enlarged the holes slightly by wrapping sandpaper around an used engine.
Here's a test fit of the 18mm, two engine mount.
The basswood locking strip was used to double check the spacing between the centering rings before glue fillets were added.
Notice the large notch in the upper ring. The notch slides over the basswood strip. The (no notch) lower ring stops the mount from going any further up into the tube. A quarter turn of the mount locks it in place inside the body tube.

GOTCHA: The thin "points" on the centering ring crescents can break off. Carefully slide the assembly together.