Friday, August 31, 2018

Estes "Starter" Igniter Upgrade - Update

A while back I started upgrading the clear tip Estes Starter Igniters using Beacon Fabri-Tac glue and 4F black powder. Many have commented that the igniter treatment has helped them have quicker, more reliable launches.

At the recent Estes NARAM plant tour, we saw the igniter machine in operation. Somebody mentioned the clear igniter tip was nothing more than corn starch, glue and water.


So, the clear tip is water soluble.
I bent the wire ends over the top lip glass of water and let the clear tip soak for a few minutes.


The softened clear tip came off pretty easily. The bridge wire top loop is delicate. Go easy when knocking off the clear tip.

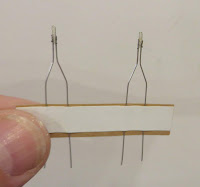
These two bare wire starters (shown below) got the Fabri-Tac glue and powdered black powder applied.
Two regular clear tip were tested beside two with the clear tip removed. All four starters got the glue and BP treatment.

It was apparent the clear tipped igniters took a moment longer to heat before the black powder treatment would flame.
The igniters with the clear tip removed flamed up much faster than the igniters with the clear tips.
The clear tips slowed up the heating of the bridge wire.

So, there you go! If you add an additional step, the Estes Starters can be further improved.

Vashon Valkyrie II Build, Part 6, My Original Vashon Launcher


I honestly don't know how I still have this.
This is my original Vashon Starter Set launcher base. It's been stored for years. The other rocket parts are nowhere to be found.


The two pieces simply interlock.  The fit is tight.A launch rod is pushed into the center hole.

No blast deflector was needed, the Freon propellant (really just a compressed gas) is self refrigerant. Freon was used in air conditioners and aerosol propellant for years. It was responsible for some depletion of the Ozone layer and was outlawed. That was one reason these models were discontinued.
The Vashon name for their Freon was RP-100.

Thursday, August 30, 2018

Centuri Museum and History Video

On the National Association of Rocketry Facebook page, Jonathan Wilkins posted a video link  showing the Centuri Museum. The video is hosted by Lee Piester.
To see the video: CLICK HERE

I had heard there was a Centuri museum, but had not seen this video. Most of the items will go to the Museum of Flight in Seattle, Washington.

Vashon Valkyrie II Build, Part 5, Prepping the Parts - Launcher


There were three dowel legs, 3/8" diameter x 8" long.
One leg was broken, the grain in that leg runs diagonally. It was probably broken when pressed into the tight base holes shown below. The fit was very tight.


This is a simple fix, some yellow glue, a clamp and sanding.

This is the round base, the top surface is on the left, the bottom view on the right.

In the center is the hole drilled for the 1/8" diameter launch rod.


The launcher base is friction fitted together, no glue needed.

It reminds me of the wood dowel launcher that Estes once produced for the Moon Mutt Starter Set.

Wednesday, August 29, 2018

Vashon Valkyrie II Build, Part 4, Parts


I have mentioned before, I found my three rocket binders when we were clearing out my Mom's house. All the instructions from every kit I built are there, including that first Vashon Valkyrie 2.

On the left are the instructions from the set I received from Doug Frost, on the right are my instructions. I had dated them July, 1969.


Apparently this was a different starter set distributed after July of 1969. Comparing the die-cut fin to my original instructions, the fin shape had changed.

On the left is the die-cut fin. On the right is the full size template from my original instruction sheet.
It's a swept parallelogram with clipped lower tip.

The die-cut fin reminds me a little of the Centuri Astro 1 fin shape.


Underneath is the die-cut fin so you can see the difference in the two shapes. The white paper fin was traced and cut from the older instruction sheet.

Three new fins were cut out of 1/16" stiff balsa. The Valkyrie 1 and 2 had 1/16" thick fins. While they seem thin, they feel very stiff when slid into the fin rails later on.
The box had four nose cones molded from stiff Styrofoam. The finished pieces were rough with a few dents.

My original Valkyrie had a balsa nose cone. I knew the Vashon body was 1" diameter. I tried a nose cone from an Odd'l Rockets Break-away kit - a perfect fit! Many Odd'l kits use heavy wall tubing, the wider n.c. shoulder works with the heavy Kraft tube in the Vashon model. On the right is the balsa cone in the printed Kraft tube.
The original kit had an aluminum parachute tube. I will try to simulate the aluminum tube if I can't find one.

Tuesday, August 28, 2018

Vashon Valkyrie II Build, Part 3, Parts


My original 1969 Vashon starter set included a shiny chrome Mylar parachute. This box included a shiny one and this orange and blue printed parachute.
The color chute was 11 3/4" wide from flat to flat. There are eight shroud line attachment points.


"Extra light, extra strong MYLAR Parachute.
The Echo Satellite material."
You could launch the Vashon models by pulling a pin and releasing the plug in the nozzle.
You could also launch it using the "Ignitor Wire". Look close, the wire is sitting on the instruction card. The wire held the plug in place after the pin was carefully slid out. Count down - Touch the other end of the plug leads to a battery. The wire melts and the plug is blown out of the nozzle.

The inset picture shows some timer disks. The disks were placed into the separator segment. More disks, the longer the delay before the parachute tube is released.
That thing that looks like a raisin was a rubber bulb that held contact cement. Cut off the end and squeeze out the glue. Contact cement was used to glue on the launch lug and fin rails to the roughed up aluminum body. Originally these were red, there were two in the kit.

Two fin sheets were included. One sheet was die-cut, the second was screen printed like the some Centuri fin sheets.
It looks like the original owner cut out some fins, not exactly on the printed lines!

Monday, August 27, 2018

Vashon Valkyrie II Build, Part 2, Parts


As I mentioned earlier, there was plenty of extra parts. The picture above shows what parts may have come in the original #802, Valkyrie 2 starter set. There was no Freon (liquid propellant) in the box.

The parts were in very good shape. I've seen these models on Ebay where the builder has roughed up the metal body to attach the fin rails.

The only missing part was the timer/separator segment. The 1" long part had a gripper "spring" that held the parachute tube in place once the lower tank was pressurized. Does anyone have a spare Vashon Separator? If I can't find one, I'll use a 1" long aluminum tube to simulate it.

I'll get into more detail on the parts in the next few posts.

Vashon Valkyrie II Build, Part 1, Opening The Box


There were several variations on the Vashon boxes.
The Valkyrie 2 came in a long box.
My Sears box had a full color overlay. This "801" package is printed in black.


On the right side is a fold of cardboard. The propellant can would have been under it. No RP-100 (Freon) was in the box.

This is unusual. This box holds more than a single starter kit would contain. The original owner may have purchased some spare parts.

There are two V2 (longer) lower bodies that would hold the Freon propellant. White plastic nozzles are friction fit on the low end.
Four Kraft paper style parachute tubes and four hard Styrofoam nose cones are included.
Two 1/4 mil parachutes, one in shiny Mylar, the other a blue and orange print.
Two different fin sheets, printed 1/16" thick balsa. Half of one sheet has been cut out, the fins are missing.
Plenty of fin rails and a length of launch lug. A bag of vent pins and separator timer disks.
A tripod launcher base. This one is round, my original was an interlocking cruciform shape.
There are no separator (parachute timer release) sections. Not a problem, I might be able to pick one up on Ebay.

Sunday, August 26, 2018

Vashon Valkyrie II Background

Anyone who has followed the blog knows I've been trying to find a Vashon Valkyrie 2 rocket. I've given up on a few Ebay bids when the price got too high.

It was one of the first rockets I ever owned. I ordered it through the Sears 1969 Christmas catalog. I thought I paid $19.99, but this catalog page shows it selling for $14.99.
Enlarge the exploded parts picture - note the fin grain is going the wrong direction.


I first saw a Vashon catalog (shown at right) at a friends house in 1969.
To see that catalog: CLICK HERE
We had both built a few Estes rockets, but couldn't get black powder engines in California. Cold Power, Freon propelled rockets were our only choice to get airborne.

These were impressive models. They were larger than the Estes Sky Hook sized models we could afford at the time. The Vashon rockets were metal. Shiny aluminum!

At the recent NARAM I met up again with Doug Frost. In the late 1970s, Doug headed the BAYNAR section near San Jose, California. I participated in many of the club launches.
Doug emailed me and asked if I wanted to share a room to save some money. The host hotel would have run me $1,100 for the week, I welcomed the savings and the chance to catch up with Doug.

We talked about the models we wish we still had. I mentioned the Vashon Valkyrie 2.
Doug said: "I've got one, would you like it?"
It arrived in the mail a few days back. I'll be building it to look like the catalog cover.

NARAM Egg Lofter Build, Finished


I can hear the readers now: "Paint adds weight! Why are you painting a competition model?"
It's just me, I like a smooth, colorful model.

The glue fillets on the natural wood fins showed up on the finished model. Not a big deal, just something to could watch for the next time around.


My competition builds are old school, it's all I know. I just don't have the recent competition experience to know the latest trends. I'll be happy to participate at NARAM and get some qualified flights.

Saturday, August 25, 2018

NARAM Egg Lofter Build, Part 9, Smaller Shroud & Pop Lug

I realized there would be a problem with the long shroud. How can I make vent holes for the altimeter with the shroud in the way?
While I would have liked the long shroud for less drag, I needed more body tube exposed below the shroud for the vent holes.

I went back to PayloadBay.com and printed up another.
TIP: Note the glue tab is narrower at the bottom and the corner angles are steeper at the bottom (see arrows) This helps with a flatter fit at the tube joint.


I formed a clean, narrow glue line for the bottom of the shroud at tube joint. I takes very little glue to hold paper to paper joints.

No centering ring is needed for inside support. The open top of the shroud is supported by the fit against the egg capsule.


I had some Apogee Fly-Away guides for 13mm and 18mm body tubes. These weren't high enough to clear the egg capsule. Apogee sells a guide for use with the egg capsule, I just didn't see it.

I'm glad I saved all my old instruction sheets! Here's the old CMR pop-lug with standoff for egg lofting. This might be a second version of the pop-lug with the smaller lower wire hook.
There is also small segments of body tube that better hold the wire on the standoff.


The fit of the pop lug is very good with clearance for the launch rod.

NARAM Egg Lofter Build, Part 8, Fin Airfoil Shaping

The fins were made using 1/32" thick plywood. I was able to cut them out with scissors, something you couldn't do with balsa.

Mentioned in an earlier build, you can easily gauge the thickness by seeing the ply layers as you sand the airfoil.


The fins got a wipe of CA and smooth sanding with 400 grit.

Notice there isn't any CA glue near the root edge. I wanted the fillets to better adhere to the body tube.
Here's how the first attempt looked before I realized the altimeter and pop lug problems. Too bad, the long shroud would really smooth out the air stream.

The fins were cut off to be reused. The body tube and shroud were thrown away.

Friday, August 24, 2018

NARAM Egg Lofter Build, Part 7, First Shroud Attempt


I went to the Payload Bay website to use the Transition Tool.
http://www.payloadbay.com/page-Tools.html

I figured a long shroud would reduce drag.
The problem is, with this long a shroud, how do punch hole for the altimeter or use a pop launch lug?
I didn't think about this until after the shroud was on the model. More on this later.


At the narrow base of the shroud, I rolled the Sharpie over the glued edge while the glue was still wet to smooth it out.


The shroud was printed on 64 lb. card stock. Normally I use 110 lb. card stock for shrouds but I wanted it lighter.
The whole shroud got a wipe of CA glue to stiffen it up.


Here's how the first shroud fit against the egg capsule and body tube.

Like I mentioned, how would you punch vent holes or use a pop lug?

Thursday, August 23, 2018

NARAM Egg Lofter Build, Part 6, ASP 18" Parachute Kit


The parachute is "spike folded" to find its center. Mark the center point with a Sharpie.

The shroud lines are pre-cut. Even up the ends and fold at the center. Mark the center with a Sharpie.


Set the center mark on the shroud line at the center mark on the parachute.

Tape the shroud line at the corner side of the parachute.

Here you can see the marked center dot on the chute material.
Set the center mark of the shroud line directly on top of the center mark of the Mylar.

1" away from the center dot, place another tape strip over the shroud line. Place another tape strip 1" to the right of the center dot.


On the right side another tape strip is set over the shroud line at chute the "corner".

TIP: Notice the tape holding the line steady for the tape strip placement.

Wednesday, August 22, 2018

NARAM Egg Lofter Build, Part 5, ASP 18" Parachute Kit

I purchased some Hang Time "Over Easy" parachutes from ASP Rocketry.

This parachute is designed for NAR Eggloft Competition so it is reinforced. The shroud lines run over and are taped to the top of the canopy. 1/4 mil Mylar and 18" diameter.
I also have some 12" Mylar parachutes. I'll pick the best chute on the day of the launch.


A strip of self-adhesive Mylar is supplied for shroud line adhesion. The builder cuts the strip into 1/4" wide pieces.

The Mylar strip was taped down for the 1/4" marks.
The wax paper backing was marked with a fine point Sharpie.


The strips were cut with a knife and straightedge. I only cut the Mylar and not to the outside of the waxed paper backing. This kept all the pieces together.


After the shroud lines were removed from the flat spool there was angles creases in the lines. Chances are these lines are some sort of poly blend. The line bends could be trouble when packing the chute.


TIP: Straighten out the lines by pulling them under a hot iron. Don't set the iron too hot, you don't want to melt the shroud lines. Try first at a low setting. If the lines still have folds, increase the heat setting.
Set a towel over the lines to dissipate the heat.

Apogee Fly-Away Rail Guides, Build, Part 3, Finished


Double check the fit around a body tube. I painted my competition models and the fit was a little tight. The rail guides didn't immediately fly off the tube when released.

I wrapped some 220 grit sandpaper around a body tube and sanded the inside diameter slightly larger.


The instructions recommend painting the guides a bright color. Apparently they can fly off and land 10 feet from the launcher. A bright fluorescent color will be easier to find on the ground.

After painting the small rubber bands were pulled into the slots to join the two halves.


Here's how they fit around a BT-20 tube.
Notice the stretched rubber band at the bottom.
At the center top is the "T" shaped halves that slide into the launch rail.

These fly-away rail guides are another great example of what can be made using a laser cutter.