Wednesday, July 22, 2015
NAR Member Record!
NAR President Ted Cochran posted this on the NAR Facebook page yesterday.
I've been in the NAR off and on since the early 1970s. My NAR number is an old one, 19806 SR.
If you re-join after not being a member for a while, you can request your old NAR number.
Tuesday, July 21, 2015
Estes Mercury Redstone #1921 Build Part 17, Tower & Capsule Details, Part F
After the last step you can see why it makes more sense to assemble the tower from the top down, not the bottom up. The tension fit and bend of the inverted Vs would make the tower gluing impossible to do with the legs bowing out at the top.
After everything has dried, add a small bit of glue at the joints.
Look close at the remaining dimple where the last motor nozzle will be glued. The paint was scraped off with the tip of a hobby knife.
All three escape motor nozzles are glued in place.
Here's the finished capsule and tower assembly, minus decals and a dull coat.
The white decals will need some MicroScale Decal Solvent to get the decal into the corrugations in the capsule.
Modifying Estes Engine Hooks? TIP
If ever I run across a engine hook "finger tab", I cut it off and smooth the sharp edges with a metal file. On a model like the Estes Mercury Redstone the standing rocket will rest on the engine hook finger tab. The fin trailing edges won't touch the display shelf!
Finger Tab engine hooks can get caught on clothes pins used to raise the rocket on the launch rod.
In the Odd'l Rocket RAISE Spring instructions I went into detail about how to avoid getting hung up at the launcher.
Last January, Jim (K'Tesh) posted a poll asking how many modify the engine hook finger tabs:
To see the entire forum thead, CLICK HERE
In post #5 David Stribling wrote:
We use clothespins clipped to the rod to keep the rocket off the blast deflector. After having several Estes hooks catch the pin and prevent liftoff, I started whacking them off.
In post #9, Bob Harrington wrote:
I don't actually remove the finger tabs. I just turn it around and install the engine hook with the finger tab at the forward end.
In post #10, Fast Cargo added:
Exactly what I do. By using this method in combination with an engine block results in a hook that is clean looking, and in combination with the 'tabbed' part being hooked around the engine block, minimizes the chance of the hook sliding out of position in either direction.
Finger Tab engine hooks can get caught on clothes pins used to raise the rocket on the launch rod.
In the Odd'l Rocket RAISE Spring instructions I went into detail about how to avoid getting hung up at the launcher.
Last January, Jim (K'Tesh) posted a poll asking how many modify the engine hook finger tabs:
To see the entire forum thead, CLICK HERE
In post #5 David Stribling wrote:
We use clothespins clipped to the rod to keep the rocket off the blast deflector. After having several Estes hooks catch the pin and prevent liftoff, I started whacking them off.
In post #9, Bob Harrington wrote:
I don't actually remove the finger tabs. I just turn it around and install the engine hook with the finger tab at the forward end.
In post #10, Fast Cargo added:
Exactly what I do. By using this method in combination with an engine block results in a hook that is clean looking, and in combination with the 'tabbed' part being hooked around the engine block, minimizes the chance of the hook sliding out of position in either direction.
Monday, July 20, 2015
Estes Mercury Redstone #1921 A Build Part 16, Tower / Capsule Assembly Part E
The antenna cap was glued into the tower.
I'll repeat that - Glue the antenna cap into the inside recessed holes in the tower legs, not onto the top of the capsule . Let dry before proceeding.
Run some glue around the antenna cap and press into place on top of the capsule while lining up the inverted tower Vs with the dimples in the antenna housing bottom piece.
Here's what too many builders have problems with when assembled using the new Estes instructions.
The inverted tower Vs won't fit into the capsule dimples by themselves. The V ends have to be pressed into the recessed holes.
The inverted Vs are bent in slightly, just as they were on the real Mercury Redstone tower.
When pressed in, the ends of the Vs will almost pop into place. Be ready, when you press them in, the tower V on the other side could pop out.
Take a deep breath and try again.
After the V ends of one side are in place, brush on some liquid cement from the outside. Don't just dip and brush - dip, wipe off the excess then apply to the joint.
Again note: I am using liquid plastic glue solvent. It's in a bottle with a brush. I wouldn't recommend assembling the tower and capsule with tube cement.

With a light even pressure, push down and hold until the glue joints dry.
I'll repeat that - Glue the antenna cap into the inside recessed holes in the tower legs, not onto the top of the capsule . Let dry before proceeding.
Run some glue around the antenna cap and press into place on top of the capsule while lining up the inverted tower Vs with the dimples in the antenna housing bottom piece.
Here's what too many builders have problems with when assembled using the new Estes instructions.
The inverted tower Vs won't fit into the capsule dimples by themselves. The V ends have to be pressed into the recessed holes.
The inverted Vs are bent in slightly, just as they were on the real Mercury Redstone tower.
When pressed in, the ends of the Vs will almost pop into place. Be ready, when you press them in, the tower V on the other side could pop out.
Take a deep breath and try again.
After the V ends of one side are in place, brush on some liquid cement from the outside. Don't just dip and brush - dip, wipe off the excess then apply to the joint.
Again note: I am using liquid plastic glue solvent. It's in a bottle with a brush. I wouldn't recommend assembling the tower and capsule with tube cement.
With a light even pressure, push down and hold until the glue joints dry.
Whew!
I've seen pictures of a finished MR where the builder cut off the horizontal Vs on the antenna cap. I wouldn't recommend doing this, they double the strength of tower attachment.

Old Quest Tiger Tail Igniter
I bought some of the older Quest German made engines last year.
Some of them came with the "Tiger Tail" igniters. I made up this post to help if you ever run across these OOP igniters.
The igniter itself resembles the older Aerotech Copper Head igniters. The Quest Tiger Tail style was made for 18mm engines.
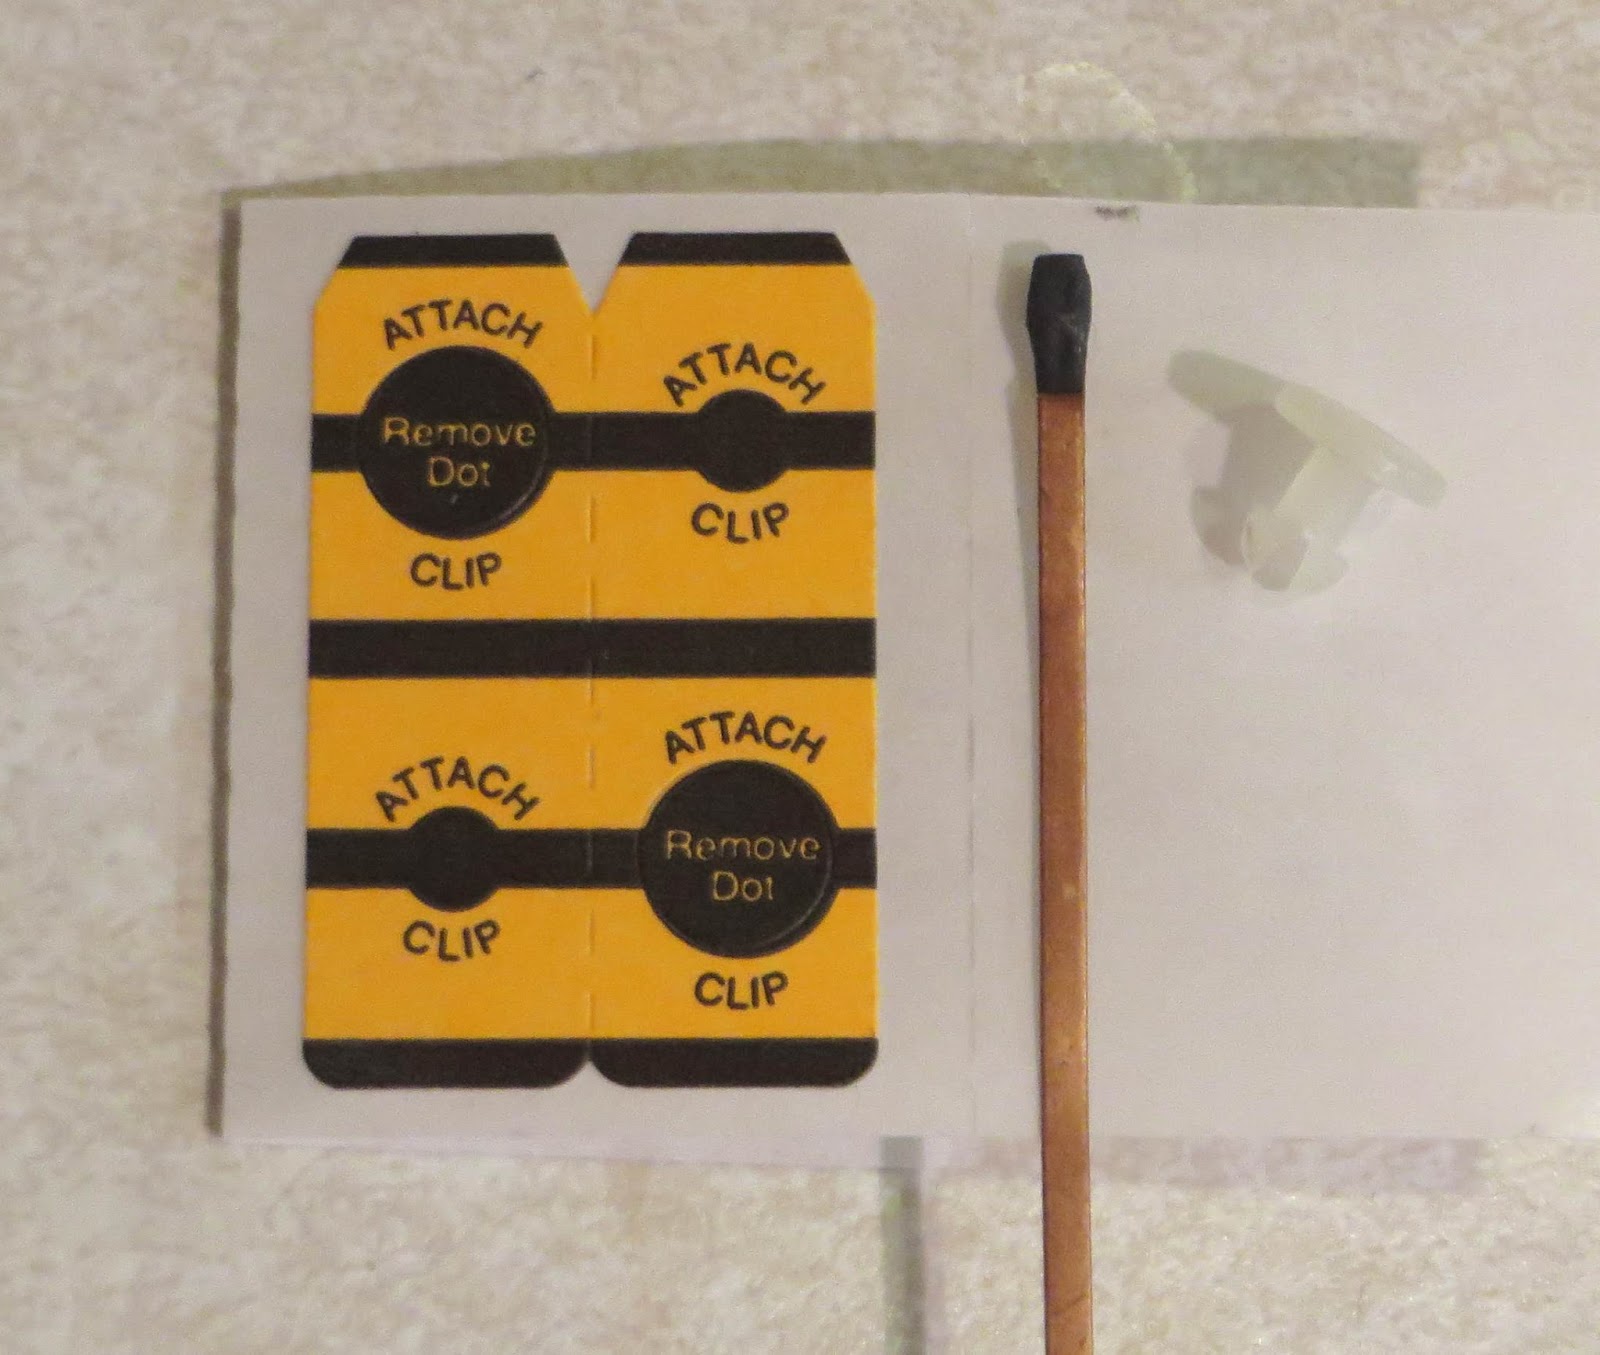
From left to right, the self adhesive sticker that folds around the igniter, the igniter and Tiger Tac plug.

The sticker is removed from the backing sheet leaving the larger black dots behind.
Center the igniter on one half of the sticker and fold it over on itself.
The igniter should be centered in the "clip attach" holes on either side.
Drop the black pyrogen end into the engine so it contacts the propellant.
The picture on the left shows the Tiger Tac plug sitting loosely on the nozzle.
The Tiger Tac is pressed into the nozzle holding the igniter in place.
The Tiger Tac plug is much harder to press in place compared to the Estes plugs.
The micro clips are connected at the holes on the top and bottom where the sides of the copper strip are exposed.
Some of them came with the "Tiger Tail" igniters. I made up this post to help if you ever run across these OOP igniters.
The igniter itself resembles the older Aerotech Copper Head igniters. The Quest Tiger Tail style was made for 18mm engines.
From left to right, the self adhesive sticker that folds around the igniter, the igniter and Tiger Tac plug.
The sticker is removed from the backing sheet leaving the larger black dots behind.
Center the igniter on one half of the sticker and fold it over on itself.
The igniter should be centered in the "clip attach" holes on either side.
Drop the black pyrogen end into the engine so it contacts the propellant.
The picture on the left shows the Tiger Tac plug sitting loosely on the nozzle.
The Tiger Tac is pressed into the nozzle holding the igniter in place.
The Tiger Tac plug is much harder to press in place compared to the Estes plugs.
The micro clips are connected at the holes on the top and bottom where the sides of the copper strip are exposed.
Sunday, July 19, 2015
Estes Mercury Redstone #1921 B Build Part 15, Tower / Capsule Assembly Part D
Here's a dry fit of the antenna cap Vs into the small dimples inside the three tower legs.
The inset picture shows how the cap is turned very slightly. This is the only way I could get everything to fit and the tower legs into the dimples in the lower antenna hosing cap.
Go ahead and glue the separation motor into the bottom of the escape motor housing.
DO NOT glue the spike into the top. Trust me, it will break off and be lost on the first hard landing. I follow the Centuri recommendation, leave in in place for display, remove it for flight.
Scrape the black paint out of the dimples before gluing on the tower.
The glue will not stick well to painted surfaces.
(That white decal band was later replaced with aluminum Monokote Trim.)
Estes Order Arrives
My July Sale order arrived on Friday, July 17. Pretty good turnaround considering the order was placed on July 9.
This ain't no Estes box!
I've mentioned it before, why not have the box stamped: "From the Model Rocket Capitol of the World!"
I have more kits now than I could build in the foreseeable future.
You've heard it before, the deals were too good to pass up.
There are two Solar Warrior kits, two Phoenix Birds and two Cosmic Interceptors.
The Cosmic Interceptor is BIG - 40" tall and a 2" diameter heavy walled tube. It also has a 24" nylon parachute.
Quite the deal at $16.99 while the sale lasts.
This ain't no Estes box!
I've mentioned it before, why not have the box stamped: "From the Model Rocket Capitol of the World!"
I have more kits now than I could build in the foreseeable future.
You've heard it before, the deals were too good to pass up.
There are two Solar Warrior kits, two Phoenix Birds and two Cosmic Interceptors.
The Cosmic Interceptor is BIG - 40" tall and a 2" diameter heavy walled tube. It also has a 24" nylon parachute.
Quite the deal at $16.99 while the sale lasts.
Subscribe to:
Posts (Atom)