Sunday, December 20, 2020

Estes Saturn 1B, #7251 Build, Part 23, Spraying The Mid Section Tube

On the left is the mid section mask after the gloss black is sprayed.
The tape was set down the middle of the wide Sharpie ink outlines. I used a combination of brown masking tape and grocery bags for the larger areas.

When spraying over this mask, the outlined black borders help define just that - the borders. Spray directly over (from the top) the open areas - Don't spray from the sides! The paint can get under any raised area.  

I paint scale models with gloss paint so the water slide decals will stick. Decals on flat paint will "silver" and not stick well. You can always hit a glossy model with flat clear after all the decals are in place.

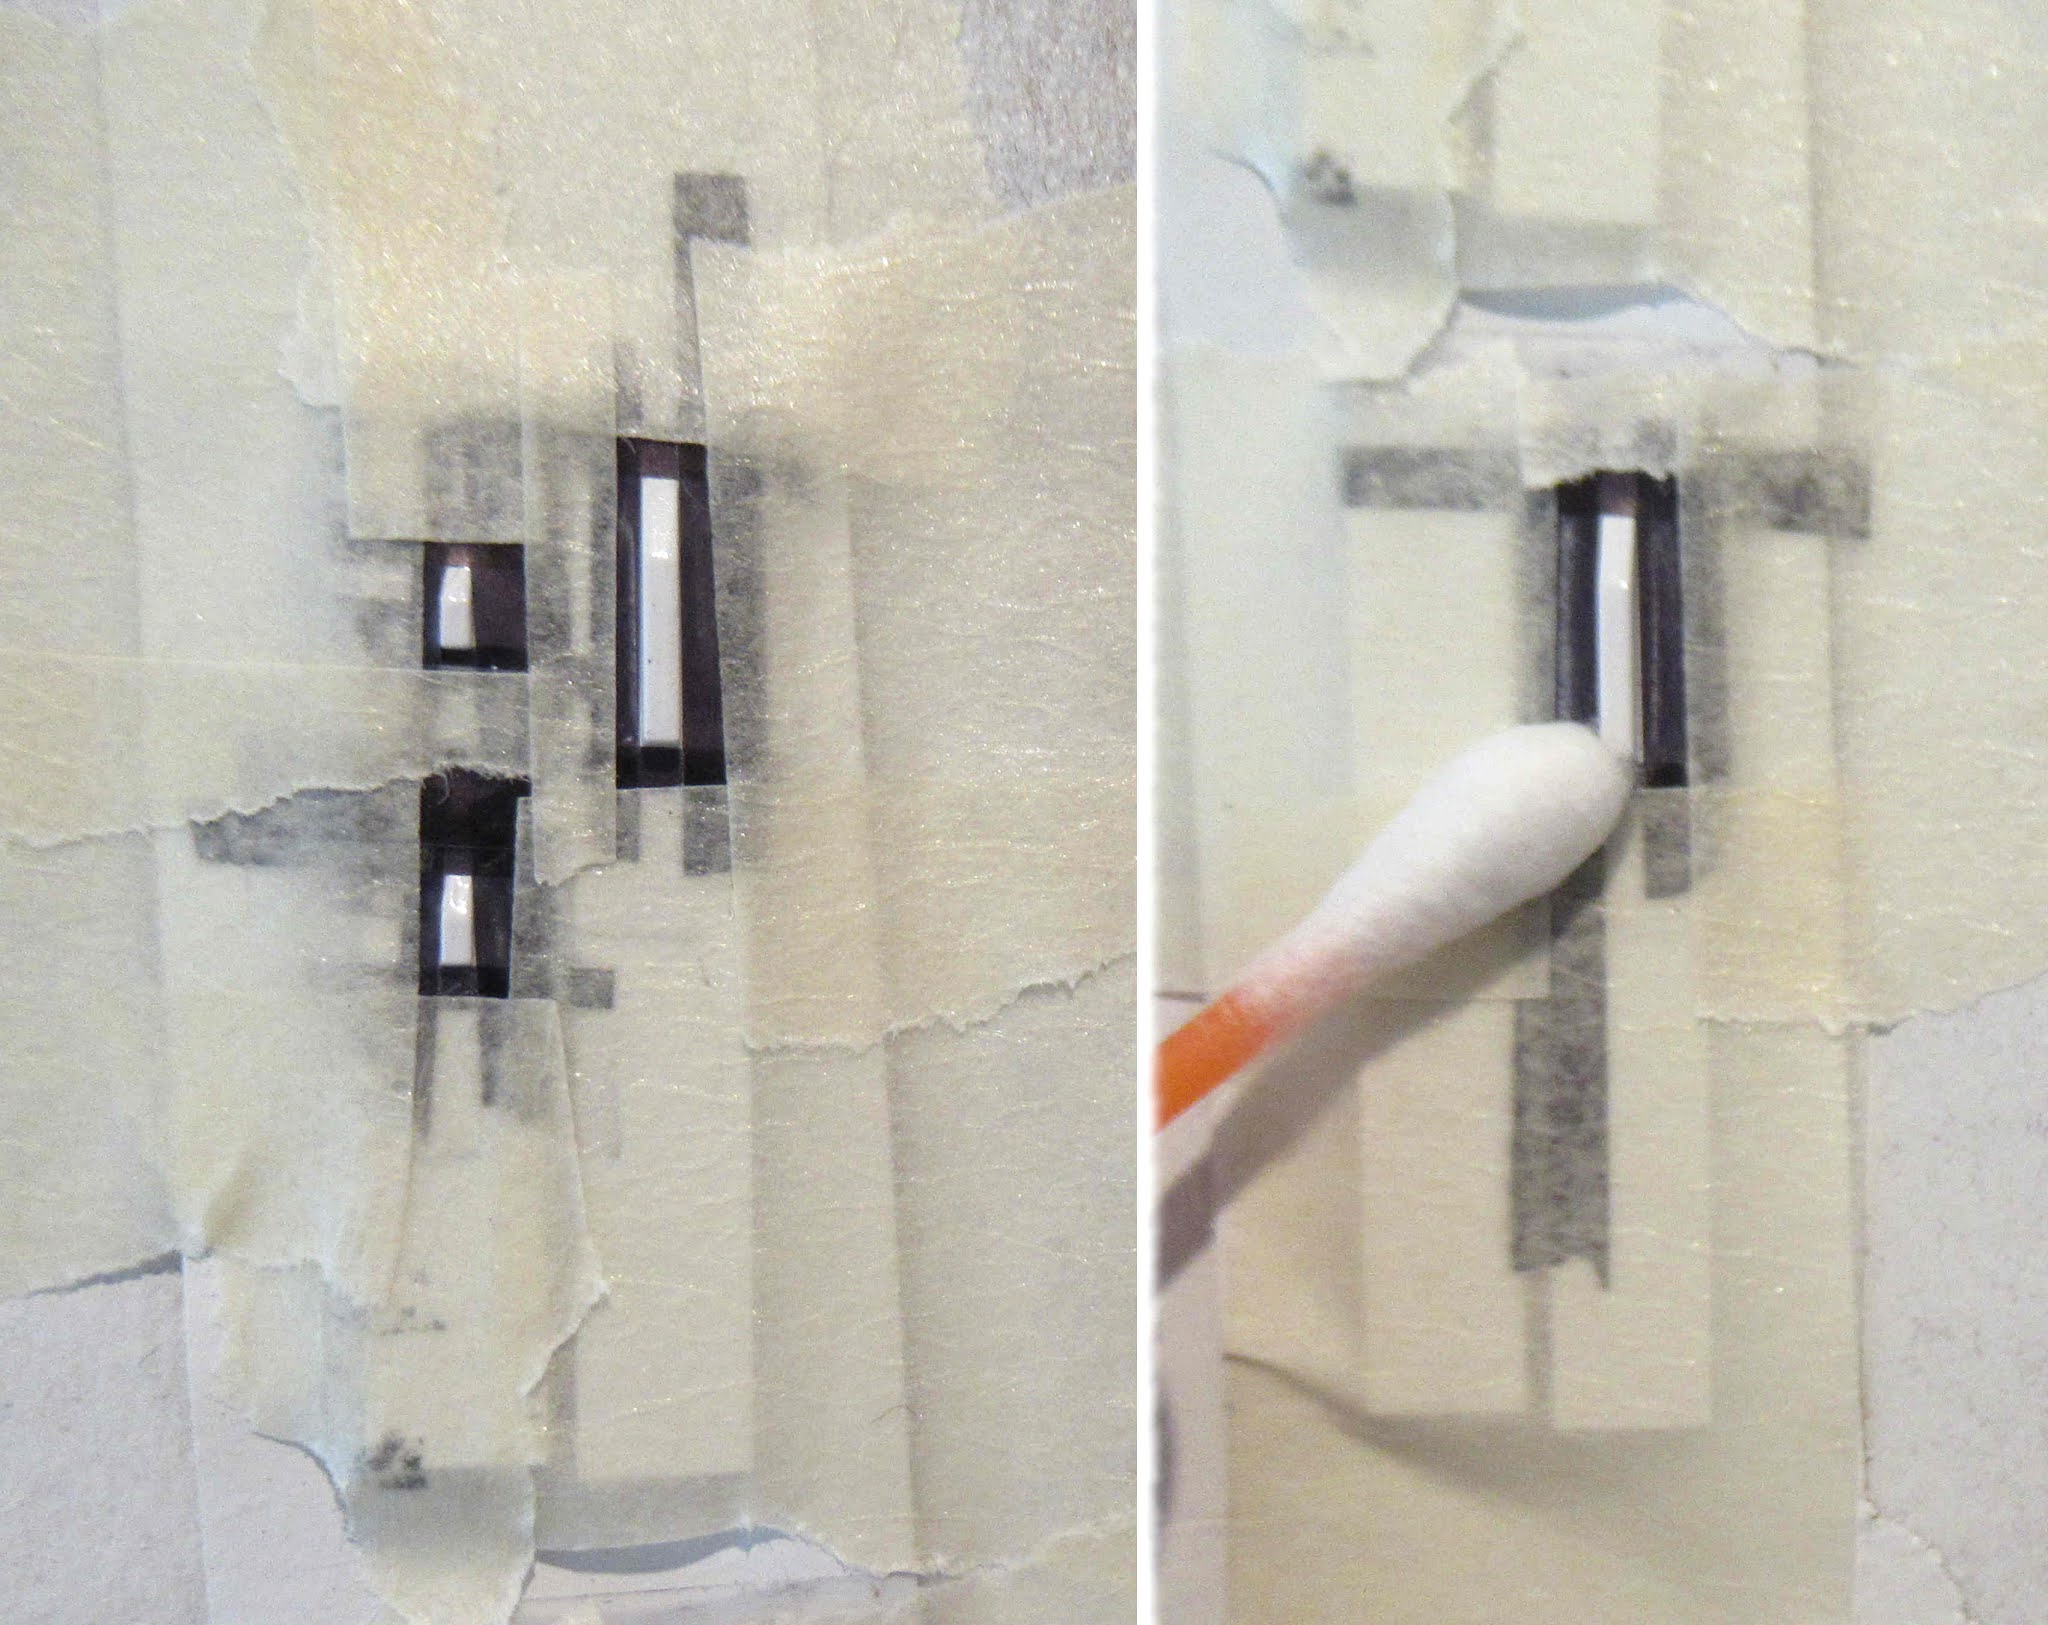
On the right is after the tape was lifted. Get ready - these complex masks over vacu-form corrugations will usually need touch-ups.

TIP: Below the Q-tip is some black bleed or overspray.
I start with a wet Mr. Clean Magic Sponge. Wet the sponge, squeeze out the excess water. Don't wipe the sponge on the model - Transfer some of the cleaner onto the Q-tip by wiping over the damp sponge.

Rub the cleaner on the overspray to pick up some of the unwanted paint.

You'll have to throw away the Q-tips often. You don't want to transfer the removed paint back on the model.

On the right is the same area after cleaning off the overspray.
Don't overdue it, you could go right down into the white paint.
You'll have the best luck cleaning off a second color before the paint is totally dry and set in. Start cleaning up the paint soon after lifting the masking tape.

This paint overspray was too tight an area to use the Q-tip. I had to scrape off the black paint, then go back and brush on some white. I still had to  touchup with more black.

Build time:
Mask mid section: 35 minutes
Spray and clean up: 1 hour
Total build time so far: 18 hours, 10 minutes

Saturday, December 19, 2020

Estes Saturn 1B, #7251 Build, Part 22, Outlining The Mid Section


The Ultra Fine Point Sharpie end nibs appear to dry out quickly. Keep a piece of paper handy to get the ink flowing again.

The picture shows many scribbles from restarting the ink flow when outlining one model.
I ended up using only one Sharpie from the five pen package. 


The large middle wrap - The body is held upside down in the picture.

As before, many pencil marks were made around the tube at 15/16" from the top of the wrap, before using the Sharpie.


It is tricky working around the raised areas. I did most of the raised areas freehand. 
Notice the wrap of tape - That is protection against finger oils and dirt.

This picture was taken from the second build I did, before marking the upper band shown above.

Notice the wiggly line at the top of the corrugation. I went back with the ultra fine point pen to touch-up and straighten out the line.


Like before, use the Fine Point pen to widen the line, working a little into the interior of the black area.
Here's the mid section corrugations ready for the main black paint mask.

Build time:
Sharpie Outline Top Band: 2 hours
Total build time so far: 16 hours, 35 minutes

Friday, December 18, 2020

Estes Saturn 1B, #7251 Build, Part 21, Starting The Black Color Mask

The main upper body was spray painted gloss white. Three coats of paint, lightly sanding between coats 1 and 2.
   
Masking over corrugations isn't easy. I wish I could take credit for this technique - I learned it when I put together two Apogee Saturn Vs.
This is the method that works for me. You are welcome to use traditional masking.

TIP: The edges of the black areas are outlined with Ultra Fine Sharpie pens. The black outline is widened with a Fine Point Sharpie. 
The wide black Sharpie edges give you a advantage when things are masked for the black spray paint. A small bit of overspray won't show with the black Sharpie border.
If you feel you don't have a steady hand, you can still do some traditional (but careful) masking -  


Start with the easier black band at the top of the middle body tube.

Measure and mark the 15/16" space with many close pencil marks going around the wrap.


Now draw a straight line around the tube using Ultra Fine Point Sharpie.
Connect all the pencil marks with a straight line.

I used a 12" metal ruler, drawing and connection many short 1/4" segments.

Come back and widen the line with a Fine Point Sharpie going towards the middle of the black area. Make a black border about 1/8" to 3/16" wide.
The top black line is the open end of the tube, I have paper set inside the end.

TIP: Notice at the bottom of the picture - I have taped a sheet of paper around the tube. You will be handling this tube a LOT! Protect the finish. Finger oils will discolor the white paint and leave you with difficult touch-ups.
 
You might think you could do all the black areas with the Sharpie, but I wouldn't recommend it. It could turn out blotchy with a hint of blue.
When the middle areas are sprayed black, the Sharpie borders will blend in, especially after the final dull coats. 

TIP:
I also carry over the black on the lip of the body tube. When the white LEM shroud is inserted the color separation will look sharper.

Build time:
Spray/Sand Main Body Section: 30 minutes
Sharpie Outline Top Band: 40 minutes
Total build time so far: 14 hours, 35 minutes

Thursday, December 17, 2020

Estes Saturn 1B, #7251 Build, Part 20, Gluing On All The Booster Tubes


Jumping around again:
The centering ring with the small hole in it is glued even with the bottom of the core body tube. That small hole designates it goes on the bottom. 
TIP: Don't make you fillet too wide, the eight outside tubes have to fit against the core tube.
I thought it would be tough to get full paint coverage if I tried to spray after the tubes were glued on. All eight tubes were taped down and sprayed gloss white. After this dried, the tubes were turned to spray the backs.

TIP: If you ever build a Saturn 1B with the alternating black and white booster tubes, spray them black and white before gluing everything together. It would be very difficult to mask them after assembly.


After the paint dried, 
A pencil line was drawn down every tube using an aluminum angle.

With a sanding block, the paint was sanded off for a better contact gluing line.


As the instructions show - 

Set the low centering ring over the edge of a table or counter top.
The first tube is glued on using the flat table top to keep it in line.
GOTCHA: Glue one side tube on to start, the go around the core tube gluing tubes on side by side. Notice the arrow I drew on the instruction drawing on the right. 
The illustration might imply the outside tubes one (left side) and five (right) lay flat on the table top.

DO NOT glue the tubes from the outside working into the center. Start on the side, go over the top and down the other side.

You should end up with tubes one and five not touching the table top.
The picture at the right shows tubes 1-5 sitting above a straightedge. 
Glue on the remaining tubes.

Build time:
Glue on rear ring: 10 minutes
Paint booster tubes: 15 minutes
Sand & Glue Tubes: 35 minutes 
Total build time so far: 13 hours, 25 minutes

Wednesday, December 16, 2020

Estes Saturn 1B, #7251 Build, Part 19, Long Tunnel Fit & Glue

There are recesses molded into the top and bottom of the long tunnel.
Set the tunnel into the flat areas on the top and middle wrap and check the fit.
GOTCHA: On my two builds, the recesses under the tunnel weren't long enough to fit against the wrap edges. 
Set the tunnel in place and mark the overlap. After checking, 1/16" trimmed off the top and 1/32" from the bottom.  

This is the top underside of the long tunnel. 
Using a single edge razor blade, a 1/16" tall sliver was cut off, down to the pencil line made earlier.

The same blade was used to cut 1/32" from the lower recess.

The fit of the smaller tunnel is fine, no trimming needed.

The primer/filler was scraped away from the two tunnels glue area.

Fabri-Tac glue was used to glue the tunnels on
On the right side you can see the line of glue down the center of the tunnel.


Masking tape was applied to hold both tunnels down while the glue dried.

Build time:
Fit Tunnel & Glue: 20 minutes
Total build time so far: 12 hours, 25 minutes

Tuesday, December 15, 2020

Estes Saturn 1B, #7251 Build, Part 18, Tunnel Mask & Capsule Tower Paint

The Antennas have raised vertical yellow bars. I wasn't sure about masking these, they would be a bear to hand paint. I figured I'd try to Scotch tape mask them

Scotch tape is set on a plexiglass, black Sharpie lines are drawn down the strips. The black edges are needed to see the clear tape on the surface borders. 

Before applying the marked clear tape to the model, wipe off any excess ink with a paper towel so it won't transfer onto your fingers or the model.  


This took some time and quite a few tape strips.
After the black tape was set down, brown masking tape covered the outside areas. 

Before painting, the edges were pressed down using a Q-tip.


These really turned out well, one of my favorite parts of the build.
When masking on a smooth surface, the edges come out sharp and clean.
The Command Module and tower were spray painted Gloss White separately. This is too be sure I get paint on the top of the command  module. If the tower were glued on, the paint wouldn't get under the struts.

The tunnels were also sprayed gloss white. The entire model will get a shot of clear flat after the decals are applied.

Build time:
Prep Tunnels, Tower & Antennas: 25 minutes
Mask & Paint Antennas: 45 minutes
Total build time so far: 12 hours, 5 minutes

Monday, December 14, 2020

Estes Saturn 1B, #7251 Build, Part 17, Fill Anchor Slot & Prep RCS Nozzles


The wire anchor slot needed a shot of filler/primer and smooth sanding.

This tube had already been filled with CWF and shot with filler/primer. This was the final fill.

I did mask around the anchor area.


Here's the finished Service Module after spraying with silver paint.
TIP: Leave the RCS nozzles on the trees for easier filling and painting. This one on the left was broken off the tree.

In the center of the RCS nozzle is a molding dent. I squeezed a drop of medium CA on scrap cardboard. A toothpick picked up some of the glue. This small drop of CA is placed in the circle dent. 
It may take a few drop and dries to fill this dent. 
Sand the hardened CA to surface.

The RCS nozzles are sprayed white while still on the plastic trees.
Let dry, then brush paint the nozzles flat black. 

When the paint dries, cut the nozzles off the trees. Sand off any plastic flash. Paint the exposed white plastic on the ends of the black nozzles.

Build time:
Fill & Paint Anchor Wire Area: 20 minutes
Prep RCS nozzles & Paint: 40 minutes
Total build time so far: 10 hours, 55 minutes