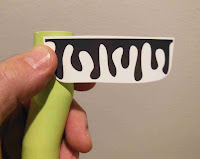
I drew and printed a decal wrap to look like stylized drips.
This will go along the top of the body tube to tie in the black nose cone.

The wrap was applied with the black edge even with the edge of the body tube. This left a clear border overlap.
After the decal drys you can either cut the edge off with a razor blade or sand it even with a sanding block. Don't sand it flat, angle the block and sand from the outside to the center all the way around the edge.
The lime green color lip was showing with the nose cone in place.
Grab your Sharpie and carefully run it around the edge to blacken the green paint on the tube lip.

I didn't attach a Kevlar line to the upper centering ring on this model.
I was concerned that the Kevlar line would snap hard against the bend joints in the body tube.
I ended up using a standard tri-fold mount made from 100 lb. card stock.
The tri-fold mount was glued right over the top joint to reinforce the "bend" even more.


No comments:
Post a Comment