

The raceway sits on top, 1" from the end.
These are still dry fittings, don't glue the raceway on yet.


The front of the raceway overhangs the front end of the body tube.
Cut it off even and sand flat.


With the raceway off the body, it's easier to form the ends.
With a sanding block, shape the side profiles first.
then round down the top.

Smooth things out with 400 grit over your fingers.
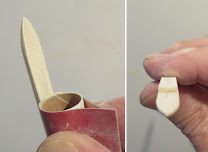

For a better fit over the round tube, I sanded a slight dip into the underside.
400 grit was wrapped around a BT-5 tube and the underside was sanded. Don't sand to a perfect fit, the raceway still needs to fit over the wing and stab.
I used a smaller tube than what it will be glued to. This can make for a better fit.
Sanding the underside of the raceway for tighter fit with body tube may result in fit problem, as you're sanding the R1 and R2 spacer pieces (which after sanding are slightly thinner than the wing and stabilizer). You may need to sand the "notches" where the wing and horizontal stabilizer go to compensate.
ReplyDeleteHi Naoto,
DeleteI took that into consideration sanding a very slight curve under the raceway. It didn't need any sanding between the notches.
To clarify what I was getting at -- you sanded a slight curve on the underside of the R1 and R2 spacer pieces to get a tighter fit of the raceway against the body tube. However since the raceway fits atop the wing and stabilizer pieces, it can't get closer to the body tube as intended (i.e. the wing and stabilizer prevents the tighter fit) -- thus my mention of sanding the "notches" in the raceway where the wing and stabilizer go (to allow the raceway piece to fit closer to the body tube).
Delete