Monday, January 17, 2022

Quest/Enerjet Quad Runner Build #Q5016, Part 1, Parts


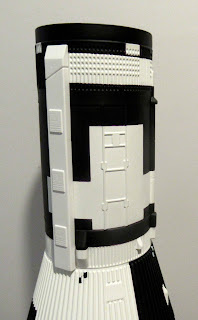
Here's another build from the Enerjet by Aerotech line, the QUAD RUNNER.
This was part of the Quest Advanced Rocketry line. 2" diameter, 27.5" tall with a four 18mm motor cluster. This larger kit line is transitioning to the Enerjet by Aerotech brand. 
The kit has been revised and now comes with a 24mm adapter. If you want to try a cluster, the four engine mount is also included.
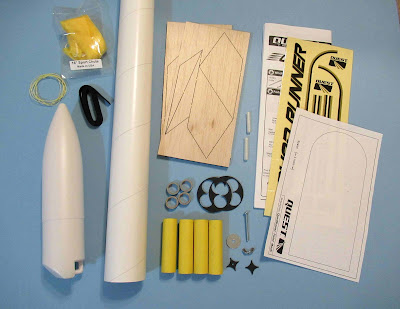

All the parts:
2" diameter nose cone and and (a bit heavier wall) body tube.
1/4" elastic and Kevlar Shock Cord
A 16" rip stop nylon parachute
3/32" thick surface mount balsa fins
The four engine cluster mount
Two 3/16" launch lugs
Instructions and sticker décor.
24mm engine mount shown in next post


Some parts of interest:
A paper masking guide template
A large sheet of stickers.

Sunday, January 16, 2022

Estes Skylab #001973, Build, Part 31, Finished


Whew! Another finished Saturn V, this time the Skylab version.
Here's the front and back views.


With the newer two piece plastic fins, the low end is much stronger than the previous Centuri vacu-form fins.

The internal crescent fairing reinforcements help strengthen the fairing assemblies.


The middle reduction transition.


The Third Stage Wrap is the most difficult to mask and paint.
There are no shortcuts - You'll have to use the info found on page 12 of the instructions. It's sometimes easier to use the Metric measurements.


The new nose cone section. 

Saturday, January 15, 2022

Estes Skylab #001973, Build, Part 31, Finishing Up

Before the Dullcoat can be applied, 
You'll have to mask off the silver on the fairings and fins.
Dullcoats (and gloss clearcoats) will turn Silver paint into a dull gray!

I made some covers out of folded paper to cover most of the fins.


Here's the back end covered for the dull coat.

Before spraying, brush off any dust with a soft brush. Any dirt could be locked under the dull clear coat.


Well - this was disappointing!
The dull coat shriveled up a few of the small camera target decals. Not all of them, just two.
I don't think I went too thick with the clear. 
TIP: You might want to try some Micro-Sol to be sure the decals are sitting IN the corrugated surface and do light mist coats of the clear.


The last things glued on were the Solar Array Panels.
Mentioned earlier - You'll find it easier to glue these on after the painting is done.

I won't be covering the shock cords and parachute assembly. The shock cords use a standard tri-fold mount. Parachute assembly is normal - just larger in diameter.

Man Does Not Live By Rockets Alone!

With the Corona virus I been staying home, building and kitting a LOT of rockets - and getting a little stir crazy.

I bought a very small camper for some safe escapes! Empty it weighs just 580 lbs. It's really an empty shell with a power strip and an A/C unit on the front.
The fun part - you outfit it yourself!

I built a cot-sized bed (25" x 75") from 3/4" plywood, glued on indoor/outdoor carpeting and structural pipe legs.
The bed is only 8 1/2" above the floor. That still gives me enough room to sit up and not hit the roof. A 4" memory foam mattress will go on top. 
There'll be four storage bins under the two bed halves.
Everything fit well. I can easily slide out the bins for easy access.

There will be some weekend trips around Florida. I might meet up with my Sister when she does an Oklahoma Dog Show. If I like it enough - a cross-country trip to my first home in California!

Friday, January 14, 2022

Estes Skylab #001973, Build, Part 30, More Decals

These small squares roll into the corrugations. 
Use a damp Q-tip to press them into the ruts.

I wish these were more landscape shape rectangles so they wouldn't get distorted when sitting in the corrugations.


Because of the tunnel - 
This one UNITED STATES decal can't be centered over the vertical black area.
Just get it in close to the side of the tunnel.


Wrap some copy paper around the body to get a baseline for the flag decals. You'll have to tape two pieces of paper together to go all the way around the tube.
The small camera target decals are the most difficult to place. 

On the left I have wet the area where the decal will go. 
Start by setting the four decals directly over the vertical UNITED STATES decals. This will set the first four of eight decals.
Set a paper strip at the decals and mark the outside position of two decals. Fold the strip and mark the center.

Set the strip at the two outside decals and lightly mark the center on the wrap. Set the decal.

Repeat for the remaining three target decals.

Thursday, January 13, 2022

Estes Skylab #001973, Build, Part 29, Finally - Decals!

To consistently line up the letters on the fins -
TIP: I traced the fins onto cardstock and cut out a window the size of the letter decal box.
Hold up to a light and trace onto the other side.

I covered the template with clear tape to protect it from water when applying the decals.

PATREON MEMBERS: I have drawn up this fin decal template PDF. This will save you time and give consistent placement of the fin decals on both sides. Home print on cardstock.
If you are a Patreon supporter, email me and request the Skylab Fin Decal Placement PDF.


Here's how the template sat on the fins.
Slide it into the root edge at the fin fairing - look through the window to check the alignment of the decal.


There are some tiny decals!
TIP: If you don't already have one - get a long tweezer to hold onto the small decals while soaking.
You won't want to chase a small decal around the bottom of your soak dish.

TIP: I don't use a drop of dish detergent in my decal soak water.
I had some disagreements with the late Micromeister on different Forum topics. He did bring up an interesting point about decal soaking. He said the dish soap could break down the adhesive on the back of the decal. I agree!


The IIII decal runs into and over the lower launch lug.
You'll have to tuck it into the corner a bit.

Wednesday, January 12, 2022

Estes Skylab #001973, Build, Part 28, Touch-ups!

The ink borders are a bit thinner than the spray painted black areas.
The paint ridges might be noticeable where the black is on the body tubes. You won't see any ridge on the corrugated areas.

I went over the ridges very lightly with some 800 grit sandpaper wrapped around a Q-tip.

This picture shows where I sanded too deep. You can see a bit of the white paint underneath the color separation line.

I sprayed some black in a small cup and did some touchup work with a small flat brush.
The ACE Hardware Premium paint works well when touching up like this - it melds into the surface paint and won't show after the dull coat is shot after decals.


Here's the upper wrap after some touch-ups. More touchups followed before the decals and the final dull coat.
TIP: Notice the Solar Array pieces aren't glued on yet. It's much easier to paint and touchup then glue on the all white pieces.
I probably spent two hours touching up the white and black areas.