Showing posts with label OR G-16. Show all posts

Thursday, April 27, 2017

Odd'l Rockets Goony G-16 Build, Finished


This was much better than building another F-16 prototype! I like Goonys.
If the regular Odd'l F-16 sells well I might bring this one out as a companion model.
What do you think? Is it worthwhile to produce as a kit?
I had two stable flights with a B6-4 and C6-5 last Saturday.
A quarter ounce of nose weight was added to help place the C/G forward.

Wednesday, April 26, 2017

Odd'l Rockets Goony G-16 Build, Part 10, Nose Cone Divot Touchup - TIP


The canopy is glued in place  using CA glue.
CA glue can get brittle over time. I'd recommend adding a bit around the edges every once in a while to keep it secured.

The canopy decal strips were overhanging the sides after the decals dried. these are trimmed off using a razor blade.
Look at the upper right along the canopy edge. The razor blade cut chipped some white paint showing the black nose cone plastic underneath - ARGHHHH!


For touch-ups I use the same paint I used on the body. Rusto 2X paints can be temperamental but they do blend very well on touch-ups.

A small snack bag is pressed into a mixing cup.
Paint is sprayed into the cup making a small pool in the bag.
NOTE: Metalhead1986 commented that Krylon spray paint will eat right through the plastic mixing cup!


Dip a toothpick into the paint retaining a small drop on the tip.

Set the tip into the chip recess letting the paint fill the divot. Don't use the toothpick as a brush, just place the tip and let the paint run into the chipped area. It might take two tries to fill the hole.


Pick up any excess paint outside the divot with a Q-tip.

It's not perfect but a whole lot easier than masking and spraying again.

Odd'l Rockets Goony G-16 Build, Part 9, Decals TIP

I always read of water slide decals  problems. Some builders dread them and won't even try to apply a decal.
In my Odd'l Rockets kits I include "Extras" or practice decals. Start with those smaller extras first! It's tempting to apply the largest, most colorful decals but save them for last after you get a feel for the decal soak times and how they transfer.

TIP: Always wet the surface of the model with a wet finger. Rub the water back and forth and leave on the surface.
This gives the decal some surface lubrication and lets you position and re-position the decal until it is where you want it.

When re-drawing decals for a Goony you should poke fun at the original design.
Obviously you include the word Goony on the decals. I replaced the stylized eagle with a duck. The duck wasn't part of the first Goony F-16 build, the decal was changed after the model was finished. The center star was changed to a target with cross hairs.
The CAUTION decals made me think of things my Mother would warn me about.


Some of the references are a little inside like the number on the rear of the rudder decal.
The DANGER decals near the canopy were changed to DANGME.

Tuesday, April 25, 2017

Odd'l Rockets Goony G-16 Build, Part 8, White Paint and a Fix TIP


This is an easy one to paint, it's all gloss white.

After one coat I sanded down any rough fillets and glue blobs.


To keep paint out of the front end of the tube a wrap of masking tape went on the inside end.

The nose cone was painted separately because the Rusto 2X seems to take much longer to dry on plastic.
To hold the nose cone, masking tape was set down on one edge of some copy paper. This was wrapped around the nose cone shoulder.


I couldn't get a smooth surface on the bomb support sides, they are hard to reach with sandpaper.

So I cheated!
TIP: A piece of white decal paper was cut to size and set over the rough support surface.
This isn't something that works all the time, this is in an area nobody would probably notice. But it did cover and smooth out the rough side some.


Here's how it came out. Much better, not perfect but better.
I followed up with some Future clear acrylic applied with a Q-tip.

Odd'l Rockets Goony G-16 Build, Part 7, Canopy Continued


After flexing the scored line back and forth it should crack on the cut. If it doesn't easily crack, go back and lightly score the line again. Don't pull or tear the sides off, score and crack!


The edges could be a bit rough, especially around the front and rear.
Notice the pen lines are still there, they will be removed in the next step.
Wrap some 220 grit around the BT-60 tube.
Sand the bottom of the canopy back and forth over the sandpaper.

Keep sanding until the pen lines are gone, it should take about 10 minutes.
The problem for many builders is they don't work vacuform parts long enough. The Estes Saturn V fairings won't fit unless you sand them down a while. I've seen some Saturn V builds where the fairings weren't fully trimmed and didn't seat well.

You are getting close when small plastic "strings" hang off the sides. Look close at the lower right side. The sanded edge is barely hanging off the edge recess line.


This is the finished canopy from the underside. Note how clean the edges are.

Monday, April 24, 2017

Odd'l Rockets Goony G-16 Build, Part 6, Canopy


Here's how the canopy looks from the Odd'l F-16 kit.
You have to trim and sand the bottom to best fit the curvature of the nose cone. It's not as hard as it sounds.


Along the bottom of the canopy is a edge recess.
To see the line you will cut, a ballpoint pen line is drawn down the recess.
Right above the pen is a squiggly line on the cardboard. The plastic is slippery and you may have to "start" the ink a few times while tracing around the clear plastic.


Don't cut all the way through the plastic. SCORE the plastic with a sharp knife. The plastic will crack down the scored line by flexing on either side of the cut line. Don't flex the scored line yet.
Score a line all the way around the canopy. Relax and TAKE YOUR TIME!


On the corners cut a line from the scored edge to the outside of the clear piece. Here you do cut all the way through the plastic.
This makes it easier to flex and crack the scored lines in four segments all the way around the four sides.

Saturday, April 22, 2017

Odd'l Rockets Goony G-16 Build, Part 5, Wings, Fins and Bomb Gluing


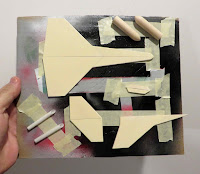
After filling the balsa parts with CWF and smooth sanding, all the parts were taped down to a scrap piece of cardboard for a good shot of  primer/filler.

Shoot one side, flip them over and shoot the other side.
Here's a wing and small sub fin after sanding off most of the primer/filler. There's not much of it left on the surface. I don't use this as a primer but more as a filler to finish any remaining grain or body tube seams.


Here's what's glued together so far. It looks better than I thought it would

Some primer filler was scraped off to make a gluing area for the bomb support piece.


The back end with the bombs and missiles glued on.
The rear sub fins are just under the rear of the intake tube.

Friday, April 21, 2017

Odd'l Rockets Goony G-16 Build, Part 4, Details

On most short Goonys you recess the engine mount to move the C/G forward.
The mount was pressed in until the low bend on the engine hook was even with the bottom of the BT-60 tube.

Here I'm applying and smoothing the rear fillet with a Q-tip. Both inside ends of the main airframe tube got a wipe of CA glue to strengthen and seal the edge.


The Goony launch lug "missiles" are wider than the Odd'l kit at 3/16" diameter.
One end is cut at a 45 degree angle.
TIP: To be sure the cut angles are consistent, I drew some guide lines in my work board.


The dowel bombs felt a little heavy. I don't want too much weight at the back end.

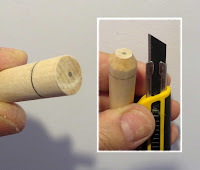
I drilled out a 3/16" diameter hole in the rear. I only cut .02 oz. from each dowel, but that could still help.


The bottom intake tube was cut from a BT-55 tube.
The launch lug was glued inside and in line with the engine hook position.

Thursday, April 20, 2017

Odd'l Rockets Goony G-16 Build, Part 3, Engine Mount - TIP

Boy, I really need to buy some 20/60 rings! This isn't the first time I've had to make my own.

TIP: The next time you are at a framing store, ask if they have any scrap mat material. It's perfect for centering rings or fiber fins. It's thicker than the centering ring material you'd find in a kit. You should be able to buy some very cheap.

I'm tracing around the BT-60 main body tube with a mechanical pencil.

Center a BT-20 on the circle you just drew. It isn't easy to get it perfectly centered and may take a few tries. Trace around the BT-20 engine mount tube.

Cut out the center first, right on the pencil line.
(Inset picture) You can cut the outside ring with scissors, cut just inside the pencil line.

You can use some 220 grit wrapped around a finger to slightly widen the inside hole until the BT-20 slides in.
(Left picture) Stack the two rings on the BT-20, sand and round the outside until it slip fits into the BT-60.


Here's the rings before and after using the rotary punch.
This rocket will have the replaceable Kevlar line, that's the small hole at the bottom of the rings.

Notice the faint pencil lines near the center of the ring. Always mark before making any punches.


Here's the finished mount with the Kevlar line running through the Q-tip tube.
The Kevlar and tied on elastic are rolled up and inside the engine tube for gluing into the main airframe tube.

Wednesday, April 19, 2017

Odd'l Rockets Goony G-16 Build, Part 2, Wings and Bombs

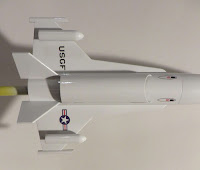
The wings and fins are the same parts used in the Odd'l Rockets F-16 kit. The wings and rudder are two piece.

The forward strake is glued to the leading edge of the wing and both leading edges are rounded. The outside and trailing edges remain square.
Here I'm knocking off the leading edge corners and trying to round into the joint between the strake and main wing piece. After using the block with 220 grit I'll switch over to 400 grit for the final rounding.


Trim parts on a Goony version can be exaggerated.
The finished white model is the underside of the Odd'l F-16. I picked out a larger diameter dowel to make the bombs. The Goony model bombs will also be a little shorter.
The front end of the dowel is carved to a "bullet" shape.
Mark the center with a dot for a reference. A ring was drawn around the dowel side about 5/16" from the end.

Start making small chip cuts knocking down the end. Use the center dot to gauge how much to remove and keep things even.


On the left is one bomb after carving, the right after smooth sanding.
Use 220 grit to smooth off the rough edges. Follow up with 400 grit.
If this Goony version ever becomes a kit I'd probably use a PNC-5 nose cone and short BT-5 to keep the weight down.

Tuesday, April 18, 2017

Odd'l Rockets Goony G-16 Build, Part 1, Parts

The new Odd'l Rockets F-16 kit is almost ready!
The fins have been laser cut and almost all the parts are here.

After the instructions are drawn up you should build a model using them to be sure everything works and check the fit of the water slide decals on the laser cut fins.
To be honest, I've made too many prototypes and wasn't excited about building another normal F-16.
I decided to make a BT-60 Goony version using spare parts with the same fins and decals used in the Odd'l Rockets F-16 kit.

The parts picture is different, this wasn't going to be a blog build. But the model turned out very well and I decided to start taking pictures. I didn't take this parts picture until after some of the prep work had been done.
The nose cone is a black plastic Alpha shape. The main airframe is a Goony sized BT-60 at 7 1/2" long. The intake tube is a 4 1/2" long BT-55.
Here the motor mount is glued together, the fins pieces have been glued and the grain filled with CWF. The dowel bombs are carved and smooth. The vacu-form canopy (don't know why I didn't include it in the picture) will be shown later in the build.

For anybody interested in the new F-16 kit, much of this build will be the same as the Odd'l kit. The Odd'l kit uses a heavy wall BT-50, very close to the original Centuri size.