Tuesday, May 31, 2016

Centuri X-24 Bug Build, Part 9, Canopy and Launch Lug Supports


If you haven't scored the canopy, do so before trying to glue it together.
A slip of paper was slid under the glue tab to keep the glue stick off the printed right side.

Long tweezers were used to hod the tab down while the glue set up.


It's easier to glue on the interior launch lug fin supports with a guideline. Hold a wing or rudder up to a bright light and make some pencil marks at the center of the black line.


Glue a 1 3/4" launch lug on the line centered between the two side edges of the wing.
Fold over the fin and glue the other side to the lug.


Here's the finished wing.
The bottom tabs are folded out to be glued to the body shroud.

Monday, May 30, 2016

Old Saturn V / X-24 Combo Launch

Frank Claunch sent me an email - 

Hi Chris,
A little X-24 tidbit.

Frank

Thanks Frank,
I actually got that one in the mail from Enerjet/Centuri way back when.
I wonder if anybody other than Larry Brown (in the picture) would "sacrifice" a Saturn V just to deploy an X-24 off the top of it? I wouldn't!
Chris Michielssen 

To see the Enerjet News, CLICK HERE

Centuri X-24 Bug Build, Part 8, Former Bulkhead Adjustments


I held the shroud up to a bright light and could the former was being bent and pushed in at an angle.
The corrugated cardboard was a good "soft" bulkhead but was distorting under the pressure against the shroud wall. I wanted it to be straight. It'll need to be stiffened up slightly.


I cut some scrap cereal box cardboard. the printed side was roughed up with some 220 grit sandpaper so the glue would hold better.


After more test fittings this is where the former ended up down the engine tube.
Fillets were applied to both sides.

Sunday, May 29, 2016

Centuri X-24 Bug Build, Part 7, Former Bulkhead Placement

No glue yet!
Fitting the bulkhead former is the hardest part of the build. You are tempted to push the former in so the shroud is touching all sides of the former.
If you push too hard the sharp former sides will push out and distort the outside of the shroud. You'll see the interior bulkhead shape from the outside of the finished model! The glue softens the card stock and makes the raised ridge even worse.


Don't push the former in too hard in the first dry fits!
The first picture shows the rounded sides making contact against the shroud wall. These can be trimmed back for a softer fit.
Round off the corners and try the fit again. Repeat!


In the end, here's the best fit I could get.
Notice at the top and sides that the shroud wall is slightly raised, not touching all the way around the former bulkhead. I didn't want to push too hard and distort the card stock.

I've Hit The BIG Time!

On TRF this morning I noticed - I'm a "Lifetime Member" now! Whatever that means.

I did a search to see how I got this "rating" and found this:
For only $2.99/month, $19.95/year or $100/Lifetime you gain the following benefits to your Membership here at RocketryForum . . . 

The "Lifetime" fee of $100 only runs for 55 years. Not a bargain in my book. Male lifespan in the US is now 75.2 years. I never paid for anything extra.

It might have something to do with how many posts you've made. On TRF I've made 1.914 posts.
There are other members with over 10,000 posts. Either that or it might have something to do with your age, I did hit 60 this month!
I'm not complaining, the title of Lifetime Member demands respect.
Yeah, like I'll get that by launching flying pigs.

Saturday, May 28, 2016

Centuri X-24 Bug Build, Part 6, Body Shroud Gluing


I remember this step seemed wrong back in 1973! Why can't I remember the important things? 

I would think the tape strip has to go on the other side of the shroud, on the glue tab side. If applied as shown here it just gets in the way of gluing in the next step.

After the shroud edges are lined up, the tape is burnished and holds the shroud edges in line for the gluing.

Use a glue stick! White glue is too thin and runny. With a glue stick you can use less and it holds quicker. It also dries clear.

Here I'm burnishing the glue tab from the inside with a Sharpie pen barrel.
Under the shroud is corrugated cardboard, a softer surface so I don't mar or dent the card stock.


The card stock shroud is a simple cone now.
That'll all change when the former bulkhead is pressed in place.

Friday, May 27, 2016

Centuri X-24 Bug Build, Part 5, Body Shroud Forming


The instructions show pre-curling the shroud under a ruler or over a table edge. I've never got good results this way. I'll usually end up with a crease line in the shroud.

I could form this one over the heel of my left hand.
Even a shroud this large could be formed by pressing and rolling a dowel over the cardstock.
You have to trust me on this, try it and you'll never pull a shroud over a table top again.


You know you've done enough when the cone will stand up on it's own without being glued shut.
No creases or dents, just a smooth outside surface.

Estes Nike Smoke Parts Pictures

From the Estes website,
Here's the previous parts picture for the new Estes Nike Smoke kit:


They (almost) have the correct parts shown now - 


I think Estes is messing with us.
Maybe I'm missing something, but why are there two BT-60 tubes shown?
According to the Centuri plans CLICK HERE the main body tube is around 13" long.
The older Centuri Nike Smoke is very close in size to the new Estes kit.
There should only be one BT-60 tube shown.

Here's the kit parts from a TRF post from Flyfalcons.
You can see everything except the parachute, shock cord, decals and launch lugs. They are in the small bag beneath the centering rings -


The kit instructions haven't been posted yet.

Thursday, May 26, 2016

Estes Shuttle Now Available!


From Jetlag on YORF: 
The new Estes Shuttle is now available on the Estes Website - CLICK HERE

While not yet on the "What's New" page, the ordering information is on the "Coming Soon" page.

Quest HL-20 Former Bulkhead

An email from Frank Claunch -

Hi Chris,
I was going through some of my old kits today.
I came up on a Quest HL-20 Lifting Body.
The former was made out of paper lined foam board 1/8" thick.
You probably knew this. Hobby Lobby has the foam board. It is easy to cut, light,and strong. Can be sanded easy also.
Thought you might want to pass this along in your blog.

Enclose is a picture of the former.
Working on a X-15 type repaint for the Bug.
__________________________________________________________________

Thanks Frank -
I've got some of that foam board and just didn't think to use it.
The foam board would have been better than the corrugated cardboard I used.
I'll put this in the blog, it might help out another builder.
Thanks, and looking forward to seeing the X-15 bug!

Chris Michielssen

Note: This shape Quest HL-20 former probably won't work in the Centuri X-24 bug.
The foam board material could make a better bulkhead/former than what I used in the blog build.
Frank has done some great "re-colors" of the X-24 body and fins.

Centuri X-24 Bug Build, Part 4, Cutting Out The Fins and Canopy


The scored lines (lines to be folded) on the fins and canopy were scored before cutting out the pieces off the sheet. It's just easier to score them ahead of time, a larger page is more stable under a straightedge.

I scored them using the rolled metal edge on the top of a single edge razor blade. A few layers of masking tape over the blade protect your fingers from being cut.


Cut the fin, wings and canopy with a new blade and straightedge.


Here's all the straight cut pieces before folding.


As always, I used the blunt, rounded back end of a Sharpie pen to make a sharp fold on the scored lines.

Wednesday, May 25, 2016

Centuri X-24 Bug Build, Part 3, Nose Cone and Engine Mount

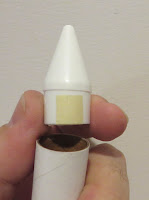
The nose cone shoulder needed a better fit in the wider ST-7 tube. three strips of masking tape were placed on the shoulder. This left some exposed plastic for a better gluing area.

I used the Beacon Fabri-Tac glue to glue the nose cone in place.
The old Centuri plastic cone is no longer available. While the fit may not be perfect, the Estes part is very close in shape and length to the Centuri kit nose cone.
The Estes nose cone is 1 1/16" tall. I can't find the older conical cone listed in the Centuri catalogs.


This is a dry fit of the engine tube into the former.
The final position of the former will be figured out once the body shroud is formed.
So far so good.

Plastic to Kraft Tube Glue?

Anytime plastic glue is recommended for a tail cone to body tube joint I wonder if it is going to hold. Some new formula plastic glues are non-toxic and don't have solvents they used to.

I bought this Beacon Fabri-Tac glue at Hobby Lobby to do some fabric gluing. It contains acetone and it will break down most all plastics.

I recently used it on a plastic tail cone to body tube joint on the Kokopelli rocket. So far its a strong joint.
Here I used it to glue down a rubber strip on a cheap knock-off guitar capo. This is a rubber to metal joint. It worked and held strong!
It reminds me of the old tube plastic cement. When you pull the glue away there is a long string web from the glue joint to the tube.

Is this a good glue for the Estes Mercury Redstone tower? I don't think so. But for now I'd use it on two piece nose cone shoulders and tail cone gluing.

Tuesday, May 24, 2016

No More Sandman (Excelsior) Decals!

From a post yesterday on Y.O.R.F. -


See the posts: CLICK HERE

Sandman Decals used the OOP Alps printers, a specialized unit that could print white and metallic decals. Home and office inkjet and laser printers only use red, yellow blue and black.
Sorry to hear this, I have rockets with Gordon's decals. They were always great quality and transferred easily.
Gordon did add he still makes custom nose cones and adapters.

Centuri X-24 Bug Build, Part 2, Parts Prep

The body skins were printed on 110 lb. stock. I didn't have the original model anymore but I think the parts were printed on heavier stock. I had to beef them up.
Inkjet printed cardstock will have to be sealed. A landing on dewey grass will smear the ink.
I first sprayed the sheets with Krylon clear acrylic, three coats.
I went over that with Future clear applied with a brush.
This glossed up the paper stock and helped harden up the paper.

The former bulkhead template was traced onto 110 lb. cardstock and glued onto some corrugated cardboard with a glue stick.

Anytime I've built a kit with a pressed in bulkhead former, the edges of the former press hard against the interior walls. This sometimes left a raised ridge on the outside of the shroud.
Corrugated cardboard would have a softer edge with less chance of deforming the large cone shroud. Worth a try, right?

The original kit used a ST-7 tube, thicker walled and slightly wider than an Estes BT-20.
I traced around the ST-7 tube on the center of the bulkhead.
(If you are using a BT-20, trace around that.)
The top hole of the formed shroud is printed to fit the Centuri ST-7 engine mount tube. If you are new to the hobby, the ST-7 is thicker walled and a slightly larger diameter than the Estes BT-20.
If you use the BT-20, you can do a few wraps of a card stock strip (about 3/8" wide) to better fit the larger top opening.

The engine tube hole was cut out just inside the pencil line for a friction fit of the ST-7 tube.

Monday, May 23, 2016

Centuri X-24 Bug Build, Part 1, Printed Parts

You can find the scanned cardstock parts at:
http://www.spacemodeling.org/JimZ/centuri/ka-12.pdf
The fins are on Page 6, the body shroud is on Page 7.
Pages 6 and 7 are printed on 110 lb. card stock.

On the first print of the shroud I tried the "fit to page" setting.
It was a a little large with a ST-7 tube slid in.
A second print was made with the "fit to page" setting off. That seems to be correct.
My print was offset to the left and didn't get all the border lines. A little bit was cut off. That's okay, I can live with that.

A X-24 search on YORF brought up many different shroud skins, some you can make up in your choice of colors: CLICK HERE
Check out Posts #9 and #71 by Ironnerd and Rosko Racer


The fins were printed with the "fit to paper" setting turned off.
You'll also need a sized bulkhead, called a "former" in the instructions.
For the former bulkhead cutting template, print off page 8 on 20 lb. paper.


In addition to the printed parts on 110 lb. card stock, here's the parts you'll need  - 
(not shown)
  • The Estes plastic nose cone # 070323, the same small conical cone from the Yankee kit.
  • 3" of ST-7 tubing (or BT-20 tubing, the slightly larger diameter ST-7 tubing will better fit the hole at the top of the shroud print. To fit the larger opening you can build up the tube top diameter with a strip of cardstock )
  • 4 launch lugs, each cut to 1 3/4" long
  • Cardboard for the "former" bulkhead. The original Centuri former looks like it was cut from light Masonite.

Sunday, May 22, 2016

Centuri X-24 Bug Background

Here's one of the weird cardstock shroud model from Centuri, the X-24 BUG. This one was introduced in the 1972 catalog.
From the catalog description:
"Now it's easy to assemble your own model of the manned re-entry vehicle that makes a weird sound and smoke trail as it climbs into the sky. It's unique shape actually makes the X-24 glide back!

I had the Centuri kit back then. I never got a decent "glide" from it.
Check out the 1972 price - $1.00!
To see the catalog page, CLICK HERE

In 1993, Quest brought out their own version, the HL-20.
I bought one on Ebay and tried to fly it a few times. I never got an acceptable glide from it either. The Quest version had a streamer taped to the ejected engine. Two pennies inside some folded cardstock were used as rear trim weight.
Here's the Quest catalog page - CLICK HERE
The Quest HL-20 instructions - CLICK HERE

Here's a more recent kit version from Squirrel Works, the X-RV.
To see the catalog page - CLICK HERE

I'll be making my Bug from the online plans from JimZs.
To print it in the correct size, go with the available PDF CLICK HERE

The Centuri X-24 BUG build starts tomorrow! Printing it at home and using spare parts, it may only cost $1.00.

Saturday, May 21, 2016

NARCON Videos

Some NARCON 2016 sessions have been posted on YouTube: CLICK HERE
Lots of great information, the link above goes to James Duffy's presentation of the G. Harry Stine Archives.

Thrustline Arapahoe C, Finished


This is one of my favorite designs and paint scheme.
Brian Coyle brought his to the Orlando ROCK launch a few years back and I've wanted to build one ever since.
The original Thrustline kit was BT-60 based and D powered. Mine was a downscale BT-55 version for 18mm engines. I kept the Indian theme with the "Kokopelli" name.

This one used metallic red paint. With this paint pattern any second trim color works. I've seen it in yellow, orange, blue, green or gold.

UPDATE: I've flown the Kokopelli three times with the standard A8-3, B6-4 and C6-5 engines.
The A8-3 was a successful launch but altitude was too low. This BT-55 sized model is best with the B6-4 and C6-5 engines.

Friday, May 20, 2016

Thrustline Arapahoe C, Part 14, Strake Decals


The short bars center over the low end of the strakes at the red mask line.


I should have looked ahead with the launch lug placement. It's right in the middle of a decal.
The decal was cut to fit around the lug before it was soaked for transfer.


The overlap was trimmed with a razor blade after the decal dried a bit.
Run the blade down the trough between the lug and strake an peel off the excess.

The "Kokopelli" name decal and main fin larger decals went on without any problems.

Thursday, May 19, 2016

Thrustline Arapahoe C, Part 13, Mask Reveal and Decal Trim


When removing a mask, pull the tape back over itself and away from the line.
The tape is pulled and folded back over itself.


For the red,I used the Rustoleum Red Metallic. I has very fine metallic specs that show well under sunlight. It sprays on thin but dries fast. This paint is best applied in thin coats.
Here's the completed mask.


I printed up some black trim lines on the decal sheet.
To get the black strip to roll around the fin, start it halfway around the leading edge. The second piece on the other side will finish up the half roll.

On the trailing edge, roll the black strip over the trailing edge and let dry a bit before trimming.

With a sharp razor blade, cut straight down the middle of the overlapping decal strips. Cut through the decals only, not into the paint and wood fin.
Lift out the overlap pieces and press down the ends matching up the edges. It's up to you whether or not you want to trim off the lower tip of the "V".