Saturday, September 30, 2017

Mosquito Problems?

I check the blog comments everyday and respond if there is a question.
Sometimes spam ads come up in the comments. They are usually sneaky, they give you a generic compliment like: "Thanks for sharing this information, very informative!" This is followed by a link in blue: "Air Conditioning Filters" 
The spam ads sometimes have some indirect relation to the blog post.


Today I found a comment after a post on the Estes Mini Mosquito.
"Work so well. Drives away all the mosquitoes in seconds. Mosquito Repellant India"
Delete, delete, delete . . .

Estes Scout Ship Nova Build #1392, Build, Part 7, Black Paint


This design makes sense when you look at the side profile. The raised engine in the rear is a good balance to the dropped nose in the front.


Except for the interior of the engine tube, the entire model is sprayed black.
Here's the model after the first coat of black was lightly sanded with 400 grit.


A rolled up piece of paper was used to block paint from getting into the tube.


There was a little bit of black that got into the tube. This was lightly scraped out and more fluorescent orange was applied.


The model is ready for decal trim.

S.P.E.V.?

On a YORF post, John Boren on Estes gave some insight into how some kits are named:


"Unless it's a scale kit or a bring back that uses a special length tube just about every design I've done for Estes uses Excess Parts or standard 18" long tubes. The name of the rocket can even reflect this such as EPM, (Excess Parts Model) followed by a number that may be the year it cam out. STM ( Slotted Tube Model ). Many time we pick a working name for the model while its going through the design and manufacturing process to have something to reference. Some times this temporary name becomes the final name."
John Boren

Above, on the left is the STM-012 or "Slotted Tube Model - 2012.
On the right, the EPM-10. Many thought that might be a SPEV, there were plenty of plastic 5 sized nose cones in that kit.


And this one - The JBR-013. Maybe not a SPEV, the naming was interesting.
On a forum we found out the JBR stood for John Boren Rocket. The"13" could be the year is came out or the body tube diameter of a BT-55.

Friday, September 29, 2017

Estes Scout Ship Nova Build #1392, Build, Part 6, Fin Gluing


TIP: Carry the fin alignment lines around the end edge of the body tube. These fins are even with the end of the body tube so the line down the body tube will be covered up.

GOTCHA: The instructions tell you the the wings and standoff should project straight away from the body tube.
Later on in the instructions, a drawing shows the correct angle of the wings. They don't mention sanding an angle in the root edge for better gluing.

The small launch lug is tucked into the root edge of a wing.
The pencil lines show where two narrow lines of glue will be applied.


I used my fingertips to form two narrow beads of glue for a cleaner joint.


Fillets are applied with Titebond M&TG.
The ends of the fillets were tapered around the end of the lug with a Q-tip.

Miss Centuri Rockets?

I saw this picture on Facebook.
Apparently NASA held a Miss NASA Beauty Pageant from 1968 through 1973. The winner was featured in promotional material and was a good will ambassador. Miss NASA may have been an inspiration to one model rocket company.

In 1975 I went to my first NARAM, held here in Orlando Florida. I got to know the Centuri representatives pretty well by the end of the week.
Bob DelPrincipe shared a Centuri photo album with some model designs and past magazine advertisements. I recognized some of the ads, but apparently a few never made it to press.

One ad had a young model with a perplexed look on her face standing next to some rocket outline silhouettes. Her voice bubble read something like: "They won't even show me the newest designs - and I'm Miss Centuri Rockets!"
Of course I asked: "What the heck is this?"

Bob explained - This promotion was developed when Centuri president Lee Piester was away on vacation. He returned to Phoenix and was shown the Miss Centuri Rockets ad series. He immediately shot it down. Obviously not something he wanted to see in the pages of Boy's Life magazine.

Thursday, September 28, 2017

Aerotech QJets 18mm Composite

From Aerotech's Facebook page - 

"Off for certification they go!
Qjet certification motors en route to NAR for testing! C's and D's will be submitted after we get the results on the A's and B's."

These are the new Quest Q-Jets in A3-4, A3-6, B4-4 and B4-6 flavors.
Composite 18mm engines with new igniters.
A step in the right direction . . . 

Estes Scout Ship Nova Build #1392, Build, Part 5, Engine Paint


I wanted this one to match the fluorescent engine in the Starship Nova. Both of these models are being built for the same client.

Here's the fluorescent orange I used on the other model.


A white coat was set down first. TIP: Always apply a white coat before using any fluorescent color.

I used a brush to reach all the way into the center area of the tube.


It took about five light coats of the acrylic orange to get full coverage. Allow each coat to dry before the next.


The fins were glued onto the body tube, the longest 3 1/2" long fin goes on top.


From the bottom you can see where I scraped of the paint to glue it on the standoff.

Tuesday, September 26, 2017

Estes Scout Ship Nova Build #1392, Build, Part 4, Parachute Re-Size


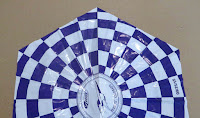
This model is only 15" tall. The Starship Nova kit chute is 18" in diameter, too big for this model.

One thing I've never noticed - 
From corner to corner the 18" parachute is actually 17 1/8" diameter.


The chute will be re-sized to around 14" wide.
I can use the original parachute, Simply count to the center, four blocks of the checkerboard print. Cut off the six sides with a sharp knife and straightedge.


Here's the 14" down-sized parachute ready for new tape disks and shroud lines.
The kit supplied shroud lines broke with an easy tug and were replaced with #10 cotton embroidery thread.

Estes Scout Ship Nova Build #1392, Build, Part 3, Nose Cone and Fins


The nose cone tie lug is thin. Instead of cutting out the center square, I rounded the hole using a rat tail diamond file.


The fins were already filled with CWF and sanded. I thought they were like the Starship Nova and had square edges. Good thing I double checked the instructions - the leading and trailing edges were rounded!
I went back, rounded the correct fin edges and filled the fins with CWF again.


The fins were taped down to some cardboard and sprayed with primer/filler. The launch lug is also getting a shot of primer/filler.

The root edges of the wings are butted up against each other to keep the primer/filler off the root edges.


The same pieces after most all the primer/filler has been sanded off. The only primer/filler left is in the remaining balsa grain.

Estes Scout Ship Nova Build #1392, Build, Part 2, Engine Mount


The BT-20 engine mount tube needs a slit cut for the upper bend of the engine hook.
TIP: For more support when cutting, I slipped the engine block into the top of the tube.


These engine mount parts came from the Starship Nova kit. The old Nova Scout Ship didn't use a split centering ring.
To allow movement of the engine hook (there is very little hook movement on a 20/50 mount) the ring positions were moved.


The glue on the split ring dried while slipped into the BT-50H body tube.
The 150 lb. Kevlar was tied around the upper bend of the engine hook.
TIP: Cut the loose end of the Kevlar cleaner by using wire cutters instead of scissors. Kevlar is like wire anyway, why not?


Here's the finished mount, a combination of old and new.

New Estes Kits


Chas Russell found it first and posted on YORF:

"Three new kits on the website. The Astron Explorer is Skill Level 4 and appears to be a ducted ejection like the Trident based on the BT-55. 
Super Big Bertha re-released for 29mm BP motors with laminated fins.
Could be interesting."

To see the new models: CLICK HERE

The model pictured above is the ASTRON EXPLORER, available in December. 
Interesting that Estes is using the "Astron" name again. This model does look like it uses ducted ejection like the old Trident design. If the tubes don't come slotted this will be a build challenge. 

The SUPER BIG BERTHA is a updated reissue BT-80 kit for BP 29mm engines. It has laminated fins like the Mega Mosquito. This is being called a Pro Series II model. Lots of balsa in this one! December release.

The RED NOVA was shown earlier on the blog. BT-60 based with missile styling begs to be a two stage rocket. October arrival.

Monday, September 25, 2017

Estes Scout Ship Nova Build #1392, Build, Part 1, Parts


I'll be using many of the parts from the Starship Nova kit, the nose cone is what makes this an easier clone.
In the above picture the fins have been correctly sized, the CWF applied and sanded smooth.


One part of the original kit I don't quite understand - it used streamer recovery.
The upper engine tube hangs over the back end and would hit the ground first.. I would think that would lead to a broken support piece or two.
UPGRADE: I'll be substituting a parachute for the streamer.


I cut the finger tab off the engine hook.
For the first time in an Estes kit I got a bendable engine hook!
This wasn't spring steel and will be replaced with a standard hook from BMS.

Sunday, September 24, 2017

Bill Simon and Alphas at the Seattle Museum Of Flight

On the NAR Facebook page, Dan French posted some pictures of Bill Simon at the Seattle Museum of Flight: CLICK HERE

For all the true rocket nerds, here's a few pictures showing the changes the kit has gone through over the years. Enlarge for easier reading -


The white lines on the engine mounts are elastic holding them down on the display board.

Estes Nova Scout Ship Build #1392, Background


For a client I put together the new, reissued Estes Starship Nova. He also asked about a build of the "sister" ship, the Nova Scout Ship. Both models used the drop down nose cone.

I found the Nova Scout Ship instructions at oldrocketsplans.com
http://www.oldrocketplans.com/estes/est1392/1392_Scout_Ship_Nova.pdf

To find the body tube sizes for this model and all the rest - 
http://www.aeromoe.com/Estes_Body_Tube_List.pdf

Here's the body tube sizes I'll need - 
1392 Nova Scout Ship 030372
BT-50W 9.50"     030324 BT-20G 3.50"     030326 BT-20J 2.75"

Estes Puma #7256 Build, Finished


For such a small model, this is a detailed build with many small parts. The paint mask would be difficult for a younger builder.

I wouldn't have bought this kit but it was on clearance at Hobby Lobby. I like a building challenge, this was a good one!


Saturday, September 23, 2017

Estes Puma #7256 Build, Part 14, Engine Pod Gluing and Decals


You can still see the top of the tabs going into the top of the engine pods.


You can camouflage it a little bit with a fillet of white glue. Mentioned earlier, use white glue for an external fillet over the paint. White glue dries clear, yellow glue would dry yellow.


The clear glue fillet blurs the joint a bit. Not perfect but better than it was.


The gun dowel ends are hit with a permanent marker to give them a black end.


This is the best fit I could find for the canopy window decals. They don't match the face card decals.
Because of the curved surface the decal was coaxed around the nose cone with a wet Q-tip.

Is it just me or does it look like an angry duck?

Sport Rocketry Igniter Article

I picked up the mail today and the Sept./Oct. issue of the NAR Sport Rocketry Magazine.
I had submitted an article on beefing up the Estes Starter Igniters.
In the past I've had a some articles in the Apogee Peak Of Flight newsletter. This time it was in print!

The Estes clear tip starters are a lot like using old school bare nichrome. Starter ignition is slow and not practical for clustering.

I came up with an easy way to improve the reliability of the bare wire Starters without dealing with dip mixes that always seem to dry out.
With this method you coat the starter end with black powder. You make them up as you need them with no remixing of the liquid  dip coating.

After the issue has had it's run, I'll share the steps on this blog for those who aren't yet members of the N.A.R.

Friday, September 22, 2017

Der Red (Orange) Max?


On TRF, Overeasy123 posts pictures of three beautifully finished Mini Red Max models.


I like the different colors, especially the orange.
Orange was the (sort of) suggested color on the original Red Max. Read Step 11.
Why orange paint on a model named the Red Max? In the end it's always your choice.
For the original instructions: CLICK HERE 

It could have been orange in the first Citation catalog. Sometimes dark oranges will print closer to a red.

Estes Puma #7256 Build, Part 13, Decals and Engine Pod Gluing


There is white ink on the decals but it is pretty much invisible until you slide it off the backing paper.

TIP: Before cutting out the decals, hold it up to a bright light to see where the white it is. Those dashed black lines are very close to the white ink.


The front winglets get mirrored black decals.
After all the decals were applied the engine pods were glued in place. This was a tip picked up on TRF from a build by Scigs30. Getting a good mask on that inside joint under the wing would be hard to do.
On the left is how I applied the white glue. On the right is a Q-tip to smooth out the glue on the inside joints.
TIP: Use white glue for joints that will be seen on the outside of the model. White glue dries clear, yellow glue dries yellow.
The clear white glue fillet also blur the wing tabs that can still be seen when the engines are on place.