Saturday, July 31, 2021

Estes DARC-1, #7307 Build Part 9, Interior Slide Tube Gluing & Lug Trim


CA glue (or Fabri-Tac glue) is set around the sides of the centering ring and front of the the body tube edge.

Line up the launch lug with the hole. The assembly is slid all the way forward into the shroud body making contact with the inside body walls. 


The outside joints of the the launch lug are hit with medium CA glue.


The lug might look a little rough - see the next pictures to clean it up.

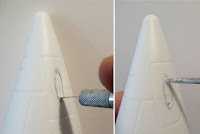
Using a new single edge razor blade, the launch lug is trimmed off matching the angle of the shroud body. It's best to cut the lug off a shade long and shave it down to the shroud body. 

Note how the rough cut lug isn't a clean oval - yet. 

Use a sharpened dowel to push out and raise the the thin skin on the lug wall.
Apply some CA glue with a Q-tip to harden it. Sand smooth.
Repeat if needed until you get a smooth rounded edge at the top and bottom. 

Those pencil marks on the shrouds are where the low seam areas were filled with medium CA and sanded smooth.


Here's a final fit and smoothing of the lug in the hole.

Notice the lug wall at the bottom near the knife point. The lug wall looks wide because it was cut and smoothed at an angle.

If you take your time, you can end up with very little joint filling.

Friday, July 30, 2021

Estes DARC-1, #7307 Build Part 8, Removing The Back of the Aero Shroud


The back end of the aero shroud is cut off around the raised step.
Trace around the raised half circle with a pencil.
This plastic at the "hump" is thick, I'd recommend using a thin razor saw to cut through it.
The rounded plastic wall near the fin slots is much thinner. Cut through this round side carefully with a sharp knife. Mark with a pencil and cut with a few light passes. 
Be Careful - Your blade could go through the plastic when you don't expect it. Don't let it get away from you -  
Cut these curves first, then work on the flats connecting the cuts.


This picture shows the thick plastic at the top half round.
The outside plastic towards the fin slots is thin by comparison.

Thursday, July 29, 2021

NARAM 62, Manufacturer's Forum Videos

The NARAM 62 Manufacturer's Forum videos are on YouTube.

Estes: CLICK HERE
Erockets: CLICK HERE
Peter Alway: CLICK HERE
Aerotech/Quest: CLICK HERE
ARA Press: CLICK HERE

Of special interest to me were the new Estes Blue Origin. 
Estes hinted at a future Fly or Display Space X model.

Estes DARC-1, #7307 Build Part 7, More Lug Hole Fitting


With the engine mount glued up, it still won't slide through.
On the right, I've marked the top (outside) that needs to be tapered. The (bottom) inside surface also needs tapering, a mirror of the upper taper but inside.

I finally got the lug to slide in but for the best fit the centering ring might need some contouring.

In the left side picture, there are three pencil boxes marked with pencil. I made the marks wide so it would be easier to see in this blog pic.
The centering ring is making good contact against the inside body wall at the pencil marks. The ring sides were sanded where the contact points were. 
With the high spots sanded down, wider areas of the centering ring made better contact with the inside walls of the plastic shroud.

The picture on the right shows the final upper taper to fit the angled lug. The pencil arc shows the outside taper. There is a "mirrored" taper arc inside the shroud on the low end of the hole.

Inside view: Here's the better fit of the centering ring.

Outside view: The lug slide is clean and straight with no tension or distortion.

Years back I built a Mars Lander kit. It was never flown because the long (through the body) launch lug was crooked. The finished model wouldn't slide down a launch rod. 
Be sure this lug is straight and won't bind when slid down a rod.

Wednesday, July 28, 2021

Estes DARC-1, #7307 Build Part 6, Cutting The Launch Lug Slot

This could be the most difficult part of the build. The plastic at the nose of the body is thick! Be prepared to take some extra time to get a good fit of the launch lug.
 

On the left - the raised "nub" for the launch lug to pass through.
I've already drawn around the sides with a sharp pencil.

A knife score is started around the raised area thinking it would leave a hole when cut off.


The plastic is thick. There was no hole when the raised plastic nub is cut off.

I built two kits. On the right is the first try at cutting through the plastic wall with a knife. 
On the second build I tried two different ways to drill into the plastic. These holes at either end were joined with more knife cuts.

Starting by spinning a knife tip or a very small hand-turned drill bit. A small hole was spin drilled to make an opening for a rat tail diamond file. The file kept the ends round as the holes were enlarged.
In the left side picture - the long launch lug is seen peeking through the lug hole. More plastic has to be removed for it to pass through.

The rat tail file is used again at approximately the same angle that the lug will be when slid in with the interior mount. At this angle, the file will remove tapered plastic from the outside top and the inside bottom around the hole.

I've drawn up a PDF that better shows the inside and outside plastic wall taper recesses to be shaped. The PDF is available to Patreon supporters. 
Email me at oddlrockets@bellsouth.net and ask for the Darc-1 PDF.
I recommend this PDF pattern for this build.

Tuesday, July 27, 2021

Estes DARC-1, #7307 Build Part 5, Interior Mount


The laser cuts left some browning on the edges of the centering ring. Most of this can be removed with a white eraser. 

Use a white eraser, a pink (pencil end) eraser can leave a pink color.


The shorter body tube (Part J) was a tight fit in the ring. The hold down tics were shaved down with a half round diamond file.

The launch lug fit was also tight. A sharpened dowel widened the hole a bit.


With the L spacer piece glued on there was a slight space between it and the launch lug.

FIX: A rectangle piece was cut from the leftover cardstock and glued to the top of the "L" spacer support to fill in. Keep the leftover cardstock pieces for quick fixes like this.


One of the shock cords is knotted and slipped through the slit in the centering ring.

Piglet-sus! Build Part 10, Finished


Well . . .  Here's the weird thing - 
This blog build has been in limbo, in draft form since 2011. 
After ten years, the final posts are missing!
That and I can't find the finished rocket.

Hopefully the above illustration from the PDF will explain the fin gluing and detail work. That Piglet-sus PDF is available to Patreon members.

Interesting - This original design was downscaled from the Odd'l kit. New, re-drawn wings are included in the OR kit.


I found some pictures from my launch records on rocketreviews.com.

The mouth, cheek and nostrils were drawn with a fine point Sharpie.
Practice on paper before drawing on the model. The picture shows the black lines have faded over time. 
The old Estes Cloud Hopper Goonybird had hand drawn details like this. 
The larger Pigasus kit includes water slide decals.

I'll have to make up another Piglet-sus to fill out my MicroMaxx fleet.

Monday, July 26, 2021

Estes DARC-1, #7307 Build Part 4, Clearing The Fin Slots

The fin slots have to be cut from the blow molded conical body.
First things first - Start with a new, sharp blade! 
Take your time - don't attempt to cut through the plastic wall with one pass. 

The widest sides of the conical body have the thinnest plastic wall!.
The fin slot area plastic is thin. Go light with your knife, you could go through the plastic when you don't expect it.

Notice the pencil line I drew around the raised fin slot before doing any cutting. The pencil line will help visualize the edge when cutting.

I don't normally use my X-Acto knife with a #11 blade, but I will on this cutting chore. I want more control than my break-off blade knife. 


If anything - cut the slots a bit smaller than needed. You can (and will) widen the slots to fit the fin thickness.

Even cutting right at the sides of the long raised hump, the cut slot is inside the pencil lines.


You could shave the sides with a knife blade, but I found more control using a small flat diamond file.


Use a scrap piece of the balsa sheet to check the fit of the fins. 
TIP: Don't use the kit fins to check the width, you could scar them up doing test fittings.

Piglet-sus! Build Part 9, Ears and Goggles


Cutting out the wings and legs could take some time. This triple ply cardstock is thick. I found it easiest to make wedge cuts and small trims afterwards.


The ears were too thick with the cereal box centers, so I ended up making them out of 110 lb. cardstock folded over itself. Position the ears with white glue, then come back with CA on a toothpick to set them in place. A small drop of CA on a toothpick is easier to set into an edge than trying to apply it directly from the bottle. 

  Just like the ears, set the goggles in place with white glue. Once you are satisfied with the position, go back with CA on a toothpick. The nostrils and smile are drawn with a fin Sharpie pen. Use a fine pen, the larger laundry marker Sharpies are too thick for the fine line work. Practice on paper to get a feel for the size of the nostrils and curves in the mouth.

Sunday, July 25, 2021

Estes DARC-1, #7307 Build Part 3, Prepping Part W

How do you fill the small holes in the balsa?
The hold down tics in the holes are sanded down with a small diamond file. Just remove what is left of the tics.

Sharpen a dowel and sand smooth.
Set the dowel in the holes and gently turn. This can compress the edges, round out the circle arc and sharpen the edges.


A Q-tip is dipped in some CWF filler.
Press into the holes and turn.

Before the filler dries, rotate the sharpened dowel again to lightly push the filler into the balsa.  
On the left - 
Leave the raised lip of filler until it dries.
Sand the filler flat, to surface with 400 grit on a block.

On the right I have applied CWF over the face. A knife blade cleared it from the laser cut lines.
Sand smooth. On this CWF application, keep the filler out of the holes.

You'll have to fill the edges after the piece is removed from the balsa sheet.

Piglet-sus! Build Part 8 Nose Cone Nose


The pig nose is a short length of 3/16" diameter launch lug.
The length is 5/32".
For the front end flat plug, I tapered a piece of dowel so it "wedge fitted" into one end.
It was glued in and allowed to dry.


After drying, the dowel was cut off a little longer than the lug length. That was sanded flush with the front end of the lug.
A drop of CA gel was set on some cardstock and spread out into a small pool.
The nose was dipped in the CA and set on the plastic nose cone.
You may have to do some adjusting to get it centered before the glue sets up.

Saturday, July 24, 2021

Estes DARC-1, #7307 Build, Part 2, Some Parts Prep


Some of this build will be out of instruction sheet order. I often look ahead for steps that might involve extra wood grain filling before assembly.

On the lower outside edges of the wing fins are laminated wedges (Parts C). These are made up of four pieces of laser cut balsa.

As always, I cleaned up the laser cut sides just removing the wedge cut. I don't sand off much, just enough to square up the sides.

Four pieces are glued together. Make two sets.
On the left, the back sides are lined up on a straightedge while the glue dries.
The picture on the right shows a before and after sanding of all the sides.  


The front landing "skid" has a balsa center piece with four holes (Part W) .
Carefully cut through just the hold down tics and remove the dots.
More prep on this skid piece in the next post - 

Piglet-sus! Build Part 7 Nose Cone


This rocket is so short, there won't be much room for anything above the upper centering ring.
The nose cone shoulder will have to be cut down to 1/4" long.
The bottom, white nose cone is the new one to be used on this rocket.


Before gluing in the shoulder, this model will require nose weight. Fill the nose cone 2/3 full with clay, tamped down into the front of the cone.
    
With the rear plug set in the nose cone, the plug edge overhangs the shoulder diameter.
This will have to be sanded down even with the shoulder.

Friday, July 23, 2021

Estes DARC-1 Build, #7307, Part 1, Parts


All the parts - 
Two lengths of shock cord
Two pats of nose weight clay
18mm Engine Retainer
12" pre-assembled parachute
Notice the white BT-20 engine tube slides over the brown "BT-19" tube like a long coupler. The BT-19 ends up inside the nose of the plastic shroud.


The parts of interest:

The large blow molded conical shroud (nose) section. 
As mentioned above, the engine mount tube and slightly smaller diameter brown tube.

Thursday, July 22, 2021

Estes DARC-1 Build, #7307, Background


This is one of the more interesting new kits from Estes. I was looking forward to the build.

From the Estes website:
"The Deep Atmosphere Research Craft is a one of a kind scientific vessel developed by Space Corps Science Division. It’s aero surfaces and resistant alloys allow the DARC-1 to navigate a dense, unforgiving atmosphere for extended research missions."


Here's the model webpage - CLICK HERE 
Click on "Technical Specifications" for model sizes  and recommended  engines.  

At first glance I thought it might be a lifting body glider, but it recovers under a 12" parachute.


The conical shape and three fin configuration reminded me of the old Centuri X-24 bug.
The Centuri kit featured a cardstock body and fins. When the engine ejected out the back, some weight at the rear raised the nose and the model went into a "glide".
Here's the Centuri catalog page: CLICK HERE
Squirrel Works has a clone kit available: CLICK HERE
And my X-24 clone build from 2016: CLICK HERE


After the Centuri X-24 Bug, Quest came out with their own version of a lifting body.
The rear glide "leveling" weight was two pennies folded inside a cardstock housing.
Years ago I assembled one from a kit, but didn't record the build. I didn't get a great glide out of it.
Here's the Quest catalog page from 1994: CLICK HERE

Piglet-sus! Build Part 6 Body Wrap

The BT-5 body wrap was printed on 24 lb. premium inkjet paper. 
I had to print out eight different body wraps in different shades of pink to find a spray paint match. The nose cone color is Rustoleum Painter's Touch 2X Candy Pink spray.
Here's a glue stick being applied to the back of the body tube wrap.


The pigs front hooves will go over the body tube edge and onto the lower end of the nose cone.
The wrap is shown in place on the body tube.

This picture is from the first build. On your print, the front legs and hooves are a little larger now and the lines thicker.


The engine mount is glued in place, slightly recessed in the end of the BT-5 tube. This is to allow room for a glue fillet. 

TIP: Where I can, I slide an engine mount in place without glue. After I'm sure the positioning is correct, I'll add glue fillets to lock it into place. This "dry position, then glue" idea doesn't work in all cases. If the main frame diameter isn't much bigger than the engine mount diameter, you can add glue afterwards. 

Wednesday, July 21, 2021

Coming Soon?


The Coming Soon page has lost a listing - 

Something has been moved to the "NEW" page.
CLICK HERE

That Mystery Kit build will start shortly!

Piglet-sus! Build Part 3 Laminating Fins

Oops! 
I skipped Step 3 of the build! I'll post it here today, then put it into the correct build order tomorrow.

Here's the wing fin "sandwiched" over the straight edge of the cereal box cardboard you cut earlier
Note the fins aren't cut to shape yet.
Lightly coat the back, unprinted side of the fin with white glue.
Set it over the edge of the cereal box stock. Push the fin fold all the way over (in this picture push to the left) until the fold is touching the straight edge of the cereal box stock.
Lay a clean piece of paper over the three layers and burnish. Clean off any glue that squeezes out around the sides.

Here's the side you'll cut on (left) and the other overlap side. (right)
The overlap on the back gives total color coverage to both sides.