Wednesday, March 31, 2021

TLP Hawk Build, Part 5, Tail Cone Fitting


The supplied centering fit was way too loose inside the main airframe  tube.
Some thin strips of cardstock were cut and glued around the ring to widen the outside diameter.


Here's the dry fit of the tail cone assembly ready to be slid into the larger BT-80 tube.
It's an interesting sub assembly - 
The 24mm engine mount will slide into the interior BT-70 tube. 


I used a brush to add a glue fillet at the ring / shroud joint.
I didn't want too much and run the chance of the glue shrinking and puckering the shroud edge.


A sparse ring of glue was set onto the bottom of the BT-70 interior tube. Don't use a lot of glue, when it dries it might pucker the cardstock.

The tail cone assembly was slid up from the bottom into the line of glue.
A fillet was added to the top ring joint.

Tuesday, March 30, 2021

TLP Hawk Build, Part 4, Tail Cone


This "kit" didn't include actual printed shrouds, but gave directions on how to make them in the instructions.
You could draw a big wedge piece but I didn't have any cardstock that large.

At first I thought the interior tube was a BT-70, but turned out to be a Centuri style ST-20.
I went to - 
https://www.payloadbay.com/page-Tools.html
and input the dimensions.
Note: Tube 1 is an ST-20, Tube 2 is a BT-80
The length should be 2.9". That was corrected before printing the shroud.


Here's the tail cone I printed on 110 lb. cardstock. 


This was cut out.
A glue tab was made and stuck to the shroud using a glue stick.

Monday, March 29, 2021

TLP Hawk Build, Part 3, Engine Mount & Tube Fitting


The engine mount is pretty standard, designed for 24mm motors.

The engine hook retention is a wrap of black electrical tape.
With the coupler slid in place with no glue,
you can see the tubes weren't cut flat.

On the right is the tubes after sanding the ends square with a block.
TIP: Note the pencil lines. I marked the best fit after rotating the tubes. The pencil lines give me a reference when gluing them up.


Larger tubes are hard to cut clean even for a vendor.
Be sure to square them up with a sanding block with 220 grit sandpaper.


TIP: Bevel the ends of the coupler for an easier fit. Bevels also prevent the inside tube ends from peeling up.

Sunday, March 28, 2021

TLP Hawk Build, Part 2, Parts

I've got a lot on my plate right now with contracted builds.
I'll take this one as far as I can, but can't guarantee a painted finished build.
Still, the sub-assemblies will be interesting . . .


Here's what was in the bag - 
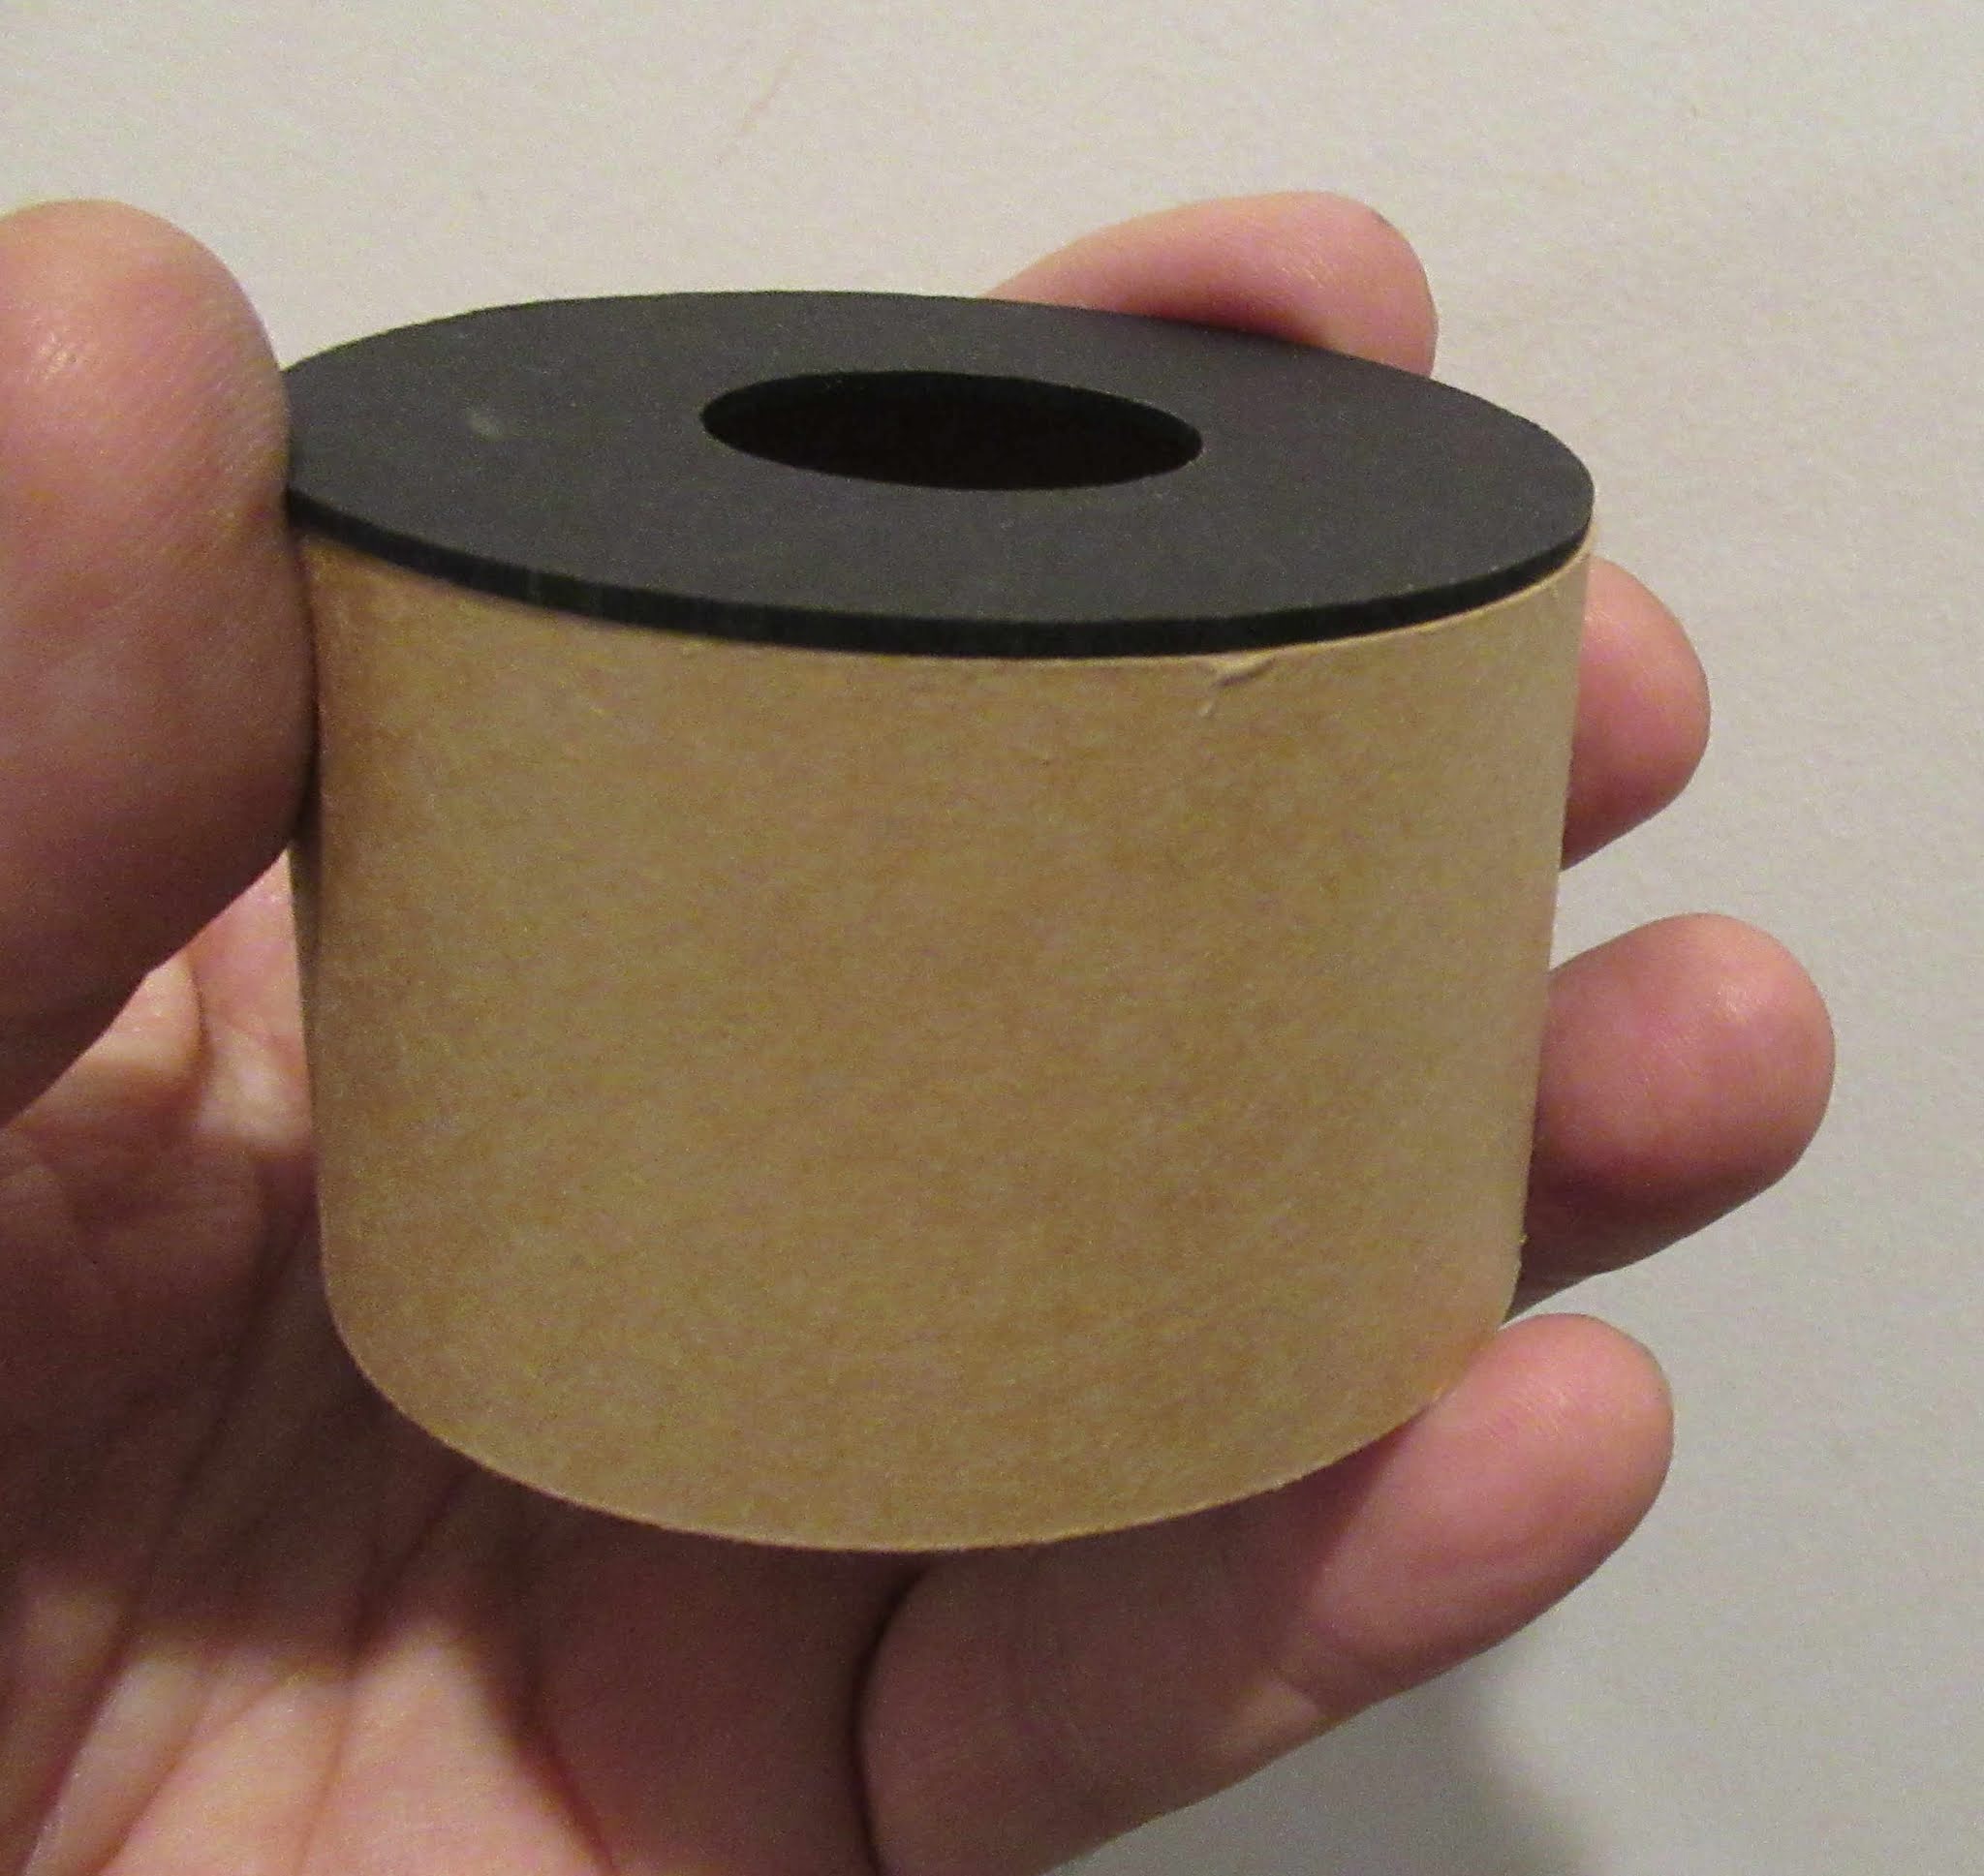
Two lengths of BT-80 tubing, the brown coupler is slid in the shorter length tube.
A length of 2" diameter tubing for inside the tail cone and surrounding the engine mount.
Lots of centering rings and engine mount parts.
Sheet balsa for fins and strips were included for the tunnels.
The instruction booklet was shown in the last post. 


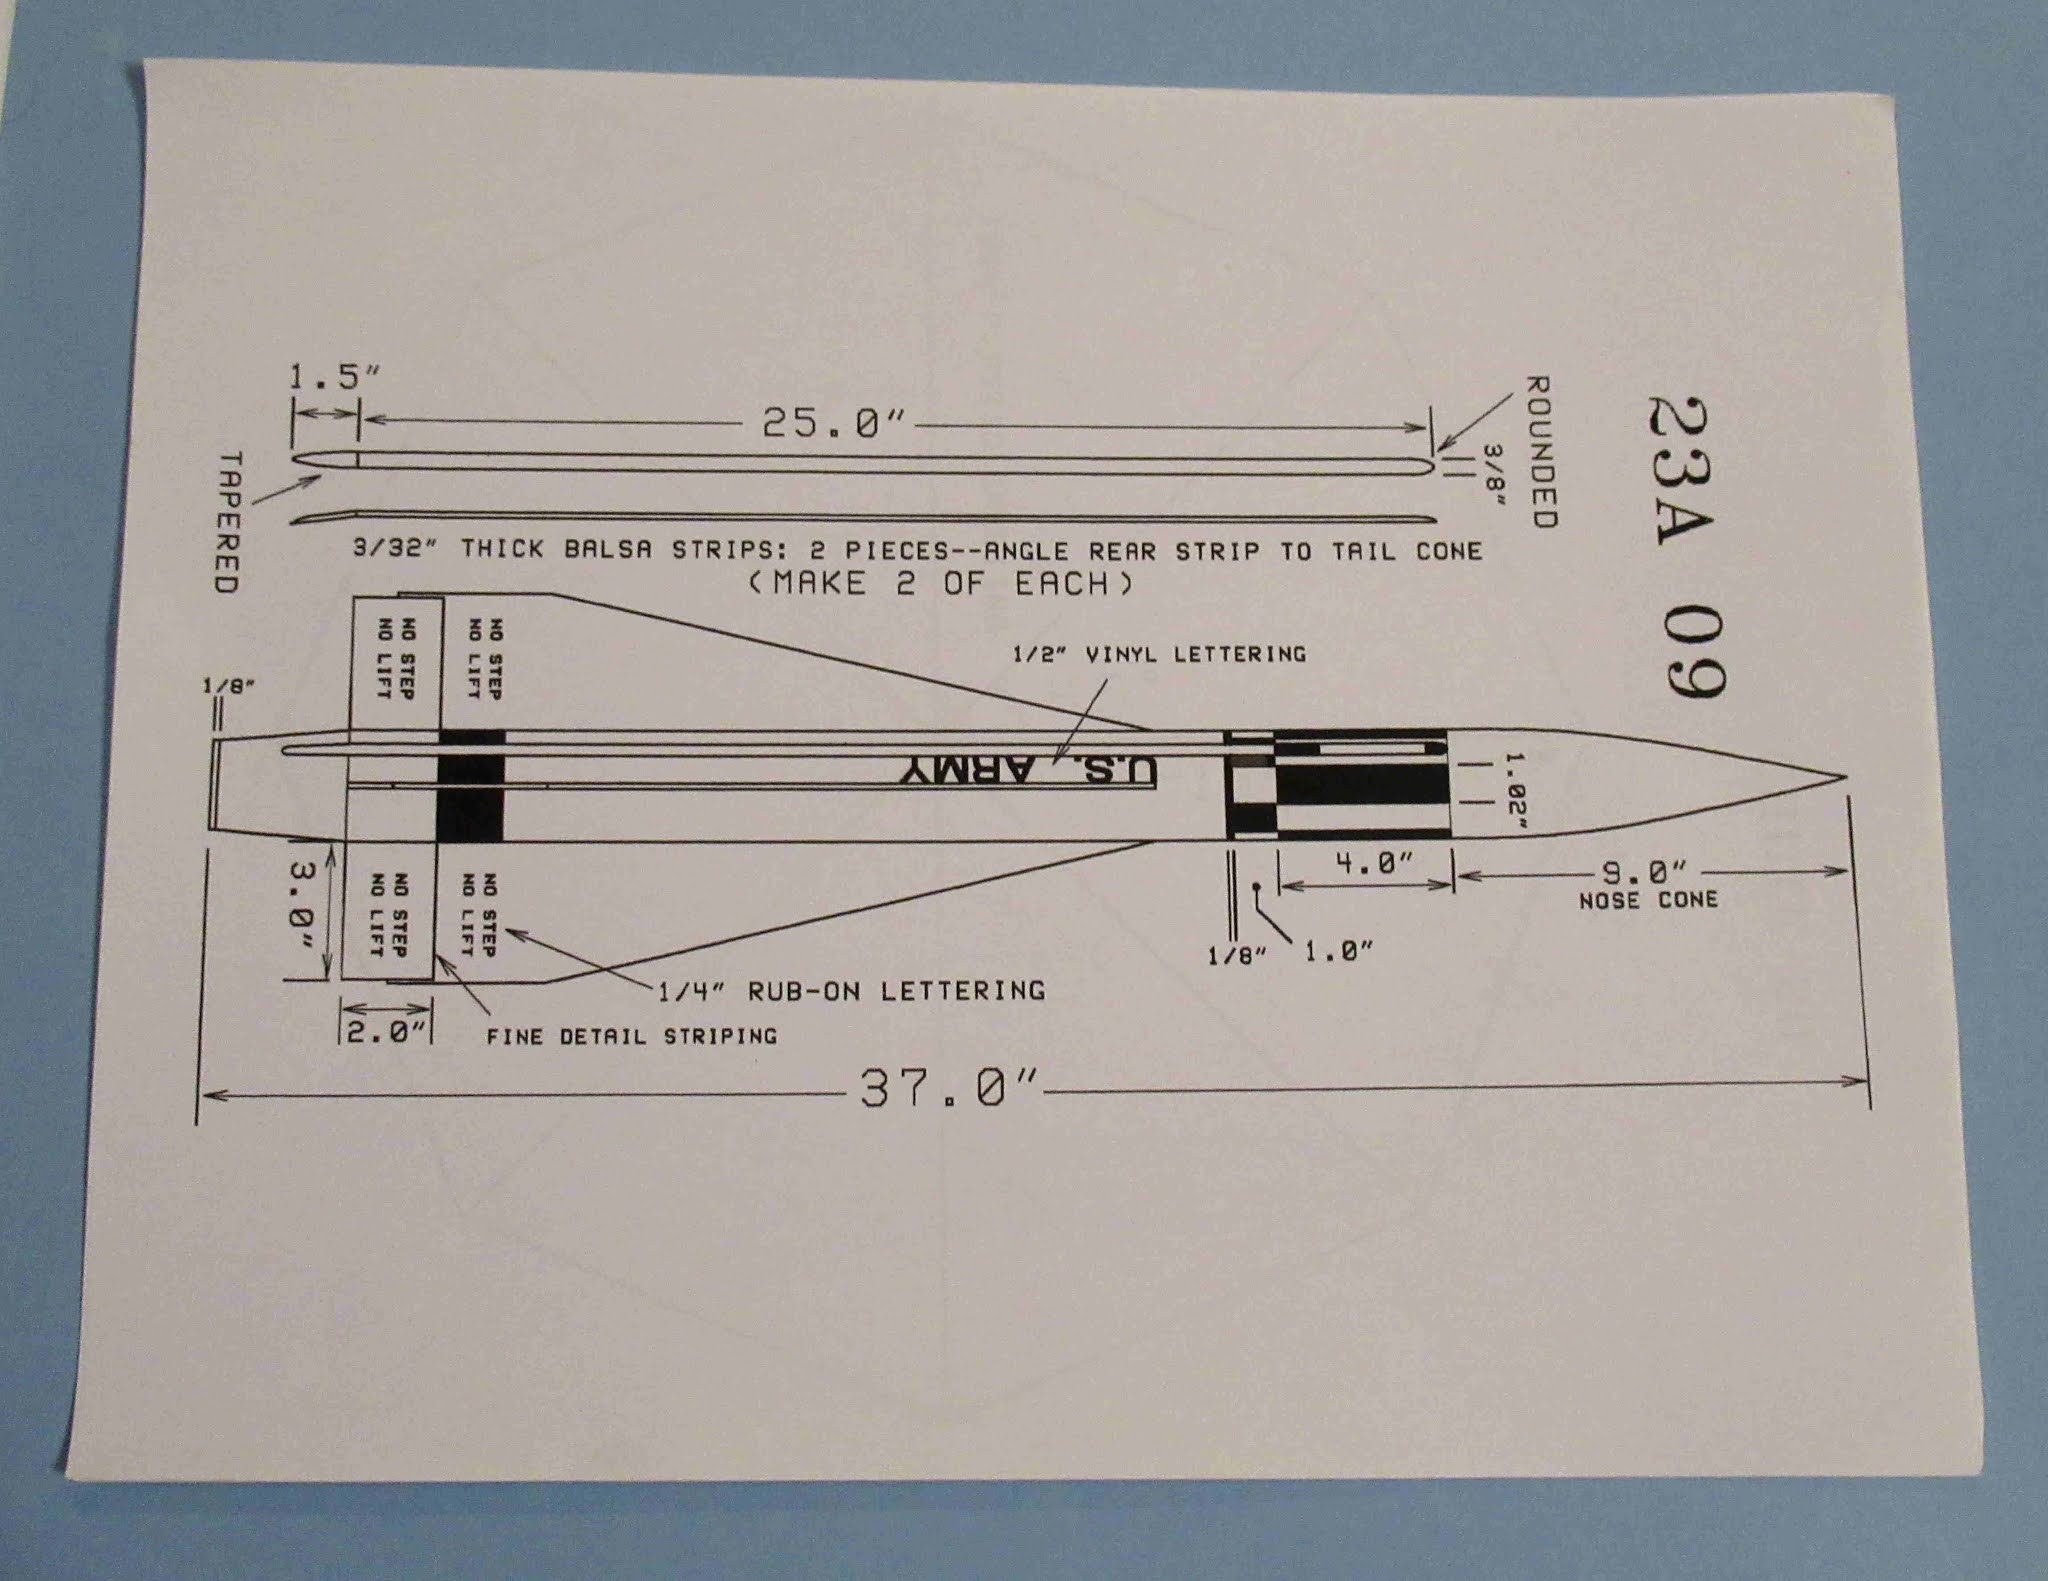
Here's that plastic Alpha style nose cone. It's been used before in the old Maxi Alpha and Colossus kits.
The "kit" also included a 3/16" launch lug.

The tri-fold shock cord mount looks small and feels too thin.


The kit supplied lug is on the left. 
It looks like a plastic drinking straw that was spray painted to rough it up for better adhesion. I'll replace it with a stronger, standard 3/16" lug.

The supplied engine hook looks wider and flatter than a regular hook. It looks questionable and will be replaced.


Above the coupler is a parachute "shelf". It's not a baffle so the model would require wadding.
The shelf prevents the parachute and wadding from sliding down towards the bottom of the rocket at boost. The shelf helps keep the C/G forward for stability. 

Saturday, March 27, 2021

TLP Hawk Build, Part 1, Parts Pack Instructions

This looked to be something different.
I found a The Launch Pad "Parts Pack" instruction booklet with most parts on Ebay.
A vendor may have bought old TLP instructions and pieced together tubes, centering rings and sheet balsa. Or - 
This may have been a early transition kit produced by TLP. 


Here's the parts pack instructions cover.
I wrote down the recommended engine designations after looking them up on the old Launch Pad website.


If you were to make the model from scratch (no pre-made tubes) the instructions explain how to roll them from manila paper or cardstock.

The main body is made up from smaller segments, joined by DIY couplers. The kit I bought included a two longer body tubes and a standard coupler. The vendor assumes you will use the body tubes.


Here's the nose cone "witches hat". You have to transfer the measurements and cut it out of cardstock.
The supplied parts included a BT-80 Alpha style plastic nose cone.
A pointed cap is rolled from cardstock and glued to the top to lengthen the plastic nose cone. The extension give the nose cone a more correct profile. Seams and joints are filled and smoothed over.


This detailed page shows the conduit shaping and decal placement.  Decals aren't  included in the TLP kits. A disappointment to some builders as kit face cards imply full markings.

Friday, March 26, 2021

"How Do You Do A Clean Build?"

I get an Email question like this once a month:
"How Do You Do A Clean Build?"

My answer: Experience, trial and error and don't rush.
I don't consider myself to be a great builder, maybe a good sport model builder. Seeing those scale model entries at a NARAM will put you in your place.
One out of every ten builds might become a "shelf queen". That's a model that turned out well. It isn't launched and stays damage free on the shelf.

For the newer builders - Before you start that new kit or build,
  1. Clean off your work area. Place all tools around your work area for easiest access.
  2. Change out your knife handle with a new blade.
  3. Change out new sandpaper on your sanding block.
  4. Keep your fingers and work area clean.
  5. Read the instructions before you start cutting and gluing. Make notes, plan ahead. Once in a while you'll find instructions aren't printed in the best assembly order. Example: Decide whether or not if some parts should be painted before gluing, like on a Saturn 1B or the Semroc Taurus pictured above. Most of the Taurus color separations were like the nose cones - sprayed orange then glued into the painted white body tubes.
General Build notes:
  1. SLOW DOWN! Take an extra five minutes on each step and do it right.
  2. Use less glue initially - less glue dries faster. Try gluing on a fin using less glue on the root edge. After it dries, check your alignment. If the fin is off, it can be removed and re-set because you used less glue to initially set it in place. If the fin is good - then apply fillets for strength. LPR and most MPR builds do not have to be bulletproof!
  3. A good final finish is a result of good surface prep. Well, that and "cooperation" of the spray paint formulas and the humidity. If your fillets aren't smooth, don't expect a clean mask line down the root edge of a fin.
  4. Don't start with a Skill level 4 or 5 kit. I wonder how many first time Saturn V (unfinished) builds end up abandoned, shoved in the back of a closet. 
  5. There's a problem with hobby forums. A simple question will get 20 different answers, some are  posted by inexperienced builders. We've all seen this one: "I seal and fill my fins by rubbing glue into the balsa!" Your personal experience will find the best methods for you. 
  6. You've got to know when to "put a fork in it." Sometimes trying to over correct a flaw could make it worse! Every build has a spot you wish could be better. If you don't point it out, nobody will know but you.
  7. Every new build is a learning experience. Your next build will be better.

Thursday, March 25, 2021

Quest Totally Tubular, Finished

Here's another show build for Quest.
This is an easy Skill Level 1 build.

A classic tube stabilized model where six tubes are glued around the long body tube. 
TIP: You can always fit six tubes around a body tube if the six short stabilizer tubes are the same diameter as the long central tube.

This kit has pre-colored yellow and blue tubes. This was a show model so the tube seams were filled. After sanding the filler down, some of the tube color was removed. This required the tubes to be re-painted.


I did my best to match up the spray paint colors to the sticker ink colors.
This kit is already pre-colored but this was a show build. It required filling the body tube seams. When the filler was sanded, some of the color was removed. I had to do a shot of filler/primer, a white undercoat then the blue and yellow colors.


The paint / sticker color match was close!

The paper sticker edges want to lift. I probably should have sprayed the back with some adhesive spray.

Wednesday, March 24, 2021

Quest Superbird Build, Finished


I didn't do a blog build on the Quest Superbird. It's a good size 3FNC or three fin - nose cone rocket.
These pictures are of the finished show build for Quest.


The body tube is 35mm diameter, close to a BT-55 size.
The balsa fins are 1/8" thick! Most kits this size size include 3/32" thick balsa.

There are two 14" parachutes, one parachute for the lower body, a second for the large payload section.


This kit has peel and stick décor, including this three color body tube wrap. 

The thin white band is actually the coupler that joins the two body tube sections. 


The nose cone plastic was a bit lighter than the color of the upper red body tube.
I sprayed both the body tube and nose cone with the same tint red paint to have them match.

Tuesday, March 23, 2021

A Bunch Of Quest Builds & a TIP


Here's the second group of kits I put together for Quest.

Back row L to R - Harpoon, Two "Show" High Qs, Big Betty
On the floor - Totally Tubular, Superbird, Three "Flight" High Qs.

The "show" rockets are photo quality. These have filled body tube seams, basswood fins and painting to match the face card pictures.
The Quick-Kit "flight" models are a simpler build, no seam fills or re-painting. 

Here's something I learned while setting down a sticker body tube wrap on the High Q rockets.

The first wrap I set down was simply stuck on what I thought was a good visual line. The roll pattern ends didn't match up after going all the way around the tube.
TIP: On the remaining four builds, I used my aluminum angle when starting the sticker edge. The roll pattern print side was lined up with the aluminum angle. I had much better results on the remaining models.
The roll pattern sticker wrap wasn't long enough to match up on the other side. Once again - start your roll patterns in line with the launch lug so any gaps won't be seen when pictures are taken with the rocket  on the launcher.

On the left you can see a partial stripe that was outside the pre-cut sticker side. I cut this out with my knife and straightedge and used it to cover the gap.
Perfect? No. Better? Yes.

Monday, March 22, 2021

New Missiles for Odd'l Rockets Jet Kits!

I'm very excited to to announce an upgrade to the Odd'l Rockets Fighter Fleet Jet kits.

On the left is an original Centuri Fighter Fleet missile, complete with an air bubble in the molded nose cone. On the right is one of the new Odd'l missiles. The small 3d printed nose cones and fin units slide into a standard 1/8" launch lug. The kits (with new missiles) are only available through Odd'l Rocket vendors.
These are smooth, SLA printed. The more common PLA printers have the ridges that require filling and sanding.  
My Odd'l kits are produced in small batches. The most recent F-16 and upcoming F-18 Hornet kits will include the missiles.


These were designed and printed by David Koo. 
David is producing two new 3D printed Russian N1 model kits. To see his website: CLICK HERE 
I recently had lunch with David and saw some 3D printed parts from his N-1 kit. His work is clean! We talked rockets and rocket trivia for 1 1/2 hours. David and I agreed we both like the problem solving aspect of rocket design and production.

Sunday, March 21, 2021

Quest Big Betty Stickers, Part 2 & Finished

The large name sticker is tricky. It goes on centered at an angle. 
Do a few dry fits, don't pull off the backing until you've found the center placement and correct angle.
On the right - Notice the pen mark on the sticker and the pencil line to the side. These were my reference marks made before the backing was peeled off. There was another pen and pencil reference on the left side.

Set down and start the sticker in the centerline - imagine a straight line from the lower left corner of the "B" to the upper right side of the "y". Adhere the center line first, then smooth it out from that center line out to the top and bottom.

A ball point pen ink reference mark was used on the sticker, I couldn't see a pencil line on the slick plastic. The ink mark was removed later using a Mr. Clean Magic Sponge.


Here's the finished model.
This could be called the Quest version of the Estes Big Bertha.
The Big Bertha has four fins, the Big Betty has three.


No masking! The purple is a good color contrast to the overall yellow.

Saturday, March 20, 2021

Quest Big Betty Stickers, Part 1


This is not a full build. Here's some tips on self-adhesive decals for the Quest Big Betty kit.
I had to check the sticker sheet under a bright light to find the pre-cut lines.
Two long stripes are pre-cut to fit both sides of three fins. 
You want the strips to be parallel to the outside edge of the fin.
Here I'm doing a dry fit to check the spacing before peeling off the backing.
The angled top starts just below the rounded leading edge.
It would be tough to get all the purple stripes straight nd evenly spaced. 


1/4" wide strips of masking tape were cut. The edge of the tape is even with the outside edge of the fins.

This picture shows a sticker already in place.
Check the next picture to see the placement.

TIP: Wash your hands before doing any peel and stick décor.
Don't touch the sticky side with your fingers if you can help it. You will leave fingerprints.

Leave the backing on the sticker as long as possible. I only peeled back enough to set down the leading edge. When you are sure it is straight you can remove the backing and continue placing the strip.
After it is in place, remove the masking tape.


The low end of the strip is long and overhangs the trailing edge.

I trimmed it off with a new razor blade using short circular sawing strokes. Go slow and don't cut into the paint or fin.

Friday, March 19, 2021

Quest Harpoon AGM Build, Finished


I've always liked the looks of this Quest kit.
Maybe it's all the fins (count 'em, twelve!) or all the decals.

This looks to be a great small field flyer with a B6-4. It's about the size of a Big Bertha so it should perform about the same.


It takes some time to place the decal stripes on both sides of all the fins.
2 decals per fin X 12 fins = 24 fin decals!

This is the upper section.
The gray and blue look good against the white body.


I like the gold color on the nose cone, another good contrast color.

The rocket recovers on a 14" yellow and red Quest parachute. The newer chutes are a more traditional sheet plastic, no longer "crispy".

Thursday, March 18, 2021

Quest Harpoon AGM Build, Part 6, More Decals


Here's the upper body - check the face card for placement.
Again - notice the wraps all start and finish in a line, one the back launch lug side of the rocket.


I don't normally put the company name on a model.
This one is being built for Quest.
On the left is one of the decal strip overhangs.
Let it dry before trimming. With the decal dry you'll get a cleaner cut.

Use a new single edge razor blade. Use small circular sawing movements being careful not to cut into the fin or the white paint.

On the right is the decal edge after trimming.


These decals were a bit brittle.
I don't normally use Future clear coats, but I did apply some on some decal edges using a Q-Tip.