Showing posts with label E Photon Probe. Show all posts

Thursday, June 29, 2017

Ebay Auctions Ending

The Classic Estes (Semroc) 
STARSHIP EXCALIBUR 
Ebay auction is ending Thursday night!

This is a pretty one, I almost hate to see it go! (But I need room for other builds)
To see the auction - CLICK HERE

Also being auctioned:

The Estes PHOTON PROBE

This is the better of the two kits built on this blog. 
It's an original kit from 1991-1993, not the Classic Series reissue.

To see this auction - CLICK HERE
Stop by, make a bid and support the blog!

Friday, June 23, 2017

Starship Excalibur Listed on EBAY


The Classic Estes (Semroc) 
STARSHIP EXCALIBUR 
is up for auction on Ebay!

This is a pretty one, I almost hate to see it go! (But I need room for other builds)
To see the auction - CLICK HERE

Also being auctioned:

 The Estes PHOTON PROBE

This is the better of the two kits built on this blog. 
It's an original kit from 1991-1993, not the Classic Series reissue.

To see this auction - CLICK HERE
Stop by, make a bid and support the blog!

Wednesday, June 21, 2017

Photon Probe Comparisons

I finally got the decals on the second Photon Probe model.
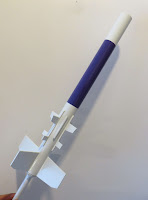
The orange one is an older kit, the purple is the newer version form the Estes Classics Series.
Moot point - 
The long vertical decal with the kit name are different. The older kit was transparent under the name allowing the (orange) contrast color to show through. On the newer (purple) model the name had a white background. Graphically it isn't as effective.
Notice too the decal above the word "Probe". The reissue kit didn't have that decal.


I usually start a roll pattern decal on the launch lug side. If the decal wrap is short or long, the different widths won't be visible when the model is on the launcher with the rod a launch lug to the back.


On the older orange version, placing the start of the wrap decal at the launch lug put the open inverted "U" centered over the fins. On the new version the decal start placed the bottom of the "U" over the fins.
The differences in this lower wrap are consistent with the face card pictures in the two kits.

These observations are not complaints, just noticed differences between two versions of the same kit.

Thursday, May 11, 2017

Estes Photon Probe #3026 Build, Finished


I do like the orange instead of the original pink center section.
Getting the smaller fin fillet areas smooth was a chore.
A clean looking model with a different, clever decal treatment.

Wednesday, May 10, 2017

Estes Photon Probe #3026 Build, Part 12, Decals


The older kit decals were actually in pretty good shape. They did require a long soak to release from the backing paper.
After the first fin decal was set down I sighted over the outside edge of the fin to line up the next decal placement.


The body wrap decal centers over the color mask with the "U" shapes directly over the fins.
The words "PHOTON PROBE" are separated at the masked color line - very clever of the designer.
The older kit had the serial number decal on the upper right.
I didn't use the Estes logo decals.

Estes Photon Probe #3026 Build, Part 11, Paint Choices


The older kit face card had the middle section painted pink. I do have pink spray paint but it's not a dark enough shade for me. I decided to go with orange like the Photon Disruptor.

Here's the paint mask Scotch tape being pulled. The line was very clean.


While the older Photon Probe was shown with a pink center, the newer reissue kit had purple.
This is the second build ready for decals.


The older kit decals are on the top. They included the additional decals shown on the right side.
While these weren't on the newer decal sheet the re-issue kit instruction picture still shows them.


What's this?
No more "Screw in the screw eye and remove. Squirt glue into the hole and re-insert the screw eye."
The new instructions have you simply screw it into the balsa shoulder. No glue!
I'd feel better knowing the screw eye was glued in.

Tuesday, May 9, 2017

Estes Photon Probe #3026 Build, Part 10, Paint and Masking


Mentioned earlier, the fins are centered on the strips. The strip isn't much wider than the small fins. A very small fillet was applied to the upper fin sides.


It took quite a bit of fine sanding to get the fillet areas smooth. This one required two base coats of gloss white and sanding in between before a final, wetter coat.


All masking should be as easy as this! If you can't get a clean mask going around a smooth body tube you shouldn't be building rockets.

The older instructions just say to paint it like the face card, no measurements are given for the mask line.
The new instructions tell you to mask 7 1/2" from the bottom and 3 1/4" down from the top of the tube.

Estes Photon Probe #3026 Build, Part 9, Dorsal Fin Gluing


The strange thing is - The Dorsal Fins are centered on the strips. The strips aren't much wider than the 3/32" thick fins. these will be a chore to fillet and get a smooth joint during finishing.


The dorsal strip fins are set directly above the main low fins, 2 3/4" from the end of the main tube.


Instead of using a ruler to mark the dorsal positions, I made a marking guide for consistency.
The 5/8" and 2 3/8" marks are from the newer kit instructions. EDIT: As noted out in a comment, I got this wrong! The 5/8" measurement was from the top of the taper in the new instructions.


A paper strip was wrapped around the body for a consistent trailing edge position.
You'd think the larger dorsal fins would go to the rear but the smaller rectangular fins are to the back of the strips.

Monday, May 8, 2017

Estes Photon Probe #3026 Build, Part 8, Tube Prepping


The launch lug was glued on in line with the engine hook side.

A painting wand is slipped in the back. Rolled up paper towel is pressed into the engine mount recess to keep paint out of the inside.
Primer coats followed.


There is a light difference in the nose cone shapes. The original plastic nose cone (on the left) is slightly broader at the tip.


Here's a strange photo edit:
TIP: To prevent yourself from sanding over and thinning the end of the tube, slip your left thumb into and against the tube end. The skin at the base of your thumb acts like a "bumper" and prevents the sandpaper from rolling over the tube edge.


The original kit fin marking guide was off! I would expect the older kit to be more accurate. I could tell it wasn't correctly spaced by rotating the guide after initially marking the tube.

While the newer kit guide didn't quite meet at the ends, the fin spacing was accurate.


After the primered tube was sanded down and the fins lines marked, the fin positions were scraped to remove the primer right down to the bare tubing.

The scraped area are a little wider than the 3/32" thick fins to allow the fillets to bond to the tube.

Sunday, May 7, 2017

Estes Photon Probe #3026 Build, Part 7, Fin Placement Differences


I don't understand why there are inconsistencies in a reissue kit. It's not a big deal, it's just curious.

The older kit has squared fin edges, shown in the upper part of the picture.
The reissue kit has rounded leading edges.


The forward "dorsal" fin positions aren't consistent. In the original kit (above) they are spaced at 3/4" and 2 1/2" up from the end of the strip.
On the reissue kit they are placed 5/8" and 2 3/8" from the back.

EDIT: Phil pointed out in a comment that in the older kit the measurements are taken from the back end of the strip. In the re-issue kit the measurements are made from the top of the taper! If the bevels are consistent, the measurements marks are actually in the same place in both kits. How did I miss that?


Here's the fins from one kit.
All parts got a coat of CWF and smooth sanding.

Estes Photon Probe #3026 Build, Part 6, Engine Mount Gluing


The 150 lb. Kevlar line rolled up and inside the engine mount for gluing into the BT-55 main air frame tube.

On the replaceable Kevlar style mount the Kevlar is looped and tied under the lower centering ring. The orange Q-tip tube allows you to check the condition of the line after a few flights and feed a in new Kevlar line if needed.


The mount is set beside the main tube to gauge how deep the inside glue line will go.

I'll be using a stick to apply the glue. The stick is marked a little below where the upper ring will end up. Placing the glue line just below the upper ring final position pushes the glue bead above the centering ring joint.
TIP: When you can, turn the mount right before it is in the final position. That will smooth out the glue into an even fillet bead.


The rear edge of the engine mount tube is even with the main BT-55. Here a ruler was used to make sure the two tube ends were flush.


A Q-tip is used to apply a smooth fillet to the lower ring / body tube joint. A drop of glue is set on the Q-tip and carefully set into the joint. Flip over the Q-tip and smooth out the glue drop. It'll take four or five drops of glue to get a complete fillet all the way around the centering ring.

Saturday, May 6, 2017

Estes Photon Probe #3026 Build, Part 5, Wood Strips


I won't be using the balsa strips from the older kit. they'd be a little hard to fill.
New strips were cut from basswood.

The ends of the strips are cut to a 45 degree angle.
TIP: To make sure all the cuts were consistent, I drew up an angle guide on my cutting board.
A single edge razor blade was set over the angle and the ends cut.


It's hard to get the cuts straight.
On the left it the first cut, on the right is the same end after sanding square with a block.

Friday, May 5, 2017

Estes Photon Probe #3026 Build, Part 4, Nose Cone Prep


The older plastic nose cone had a small nib at the shoulder. This prevented the nose cone from seating all the way into the tube.

The second picture shows the fit after shaving off the nib.

I never liked this small round shock cord attachment. It always seemed weak.
It was cut off and a hole was drilled by spinning a #11 blade in the shoulder plastic.
TIP: Save an old blade or two for jobs like this. You wouldn't want to ruin a new sharp blade by spinning it into plastic.


The nose cone weights were a little surprising.
The plastic cone weighed in at .43 oz.


The balsa cone and screw eye together weighed .37 oz!


Estes Photon Probe #3026 Build, Part 3, Engine Mount


The older kit had thicker centering rings.
To the right is the thinner rings from the reissue kit.


I did my standard relief punches so the rings would slide easier over the engine hook.

The inset picture shows the slight curved punch over the hook.
The instructions would have you glue the upper ring right above the upper bend of the hook. I glue it a little lower, over the hook itself. The upper bend of the hook is a stress point, with the ring over it the mount is stronger.

The older kit had a clear Mylar ring, the reissue kit had a thicker black ring.

The punches shown on the right side picture will be for a replaceable Kevlar mount tube.
(The rings are actually on straight, the camera distorts the angle.)

Thursday, May 4, 2017

Estes Photon Probe #3026 Build, Part 2, Fin Prepping

In a grumpy old man voice: "You kids don't know how good you've got it! In my day we had to cut out our own fins! Then things got easier when they started die-cutting the balsa."


To be honest, die-cut balsa was never that great. We used to call it "die-crushing". If the shop blades were old you'd spend some time freeing up the pieces with your X-Acto knife.

The kit from the 1990s was a good example of dull blades. Here I'm flexing the die-cut balsa just to find the fin edges.


Here's how some of the cross grain leading edges could separate. You definitely don't want to punch these fins from the sheet.

From the older kit you can see how different the fins are. Here you do have to "gang sand" die cut fins to get a consistant size.
With laser cut fins there really isn't a reason to gang sand, they should be identical. You should remove the blackened, burnt edges though.


Here's the old and new, side by side.
The old kit instructions say to leave the fin edges square. The reissue kit says to round the leading edges.