Wednesday, September 30, 2015

Dr. Zooch Ares I-X Build, Part 4, Shrouds


As I usually do, scans were made so I can print out more shrouds and the tube wraps if I screw things up.
I tend to print extra shrouds and make up four or five. I check the fit and then use the best one.

Cut out the SRB shroud.
Here I'm running some 400 grit along the curves sides to smooth off any high spots. They are there, just run your finger over the edge and you can feel them.


Don't pre-form a shroud by pulling it over the edge of a table top, try the method shown in the picture.
Roll over it in the heel of your hand with a smooth burnisher or clean dowel.
You only have to try this once to see how well it works. The curve will be smoother with no creases.

I roll my shrouds with the printing on the inside. Sometimes it's hard to cover printer ink with spray paint.
This makes it a little harder to line up the overlap tab but the finished look will be cleaner.

A glue stick was used and the overlap tab clamped with tweezers while it dried.

Another Igniter Dip Source

On YORF, LeeR brought up igniter dip from FireFox:

To go to the Firefox website, CLICK HERE
Scroll down a bit and look for "SECPLEL" in green color.

Now you can make electric igniters that require NO SOLDERING OF BRIDGEWIRES TO LEADS yet will ignite reliably using as little as a 9 volt "transistor" battery up to and including 12 volt automotive and every DC voltage in between! 

Simply strip 3/16" of insulation from lead wires and dip into the primer slurry - allow to dry and use as is or dip them again in your favorite match composition/pyrogen. 
Make 50 to 100 igniters per hour for as little as 5 cents each - with no soldering! 
Our procedure allows you to use your lead wires over and over saving you money and time. Each bottle comes with complete instructions and enough primer and binder to make up to 400 igniters (allowing for 10-15% as waste). 
Liquid Element™ acts as both primer/booster and pyrogen! Basically foolproof!   

This is our most popular selling pyrogen kit for over 15 years!!
SECPLEL - ELECTRIC IGNITER PYROGEN/PRIMER   
Non-hazmat shipping- No ATFE required to order.


$18.50/bottle, before shipping charges (3oz/bottle)

Tuesday, September 29, 2015

New Estes Kit, The Quinstar


From YORF - 
Bob Sanford (Initiator001) showed an upcoming Estes kit. Bob is a lucky man, he tests the new kits before they are released for sale.

"Estes will soon be releasing a new kit named Quinstar.
The SRP on this model will be $19.99.
I would refer to it as a similar concept to the Blender kit but with a 18mm motor mount.
Another neat idea from John Boren."

Dr. Zooch Ares I-X Build, Part 3, Engine Mount Bands

The engine mount uses a reinforcement band under the top bend of the engine hook. It's a card stock wrap that strengthens the typically weak BT-20 tube.

The band goes around the tube. I used a shorter piece that will fit between the two surrounding fin roots.

The instructions also suggest masking tape over the engine hook. This textured tape wrap would be visible on the finished model.

I ended up using a card stock wrap instead of masking tape.
It'll be smoother and look better on the finished model.

The inset shows the wrap seam which was set down to be hidden under a fin root edge. Fins aren't glued on yet - this was just to show how the fin root line will sit over the wrap seam.

You can see the second coupler glued into the top of the engine mount tube.

Monday, September 28, 2015

Dr. Zooch Ares I-X Build, Part 2, ACM and Couplers


It's a good idea to number the instruction sheet pages.
The loose sheets are easy to get mixed up


You make couplers from the 1" long BT-20 tubes.
Another one will be needed for the engine mount so go ahead and make them both now.
Mark a straight line down the tube and cut through the tube down the line. The tube is short and thin, you can use sharp scissors. Slide into one of the other 1" long BT-20 tube sections. Mark the overlap.


Cut off the overlap. I tend to cut short (inside the drawn overlap line) and sand with a block to a good fit.
Check the fit in the BT-20 and sand if needed.


Here's the finished coupler slip fitted into the 1" long BT-20.

Making couplers from body tube segments is a good technique to know. It can come in handy when you don't have a "real" coupler.

Flat Finish to Semi-Gloss? TIP

I wanted to paint the upper tube on the Estes QCC Explorer gloss grey.
I didn't have any gloss grey but I did have some grey primer. Grey primer is a flat finish.

Years back I painted a Estes Mosquito phosphorus orange. Phosphorus colors are flat, rough finishes. I wanted it smoother and a bit shinier.

I started rubbing the dried flat finish paint with a soft cloth.
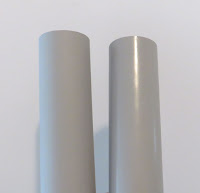
Here's the two upper tubes from the two QCC Explorers I'm making right now.

On the left is the grey primer, a dull no gloss finish.
On the right is the other tube after a brisk rubbing with a paper towel. I also ended up using some polishing compound to bring it to a higher gloss.

This is not a high gloss finish but a semi-gloss. I would assume a decal would stick better to this glossier finish.

This polishing tip might be a little tough to do in tight or inside areas. Be careful, you could scar a softer balsa wood fin or nose cone.

Sunday, September 27, 2015

Dr. Zooch Ares I-X Build, Part 1, Parts


I've built a Zooch Ares before, but not this version.
The Ares 1 build was posted on rocketreviews.com CLICK HERE
This was back in 2010. The review had posted pictures of the completed model, but not much build information.

The parts are all good quality, typical of the Zooch kits.

Some parts of interest:
The 1/4" wide elastic is 18" long.
The Kevlar is a loose wrap, almost like a ribbon. I'll probably leave it off this one and substitute some longer elastic.
Four small LAS nozzles cut from ends of fancy toothpicks.
The screw eye seems too small.


Zooch nose cones are pre-weighted and have the hole plugged with wood filler.
The screw eye goes in off center, to the side of the filler.

Ebay Score!

While most of my cutting is done with a break-off blade knife, there are times when you need a style #11 blade in an X-Acto #1 handle.

You can find a 100 pack of #11 X-Acto brand blades online for $25.00 dollars or more before shipping charges are added.
I found this 100 pack of #11 Excel blades on Ebay for $9.50 + $2.25 shipping for a total of $11.75!
That's a little under 12 cents each.

There might be some 100 packs left - CLICK HERE

Yeah, I'm cheap. Trust me, these blades are just as sharp as the X-Acto blades and are made in the U.S.

Saturday, September 26, 2015

Estes Wizard #1292, Finished


The short, flat rubber shock cord was replaced with a round elastic cord.
The streamer is bright plastic. The instructions have you tie the shock cord around the center of the  streamer. I used two reinforcement disks on either side and tied the shock cord through those.

On this second Wizard build I cut the back end of the roll decal just outside of the black band. I was concerned the old decal might be brittle so I left a very slight edge of the clear overcoat.

In the picture at the right you see a little bit of white under the black band. That's the clear border edge butting up against the purple paint ridge.

This minimum diameter (BT-20) design reminds me of the early kits like the Sky Hook and Wac Corporal. These were small models that fly high even with 1/2A6-4 and A8-5 engines. Good thing it has streamer recovery.

How Do You Spot A Rocket Builder?


If you didn't know me, you could pick me out of a crowd by looking for the spray painted thumb -
(I normally wear a disposable glove but I ran out of them)


Or the saw dust on my pant leg.
I always sand a few passes them wipe off the dust on my right pant leg.This keeps the sandpaper from loading up if I am dry sanding. My right pant leg is often worn through.

Friday, September 25, 2015

Real Shock Cord Rubber Supplier

On TRF, Caveduck referred a website with the old style shock cord rubber:

"The white rubber has additives and colorants in it that reduce the life. For a longer lasting shock cord, ditch the Estes stuff and replace with model airplane rubber motor stock. It is tan color, much more pure and lasts a really long time by comparison. In the old days Estes actually used it. 

Check out www.faimodelsupply.com - they have 1/16 through 1/4" width, and it's not that expensive, 32ft of 1/8" for $3 and change. Or you can buy a 1 lb. box for a near lifetime supply. 
Or try decent sewing elastic which also has pretty good life and fails more gracefully by losing its stretch rather than abruptly breaking. Some people don't like it but I've always had good luck with it, and it will not zipper your model."

For the 1/8" x 32' package, here's the web page: CLICK HERE
32 feet of 1/8" real rubber shock cord for $3.65. Not a bad deal.

Estes Wizard #1292 Build, Part 6, Touch Up and Decals


After the tape mask was removed there was a little purple touch-up needed.


The decals were old and brittle.
I built two Wizard kits at the same time. The first star roll pattern decal went on fine. The second one broke up right at the cut edge next to the launch lug.

It's an iffy fix and requires a steady hand. A fine point Sharpie filled in the missing black area.


Here's the fix. Not perfect, but nobody should be looking that close anyway.

Thursday, September 24, 2015

Estes Wizard #1292 Build, Part 5, Lower Body Mask


After the first shot of gloss white there was still some M&TG "boogers" around the launch lug and fin fillets.

These were knocked down with some 400 grit, see inset picture.


The color separation line is right at the end of the launch lug, not an easy mask.
I started the tape mask in the crux of the lug fillet.


After the entire wrap was in place and trimmed, a second piece of tape was set over the end of the lug.


A piece of copy paper was wrapped over the top of the body tube and masking tape was set over the previous Scotch tape line.

Now the gloss purple is shot.

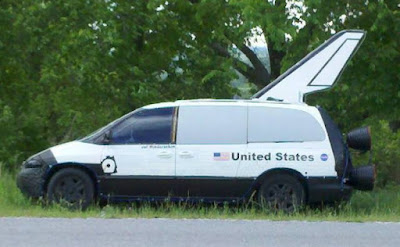
Shuttle Van

I don't normally post somebody else's "find" but this was too good to pass up:
Thomas Thurman posted this on the NAR Facebook page:


What's interesting is the van's original shape is a bit like the shuttle profile. 
The original picture was posted on www.stupidvideo.com

Wednesday, September 23, 2015

New Apogee Peak Of Flight Article


A new article on Rocket Design Inspiration was just published in the Apogee Peak Of Flight newsletter.

Where do rocket design ideas come from? Topics cover color choices, rocket names, picking a font, kit bashing and fin design.

To see it, CLICK HERE

Estes Wizard #1292 Build, Part 4, Decal Check and Fin Fillets


Looking ahead, the mask illustration shows the purple starting right at the lower end of the launch lug. I was curious if that would intersect the decal location.
As it turns out, the decal isn't wide enough to go all the way around the body tube meaning it would start and finish on the sides of the launch lug.

The instructions don't mention any rounding of the fin edges, I rounded just the leading edges.
The fins are glued on, 3/8" up from the end of the tube.

The rear trailing edge corner is hard to fillet.
Drop a small amount of glue on the joint.


The area is too tight to get a finger in there.
I used the stick of a Q-tip to remove the excess glue.
The cotton end picked up the rest.


Be sure to check and wipe down the sides.

The inset shows the glue in the tight corners.

Tuesday, September 22, 2015

Estes Wizard #1292 Build, Part 3, Tube Ends and Kevlar


The inside end of the tube wrap was starting to lift.
For a while I would use CA glue but I found that it didn't hold the edge down. I have better results using white glue.
The inset picture shows the inside edge being burnished down.


After the lift is glued down then do a coat of medium CA applied with a Q-tip.

Smooth out the treated end with some 400 grit.


The side of a square diamond file make a good notch for the Kevlar.

The kit says to use a tri-fold mount but I wouldn't use one on such a small tube like this BT-20. We used them for years but now I'm more concerned about blocking the eject of the chute or streamer.
This build will get Kevlar.
The get the correct length for the Kevlar tie, I set the engine block assembly along the outside of the body tube. Tie the loop before the end of the tube. The Kevlar can't go beyond the end of the body tube.

Angry Older Man Rant

One of my big gripes are lazy, inconsiderate people skipping parking spaces and parking right in front of the store. They'll turn on the emergency flashers assuming that makes it okay.
While blocking traffic they'll use the ATM or make a trip to the liquor store. There are always parking spaces just a few feet away.

I've mentioned it to the store manager a few times. "A car parked in front of the store blocks traffic and would put everybody in the store in danger if there was a fire." (I know, a little dramatic, but a good argument.) I e-mailed the Publix corporate offices.
Last week, Publix finally put up signs and painted yellow fire lanes. I'd like to think I had something to do with the change.


Here's the front entrance of that Publix grocery store near my home.
Imagine a car parked on the left (store) side.
There's only two lanes. If a car was stopped, all cars behind him have to go around and right into the oncoming traffic.
It seems to have solved the problem on the store side, to the left.

When I was taking pictures I saw this - 
Some idiot parked on the right side, beside the planter! You can see the truck that had to go around him.
It's okay though, he had his emergency flashers on. Lazy ass.

Monday, September 21, 2015

Spray Can Nozzle Caps?

Dixon on TRF -
Let us know where we can get replacement nozzles for Rustoleum 2X spray cans. Sometimes the 2X can nozzles can clog up before the can is empty.
CLICK HERE to go to the Art Primo website

Look for the Art Primo EZ Rider Cap at the top of the page.

I haven't bought or tried these replacement nozzles yet.
These nozzles are actually meant as an upgrade for graffiti use!
The descriptions sound as if they are a finer line spray than the nozzles sold on the spray cans.

Estes Wizard #1292 Build, Part 2, Parts Prep

The nose cone had some wide molded ribs down the shoulder.
They were narrow at the bottom and wider towards the lip of the nose cone.
The nose cone was way too tight. It took some sanding to take the ribs down for a good fit.
The tip of the nose cone had some flash and a dimple at the top.


Mentioned earlier, the fin die-cut was poor.
Die cut fins need to be gang sanded. The picture shows how much they are off before truing up.


The body tube seam was so thin that the primer filler could have filled it.
I still applied CWF to fill them.

After sanding there was a few gaps. The inset shows the second fill before sanding.

Sunday, September 20, 2015

Estes Wizard #1292 Build, Part 1, Parts


I rarely build smaller models anymore. When I got started in 1969, BT-20 sport models were the norm. This one reminded me of those early builds.

I picked up some Estes Wizard kits on Ebay. They were reasonable and shipping was cheap.
This is the original Wizard with the purple fins and stars band decal.


Here's all the parts.
This one is late into the kit run, a two piece plastic nose cone is included.

The BT-20 is very good quality, stiffer and stronger than recent tubes.
Parts of interest:
The die-cut balsa sheet is not cut all the way through the 1/16" balsa sheet. The cuts are rough.
The shock cord is only 9" long! An inch and a half is in the tri-fold mount and another inch ties to the nose cone lug. Recess the mount inside the tube end about 1", that leaves only 6" between the tube and nose cone.
One end of the BT-20 is a little out of round. The nose cone base should reshape it in time.