Showing posts with label Reinforce. Show all posts

Sunday, December 7, 2025

Estes USS Enterprise #1275, Part 28, The Recovery Probe


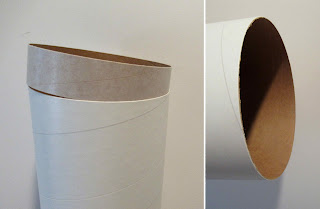
When the face of a centering ring is exposed - 
I like to sand, seal, then re-sand the face.  

This rear ring face was sanded with 220 on a block,
then got a wood glue coat rubbed in,
Then more sanding with 220 and 400 grit.


The long 1/8" dowel is there to reinforce the thin walled BT-20.
The upper picture shows the glue line before the dowel was set down.

My dowel had a slight warp. I let the glue set up a bit before placing the dowel. The half dried glue helped hold the dowel to a straighter line. Fillets are going to be fun!


In the picture, this sealed ring face is facing down, against the long dowel.


The BT-50 parachute tube is slid down and butts up against the outside edge of the dowel. 

Apply a ring of glue inside the BT-50 and slide the tube down until it stops against the top end of the dowel.

Tuesday, October 28, 2025

I Wish Manufacturers Wouldn't Do This, Part 3 . . .


PAPER REINFORCEMENT RINGS?

Paper tears and doesn't really offer any reinforcement to a hard shroud line pull at ejection.

Right out of the kit bag, the ring was already tearing from a rough punch tearing into the plastic chute.

I often replace the paper rings with Avery Plastic Reinforcement Rings, #5720.

Wednesday, June 14, 2023

NewWay Angled Invader, Part 6, Parachute Assembly & CA On The Tube Edges

The New Way kits don't use the regular Avery style adhesive disks to reinforce the parachute tie points.

These are Tyvek, a reinforced paper you can't tear.
Stick one circle under the chute material, centering it under the pre-punched hole.
Soft fold over the other end and center the second circle on the lower circle. Press in place.
There is no adhesive on the inside middle of the fold. The fold stays open and allows a shroud line to be tied on.
  

Directions are supplied for tying on the shroud lines.
I went with my standard Square Knots for attaching the lines. 
This knot seems pretty complicated for a shroud line attachment.


Here you can see the sanded CWF filler in the inside seam of the outside tubes.

The tubes are strong and thick. I still used a wipe of medium CA to harden the edges and keep the fuzzies down after sanding.

Thursday, March 9, 2023

New Way N-21 Sky Fighter Build, Part 5, Parachute, Filler/Primer & Nose Cone Fill

The New Way kit parachutes use (no-tear) Tyvek ring labels for shroud line attachment.
There are holes punched into the corners of the parachutes for the reinforcement tab locations. 
Center the round side under the punched hole.

The white parachute is 9 1/2" from "flat" to "flat". It seems a little small, I would rather have a 12" diameter chute on a model this size and weight.


Fold the other side of the "dumbbell'" shaped reinforcement directly over the round end under the chute corner.

This leaves a fold just outside the corner of the parachute to tie on shroud lines.


After a first coat of CWF and sanding - 
The wings, fins and launch lugs were taped to some cardboard for spraying with the filler/primer.


The New Way nose cones are very smooth for a 3D print.

After sanding down the filler/primer, you can see how little was left in the very slight layer ridges. 
3D printing has come a long way!

Friday, January 13, 2023

Estes BOSS Kit #7316, Build, Part 6, Engine Pod Reinforcement


The yellow rings (Part M) are glued in even with the back of the engine pod tube.

Here I'm using the flat surface of the sanding block to press the ends even.
I used a little bit of CWF applied with my knife blade to fill the seam inside the reinforcement ring and around the seam. 

After it was sanded to surface,
I applied some medium CA glue over the outside of the ring edge to seal the surface. Sanding followed. 


Here I'm sanding the CWF filled inside ring seam (Yes, I fill the inside seam if it can be seen on the finished model) before the CA glue was applied and sanded. Some 400 grit was wrapped around a dowel.

Tuesday, December 14, 2021

Estes Skylab #001973, Build, Part 2, That Darn Reinforcement Ring!

GOTCHA: It seems like the internal reinforcement ring has always been a problem.

Too many first timers (I was a once first timer) assume that it will just slide in after glue is applied.
You will have to cut out a small segment to get a slip fit.

Be sure you have the correct reinforcing ring, it is the 1" length of tube.

Try a dry fit or the ring - it won't easily slide in.
Don't try to force it!

The picture on the right shows the rough edge of the body tube. The larger the body tube, the harder they are to cut clean. Square up the tube edges with sandpaper on a block. 

Cut one straight line through the ring using scissors.

Set the ring in the tube and check the overlap. This is how much will need to be removed for a good fit.

It's best to cut the segment a bit short and sand to fit.


Sand and square up the ends. Check the fit.
Repeat - 
Repeat - 
Repeat - 
Until you get a good fit.

Wednesday, July 7, 2021

Estes Space Twister #7258, Part 7, Strange Reinforcement & Green Mask

I mentioned earlier, the BT-50 body tube seemed weak. 
There were two seams to fill, one was the typical glassine seam. The second one was underneath, where the clear glassine shrunk into a slight separation of the brown wrap underneath.  
The tube was already showing crimps from handling when building the rocket. I've never seen a tube this bad since the MRC Enforcer build: CLICK HERE  

I did something I've never done before.
There are flyers that like to "bulletproof" their models by using a long coupler all the way inside the body down to the engine mount.
I know this tube would crimp above the engine mount after the first flight.

I have some long BT-50 couplers ordered from BMS. I slid the long coupler in, all the way down until it touched the upper centering ring of the engine mount. The top was marked, then the top was cut back to clear the nose cone shoulder. The upper picture shows the shoulder allowance marked before cutting the coupler to length.
 
The coupler was slid in without using any glue. I probably wouldn't have gotten the whole length in if glue were used.
The picture shows the coupler inside, you can see the the coupler recess for the nose cone shoulder fit.

This length of coupler added 1/2 oz. weight to the model! I wouldn't recommend doing this unless you couldn't see any other method to strengthen the tube. This is not a high performance rocket, the spinning boost will definitely hurt the altitude. The added heavy coupler doesn't help.


This wasn't an easy mask. The green color is on one side of the fins, and under the spin tab. 

The tape had to be cut thin and tucked into the crux under the top of the spin tab.
The lower picture shows the masking tape over the larger areas.
Green paint coming up - uh oh!

Monday, April 19, 2021

Wolverine Jayhawk Build, Part 4, Screw Eye & Parachute

The screw eye is screwed into a dowel that you glued into the nose cone base. This makes a very strong screw eye attachment.

I placed some glue in the nose cone base hole and pressed the dowel into place. I didn't press it all the way in, I wanted to sand the dowel end flush with the base of the nose cone.
OOPS: After it was glued in I realized the dowel was glued in backwards! The drilled screws eye hole was inside the nose cone.
I knew I'd never get it back out, so another small hole was drilled for the screw eye attachment.


Eight parachute reinforcement discs are supplied, only six are needed.
I wanted to be sure these were plastic, permanent discs so I tried to tear one of the extra disks. It did rip, telling me it was a paper disk.

I'd prefer stronger disks, so I switched them out for Avery plastic disks.
The instructions tell you to place the disks 1/4" from the edge. I don't see any reason to do this. The table covering plastic can stretch if pulled, I put the disks closer to the corners.

TIP: Because of the stretch, the shroud line hole was punched close to the outside of the inner disk circle.

TIP: Some tablecloth covering plastic sheeting has a smooth side and a textured side. Attach your discs to the smooth side for better adhesion.

Monday, December 7, 2020

Estes Saturn V New Fairing Reinforcements


On the Facebook Model Rocketry Fanatics page, 
Steven Carricato posted a parts picture from his new Saturn V and Saturn 1B kits.
I noticed something interesting. In the center of the picture are some crescent shaped pieces laser cut from cardstock.

Going back to the original Centuri Saturn V, the vacuform fairings have always been a weak spot. They would sometimes crack on a hard landing.

I built a Saturn V show model for Estes in June 2019. I sometimes send build notes with the finished model.
I wrote: "The only place I varied from the instructions was to glue some cardstock crescents to the bottoms of the fairings. Even a single layer of 110 lb. cardstock helps strengthen the thin vacuform plastic."

I made a Fairing Reinforcement PDF available. Included is Third Stage Foundation Wrap and Anchor Wire pattern to Patreon supporters. (In a run of #2157 Saturn V kits, the Third Stage Fairing pattern was small and the anchor wire ends too long.)

It looks like Estes incorporated the crescent reinforcement idea in the new Skylab Saturn V. I haven't seen the Skylab kit yet - I understand the crescent pieces are glued inside the flat bottom of the fairings.
I set my crescent reinforcement pieces on the outside. This way I could overlap and cover any gap between the main body tube and curved fairing edge.
To see Part 1 of the 2019 blog post: CLICK HERE  
To see Part 2: CLICK HERE 

If you have a previous edition of the Saturn V kit, this PDF is available to Patreon members. 
Email me and ask for the #2157 Saturn V Third Stage Foundation Wrap PDF.

Sunday, August 23, 2020

Shroud Line Hole Punch TIP

When assembling parachutes, you are instructed to punch a hole through the reinforcement ring and the plastic chute material. A sharpened pencil is usually suggested. A pencil point can tear and stretch the parachute plastic.

I use the smallest punch on my rotary punch.
Notice there is some card stock underneath the plastic sheet to make an easier, clean punch.

TIP: Instead of punching the whole in the center of the disk, I set the hole to the outside edge. This puts the line strain against the reinforcement disk preventing stretching and tearing of the chute plastic.

Thursday, August 20, 2020

Centuri Flying Saucer #5325, Part 7, First Fit of the C Braces


TIP: You can get a rounded leading and trailing edges on carded fins by applying a glue bead down the edge. Apply a fine line of glue, then run your finger down both sides of the fin to even out the glue bead. Let dry and sand lightly with 400 grit.

This glue bead will also strengthen and seal the edges of the fins.
I tried to slide the engine mount assembly into the center core. The fit was too tight!
With the addition of the wire thickness the span was now too wide! I trimmed off about 1/32" from the outside edge of the C brace.

I later learned this wasn't enough! You'll have to trim off almost 1/16" for the proper fit.
I'll continue with the build to show what happened - but be aware, on my build it required some extra fitting and time.

I made some "Wire Form Retainers" from 110 lb. card stock. These were just strips of card stock about 3/8" wide.

On the left it looks like a simple fold. The center is actually a double fold, to roll over the wire antenna positioned in the center.

I drew up some Wire Form Retainers along with an Antenna Template. This PDF is available to Patreon supporters. Email me at oddlrockets@bellsouth.net and ask for the Centuri Flying Saucer PDF.
Note: I do not have all the templates, just the 75% size antenna and the antenna retainers. All other PDFs for the main body parts are listed in the first Background Post: CLICK HERE


Here's how the antennas fit -
And the retainer strips over that. That angle joint at the upper right is cut and fitted.

When first gluing on the antennas (left picture), don't use much glue. They hold better when the glue is about half dry and tacky.

Saturday, August 15, 2020

Clear Tape Over Leading Edges? TIP

Something I hadn't thought about before -
A protective cover over the leading edges of fins. Here, TRF posts are talking about the fins on the Estes Ascender splitting down the leading edge glue seam during a strong boost.

Thirsty Barbarian posted:
"You could wrap a strip of electrical tape over the leading edge if you go for more aggressive motors.

5X7 added:
"I think clear packing tape would be effective and won’t ruin the great graphics. I have made home decals with good packing tape overlain that are still good now after 25 years."

Neil W answered:
"Even plain old cellophane tape (i.e. Scotch tape) does the trick just fine. Dunno if it lasts 25 years though. "

Thirsty Barbarian then finished:
"Clear tape sounds like a good option. The point is to seal that glued joint from the air stream, so I'm sure a lot of different products would be good for that."


My thought:
This might be good for a LPR model with soft balsa.
The balsa on my Centurion Project (Centurion with interchangeable engine mounts) had soft balsa fins. I'm still kicking myself for not cutting new ones from stiffer stock. A shock cord "snap back" could do some damage to the leading edges. The clear tape (or packing tape) reinforcement might just be the answer.

To read about the Centurion Project and interchangeable engine mounts (single 18mm, two 18mm and single 24mm mounts in one rocket) CLICK HERE

Monday, August 3, 2020

Estes Green Eggs, #7301 Build, Part 3, Engine Mount Reinforcement


Occasionally I see a forum post where a builder will upgrade the centering rings to plywood. These kit supplied card stock rings are certainly strong enough for 24mm engines.
For those interested, I'll show how to make a much stronger engine mount using what was included in the kit.
I wrapped a copy paper strip around the engine mount tube. The overlap was marked.
The strip was folded into even thirds, the folds were marked with pencil.

The strip is re-wrapped around the tube. You must be sure the marked lines won't be in the way of the TTW fin tabs.
I set the first line just to the right side of the engine hook. This will place all the gusset lines to the sides of the fin tabs.

There is plenty of extra balsa on the fin sheet to make the three gussets.
Cut a wide piece with the grain running vertically. Sand to a tight slip fit between the rings. (shown above right)

Mark the gusset width a bit wide. (Bottom left) You'll sand off the excess afterwards.
A shallow notch is cut to fit over the black retainer band.

Glue the gussets into place. Sand off the excess gusset width little by little. Check the fit in the body tube as you are sanding.

Before adding and fitting the gussets, my centering rings were a loose fit in the body tube. After sanding them to size, the fit is much better and the mount will feel much stronger.

Thursday, November 28, 2019

I Wish They Didn't Do That - Part 3, Tape Disks

Some smaller vendors supply parachute kits you assemble.
If you can tear a tape disk before making of the parachute - the tape disk will tear under the stress of the ejection charge.
If it tears, it is made of paper.

TIP: Don't apply the disk using your fingers. The oil or dirt on your fingertips can make the disk less sticky.


TIP: Replace paper disks with plastic Avery Reinforcement Disks. Be sure the package says "Permanent".
This is the 1,000 quantity package, #5720.
200 quantity packs are also available, #5729

Friday, June 7, 2019

Estes Saturn V #1969 Build, Part 25, Reinforcing The Fairings Part 2

Look close at the right side picture. There is a pencil line inside the edge of the fairing. The disk will be glued inside that border.

The contact cement is brushed on the fairing up to the pencil line and on the body tube edge.  Cement is also brushed onto the disk reinforcement piece.

Don't let the contact cement totally dry!
While it is still wet you can slide and adjust the position. If the glue was to dry, it will stay where it is first set down.

There should be a slight overlap on the inside of the tube edge.
This is shaved off with a new X-Acto blade. Go slow and cut the reinforcement crescent piece, not the body tube edge.

After shaving off the overhang, lightly sand with 400 grit.

For a cleaner finished look, the reinforcement crescent piece was set a little inside the round edge of the fairing.
In the end you'll have a much stronger fairing and fin assembly with hardly any added weight.


Here's the PDF that includes the slightly larger #2157 3rd Stage shroud, four reinforcement crescents and a full size wire anchor pattern.
The full-size wire anchor template is not in the current instructions.
Print this PDF on 110 lb. card stock.

If you are a Patreon supporter, email me at:
oddlrockets@bellsouth.net
and request the #2157 3rd Stage Shroud PDF.
Print on 110 lb. card stock.

Assembly time so far:
14:10 minutes previous
  1:00 minutes this post
  1:00 to draw up PDF
16:10 Total so far

Thursday, June 6, 2019

Estes Saturn V #1969 Build, Part 24, Reinforcing The Fairings Part 1


If your build is like mine, (on some fins) the rear of the fairing base doesn't contact the body tube. The edge floats, not making contact with the end of the body tube.
It can be reinforced.


You'll need some Contact Cement to do this.
HISTORY: Contact cement is interesting stuff, it was once supplied with the Centuri Saturn V and Saturn 1B kits to attache the vacu-form wraps.

The trouble in the Centuri kits is, you got one shot to set the wraps. When applied on both pieces to be joined, Contact Cement (when dry) grabs immediately and won't let go!
Contact cement is good for some plastic to Kraft tube bonds. It can be messy, it's like brushing on snot.
I'll add some 110 lb. card stock on the base of the fairings.

These reinforcement "crescents" have been drawn up and are available on a PDF. If you are a Patreon supporter, email me at: oddlrockets@bellsouth.net and ask for the: #2157 3rd Stage Shroud PDF.
This PDF includes the 3rd Stage wrap and Anchor Wire bend template. 

To make your own, trace around the fairing.
Cut out that disk. Trace it and use a compass to draw a better arc a little smaller than the tracing. Trace four pieces with the inside (shown here under the ruler) a bit longer.
Cut out this template. Set it against the base of the fairing and trace the underside inside arc. Cut the underside arc making a crescent moon shape.
Ideally, the inside arc should be a little larger to overlap the tube edge. That overlap will be trimmed off after the glue dries.

Total build time for this two-part step in next post -

Tuesday, November 20, 2018

Semroc Saturn 1B, Build, OOP #KS-1, Part 21, Parachute


The edges on the eight sided 32" plastic sheet parachute (picnic tablecloth material) were roughly cut. No chute assembly instructions were provided.

The material seemed very thin. I'll assemble the kit parachute but will probably use two 18" Odd'l Rockets parachutes (side by side) on the finished model.
I had to clean up most all the edges.

TRIVIA: Some rulers have a cork backing to raise the edge. If you were drawing lines with an India ink Radipograph pen, the slightly raised ruler prevents the ink from running under the edge.

TIP: When cutting a thin plastic sheet, turn over the ruler with the cork side up. Press down fairly hard on the ruler when cutting. With the edge touching the sheet, the thin plastic won't flex. You won't end up with a jagged cut edge.

TIP: Sometimes tablecloth material has a textured side and the other side is smooth. When you can, stick the tape disks on the smooth side of the sheet.

This sheet was textured on both sides. There were enough tape disks to apply a disk on both sides. These are clear plastic disks, hard to see on the backing paper.
After you stick a disk on one side, flip over the sheet. Press on the disk again and you should be able to see it to position the second disk.

Ugh! Has this ever happened to you?
This took twenty minutes to untangle.

I'm very careful when unraveling a long, one piece shroud line. This was a long single string, twice what was needed to assemble the parachute. What a pain!

Build time this post: 1 hour, 00 minutes
Total build time so far: 24 hours, 10 minutes