Showing posts with label Tower. Show all posts

Friday, January 23, 2026

Estes Semi-Scale Saturn V, Kit #K-39, Part 18, The "Tower"


I'd recommend embossing fold lines before cutting out the tower.
I used the tip of a non serrated butter knife and straightedge to "line" the folds.

Form the tower into a box shape.
Make the folds sharp.

It takes very little glue to adhere the glue tab.
Hold the joint firm with tweezers as the glue dries.


The tower is slide down over the escape motor body.

Next up - the structural skirt.

Tuesday, August 27, 2024

Estes #2157 Saturn V Tower Fix

I've run into delays while spray painting the Astrobee D. August rains and humidity have delayed the build. 
Here's another small project I've been working on.

A contract build of a Saturn V had broken tower. The tower was broken beyond repair. Luckily I have an extra #2157 capsule and tower kit.
This was a display build, not meant for flight. 
I wanted to figure out a way to prevent a future tower break if the model were to fall over again. 

I decided to do a friction fit of the legs into the holes at the top of the capsule. If the model fell over, the tower could flex and pop off in one piece. That's what I'm hoping for anyway - 

The problem - 
The tower legs have too loose a fit into the capsule holes.

I squeezed a small drop of Beacon Fabri-Tac glue into the holes and cleaned off the excess glue. Don't use much glue, you don't want it to melt the plastic. 

I used the thicker Fabri-Tac as it would fill the holes. Liquid (brushed on) cement would be too thin for this.

The glue completely covered the holes and if allowed to dry you couldn't push in the tower ends.

Open the holes slightly with a round toothpick. You want to leave some glue on the inside hole wall to make the inside diameter a bit smaller.

Let dry and test the fit. I did two applications with the glue and toothpick.


I got a good fit of the tower.

Many builders won't fly a delicate tower on their scale models. The older Centuri Mercury Redstone instruction say to insert the top spike (no glue) for display, remove it for flight.

Tuesday, December 15, 2020

Estes Saturn 1B, #7251 Build, Part 18, Tunnel Mask & Capsule Tower Paint

The Antennas have raised vertical yellow bars. I wasn't sure about masking these, they would be a bear to hand paint. I figured I'd try to Scotch tape mask them

Scotch tape is set on a plexiglass, black Sharpie lines are drawn down the strips. The black edges are needed to see the clear tape on the surface borders. 

Before applying the marked clear tape to the model, wipe off any excess ink with a paper towel so it won't transfer onto your fingers or the model.  


This took some time and quite a few tape strips.
After the black tape was set down, brown masking tape covered the outside areas. 

Before painting, the edges were pressed down using a Q-tip.


These really turned out well, one of my favorite parts of the build.
When masking on a smooth surface, the edges come out sharp and clean.
The Command Module and tower were spray painted Gloss White separately. This is too be sure I get paint on the top of the command  module. If the tower were glued on, the paint wouldn't get under the struts.

The tunnels were also sprayed gloss white. The entire model will get a shot of clear flat after the decals are applied.

Build time:
Prep Tunnels, Tower & Antennas: 25 minutes
Mask & Paint Antennas: 45 minutes
Total build time so far: 12 hours, 5 minutes

Sunday, December 6, 2020

Estes Saturn 1B, #7251 Build, Part 9, Tower Assembly

I'm not building in the order of the instructions. I'll be bouncing around a bit -


One side of the tower has alignment pins,
The other side has alignment holes the pins fit in.


TIP: You can sand the side with the alignment holes a little smoother for a better fit of the two sides.

Only sand smooth the side with the holes, not the pins side!


The resulting fit is subtle but better - 

On the left is the dry fit before sanding the "hole" side.
On the right is the better dry fit after sanding the one side of the assembly. No glue yet!

You have to glue the ring inside one side of the tower before gluing the two sides together.

It helps to use tweezers -


Liquid cement (in a bottle with the brush attached to the screw cap) works best for a tower assembly.

You can hold both sides together - 
Then brush the outside down the seams. After the glue dries, lightly sand the glued seam with 400 grit sandpaper.

Build time:
Glue up tower - 20 minutes
Total build time so far: 6 hours, 25 minutes

Monday, June 10, 2019

Estes Saturn V #1969 Build, Part 28, Assembling the Tower


If you make a lot of plastic models you should have a sprue cutter or nipper. It allows you to cut the pieces off the trees with little left to trim off.
TIP: Wait to cut off and remove the RCS nozzles, leave them on the trees  - Find out why in an upcoming post.
The tower escape nozzles glue into an "X" shape. These are like a smaller version of the larger Little Joe II escape nozzles.

The "X" shape assembly glues into an X shaped recess in the skirt.
The new tower is a big improvement over the previous version.
The "O" ring doesn't "float" between the X struts. This new design glues the ring into recesses at the center of the Xs.
The tower is made up of two sides now, not four.
You can brush a bit of glue onto the sides seams after pressing it together.


The glued sides of the tower can be smoothed off with 400 grit sandpaper.

Assembly time so far:
17:10 minutes previous
  0:25 minutes this post
17:35 Total so far

Sunday, December 16, 2018

Semroc Saturn 1B, Build, OOP #KS-1, Part 45, Capsule Details


The seven lines were cut from some adhesive backed paper from an Avery CD label.
Using self-adhesive strips is just cleaner and easier, no glue.


Here's a dry fit of the tower.

Look below and you can see the subtle tape on the seven lines and the hatch cover. It's not a lot of detail but I think it's better than the old hand drawn print of what was under the protective cover.

Under the the escape rocket, four small circles were scraped exposing the balsa under the paint.

On the left - 
Four white glue drops were set on the tower tops. The glue drops are consistent in size. When the escape rocket is pressed in place the glue will squeeze out around the tower side struts making automatic fillets.


Build time this post: 0 hour, 45 minutes
Total build time so far: 41 hours, 15 minutes

Thursday, November 15, 2018

Semroc Saturn 1B, Build, OOP #KS-1, Part 16, Escape Tower Decals


I never understood how Estes expected anybody to draw these lines and details on the escape motor assembly. Both Estes and Semroc Apollo Capsule instructions suggest this trim. I have plenty of experience using Rapidograph pens and don't know how to pull this off. Straight lines around curved surfaces are very difficult.

Here's a screen grab of the decals I drew up for the trim lines.

If you would like a copy of the decals to print your own, Patreon members can email me at:
oddlrockets@bellsouth.net
and request the Saturn 1B Escape Tower Decals.
I'll send it right out!

The decals take up 1/2 sheet, there are extras so you can practice the soak times and transfers.

The decal sheet got three coats of Krylon UV Clear.

Here's how to cut the decal to prevent tearing. The inside corners are rounded. The top is cut out so it won't overlap the nose cone tip.
For an easier transfer I cut off the lower wrap for a second application.


The top and lines below the pitch control motor (upper circle) is applied first.
The lower section with the jettison motor (oval) and lines are applied second. EDIT: Add a second jettison motor (oval) to the opposite side. Cut it from one of the extras on the decal sheet.
The long vertical lines decal goes on last.

This is one of those rare home print decals that really worked well.
I did have to make some adjustments and fixed the decal PDF.

Build time this post: 2 hour, 00 minutes
Total build time so far: 17 hours, 55 minutes

Wednesday, November 14, 2018

Semroc Saturn 1B, Build, OOP #KS-1, Part 15, Escape Tower Painting


Before the decals can be applied, all the tower pieces were painted gloss white.

I tend to paint my scale models with gloss paint. Flat white paint is a dirt and finger oil magnet. You can quickly soil a good finish. Dirt and oils don't stick to gloss paint. If the rocket gets dirty it can be cleaned off. If this model were to be entered in Scale Competition it would have a flat finish and be handled with clean gloves.


Here's the escape motor assembly was painted.

Let paint dry for a few days before trying to apply decals.


The underside of the skirt is marked for the tower structure gluing.
The top of the tower jig is slipped over the raised center circle.
Paint was scraped off where the tower top will glue on.

Build time this post: 0 hour, 45 minutes
Total build time so far: 15 hours, 55 minutes

Thursday, November 8, 2018

Semroc Saturn 1B, Build, OOP #KS-1, Part 8, Making The Tower


Don't forget to add some glue to the inside joints.
You can use a little more glue here, it won't be seen from the outside. Apply small dots of glue with a toothpick tip.


The bottom (slightly larger) inside V strut assembly is slipped inside and seated on top of the top of the "Z". Glue in place and let dry.

Dry fit the upper V strut assembly on top. I rotated the top assembly a few times to find the best fit and marked it with a pencil.


Raise the upper V assembly.
Glued was slipped in on the side of a knife blade.

The upper assembly was set on the lower "O" ring half. Flat tweezers were used to lightly squeeze the the ring halves together.

After the ring glue dries, more glue is placed on all the joints.


There is a visible seam where the two ring halves are glued together.
TIP: I applied a raised bead of wood glue using a toothpick. When it dries it should fill and cover the joint.


Build time this post: 1 Hours, 15 minutes
Total build time so far: 9 hours, 00 minutes

Wednesday, November 7, 2018

Semroc Saturn 1B, Build, OOP #KS-1, Part 7, Making The Tower


Even though I reduced the dowel diameters, the fit was too tight in the assembly jig holes.
The holes were widened slightly with my small rat tail file. Don't remove too much, you still want a tight fit in the jig.


GOTCHA: Notice the directions of the "Z" struts. This has been shown incorrectly in many kit instructions.
Every other "Z" should be flipped.

This is also shown wrong in the original Estes Saturn 1B instructions.


Here's a clear picture of the Saturn 1B tower showing every other "Z" strut flipped. This made the tower stronger.

It's a moot point and nobody will notice. Don't kick yourself for following the directions.


TIP: Notice the pencil marks on the vertical tower sides. These center marks make it easier to line up the horizontal upper and lower "Z" pieces.

The sides should lightly friction fit and be held in place without glue. Slide them in place dry, then add glue to the joints and remove the excess.

Build time this post: 0 Hours, 45minutes
Total build time so far: 7 hours, 45 minutes

Tuesday, November 6, 2018

Semroc Saturn 1B, Build, OOP #KS-1, Part 6, Making The Tower

Four sets of upper internal "V" struts and four sets of (slightly larger) lower "V" struts are made.

The V tops are trimmed flat after the sides are glued together. I didn't see any need for using the headed pins here.

TIP: Notice the pencil lines - These give you something to line up the razor blade with when cutting the dowels to length.


The small pieces of dowel on the right are all that's left after the upper and lower "Vs" were cut and glued.

The round center ring is split in two.
The instructions show the V struts tips set on small dots on the pattern sheet.
TIP: I found it easier to mark the rings with a pencil at the 90 degree  N, E, S and W positions. The glued centers were glued on the pencil marks, just the centers. No glue on the outside tips yet.

After that dried, the ends were glued together one at a time and clamped with a clothes pin. The clothes pin keep the ends in alignment.
After all is dried, even up the sharp ends, don't shorten them! Just knock off the tip if one is longer than the other.

TIP: You can get a better fit inside the assembly by using a small diamond rat tail file in the end dowels joint.

Build time this post: 2 Hours, 30 minutes
Total build time so far: 7 hours, 00 minutes

Semroc Saturn 1B, Build, OOP #KS-1, Part 5, Making The Tower


You'll have to make two more sets of the horizontal center struts.

TIP: To keep the side ends even, I pinned two vertical flat toothpicks down first. The center horizontal struts are not glued to the side flat toothpicks, you only glue use the center "Z" and two diagonals beneath it.


Again, using long tweezers will really help to build the tower.
I got my set of tweezers cheap from Harbor Freight.
In this picture you can better see the flat toothpicks.


Here's the center struts.
Notice the small fillet of glue in the crux of the "Z". There's really not much glue there, I can actually bend the pieces like a hinge to correct the alignment if needed later on.


Build time this post: 1 Hour, 15 minutes
Total build time so far: 4 hours, 30 minutes

Monday, November 5, 2018

Semroc Saturn 1B, Build, OOP #KS-1, Part 4, Making The Tower

Use the full size patterns to cut four tower sides to length.

TIP: Don't just roll your knife blade across the rolling dowel - Roll forward a half turn and stop. Keep the blade in the cut slot.
Roll back towards yourself and do a full turn, this cuts beyond the first half turn cut. This helps prevent the knife from "traveling" or  making a spiral cut down the dowel. Keep the blade centered and in a straight line.

You don't have to cut all the way through with your knife, trace all the way around and crack the dowel. You can then lightly sand the ends flat. Don't shorten the desired end length when sanding.

You'll need lots of head pins to hold the tower pieces steady for gluing.

Pin down the sides first, directly over the patterns. I used more pins than the instructions showed.

Do the horizontal struts first, cut from the thinner dowels. Cut to size and press in place using long tweezers. Long tweezers will help with the construction.

The strut pieces were pressed in place dry -


Glue was applied with a toothpick. You shouldn't have to use much glue, the outside of the finished tower will look cleaner.

After the glue was applied, the excess was wiped off and removed with a Q-tip.
The diagonal glue joints will be much stronger if the ends have a fitted corner. (See the left) Cut slightly longer and use a sanding block to shape the end to a "V".

If you cut the piece too short, save it - you can use it for the low struts.
As Bob Villa says: "Measure twice, cut once."


Build time this post: 2 Hours
Total build time so far: 3 hours, 15 minutes

Saturday, November 3, 2018

Semroc Saturn 1B, Build, OOP #KS-1, Part 3, Dowel Prep

Building an escape tower isn't easy, sort of a rocketry Rite Of Passage.
Like every new build challenge, don't expect perfection in your first try. I've heard a few say: "I can't build that, I have fat fingers." Give it a shot, you might surprise yourself.
Get a new sharp blade, change out the old sandpaper. Take deep, relaxed breaths and don't try to build an escape tower in one sitting.
I respect and always acknowledge a builder that took the chance and assembled something difficult.

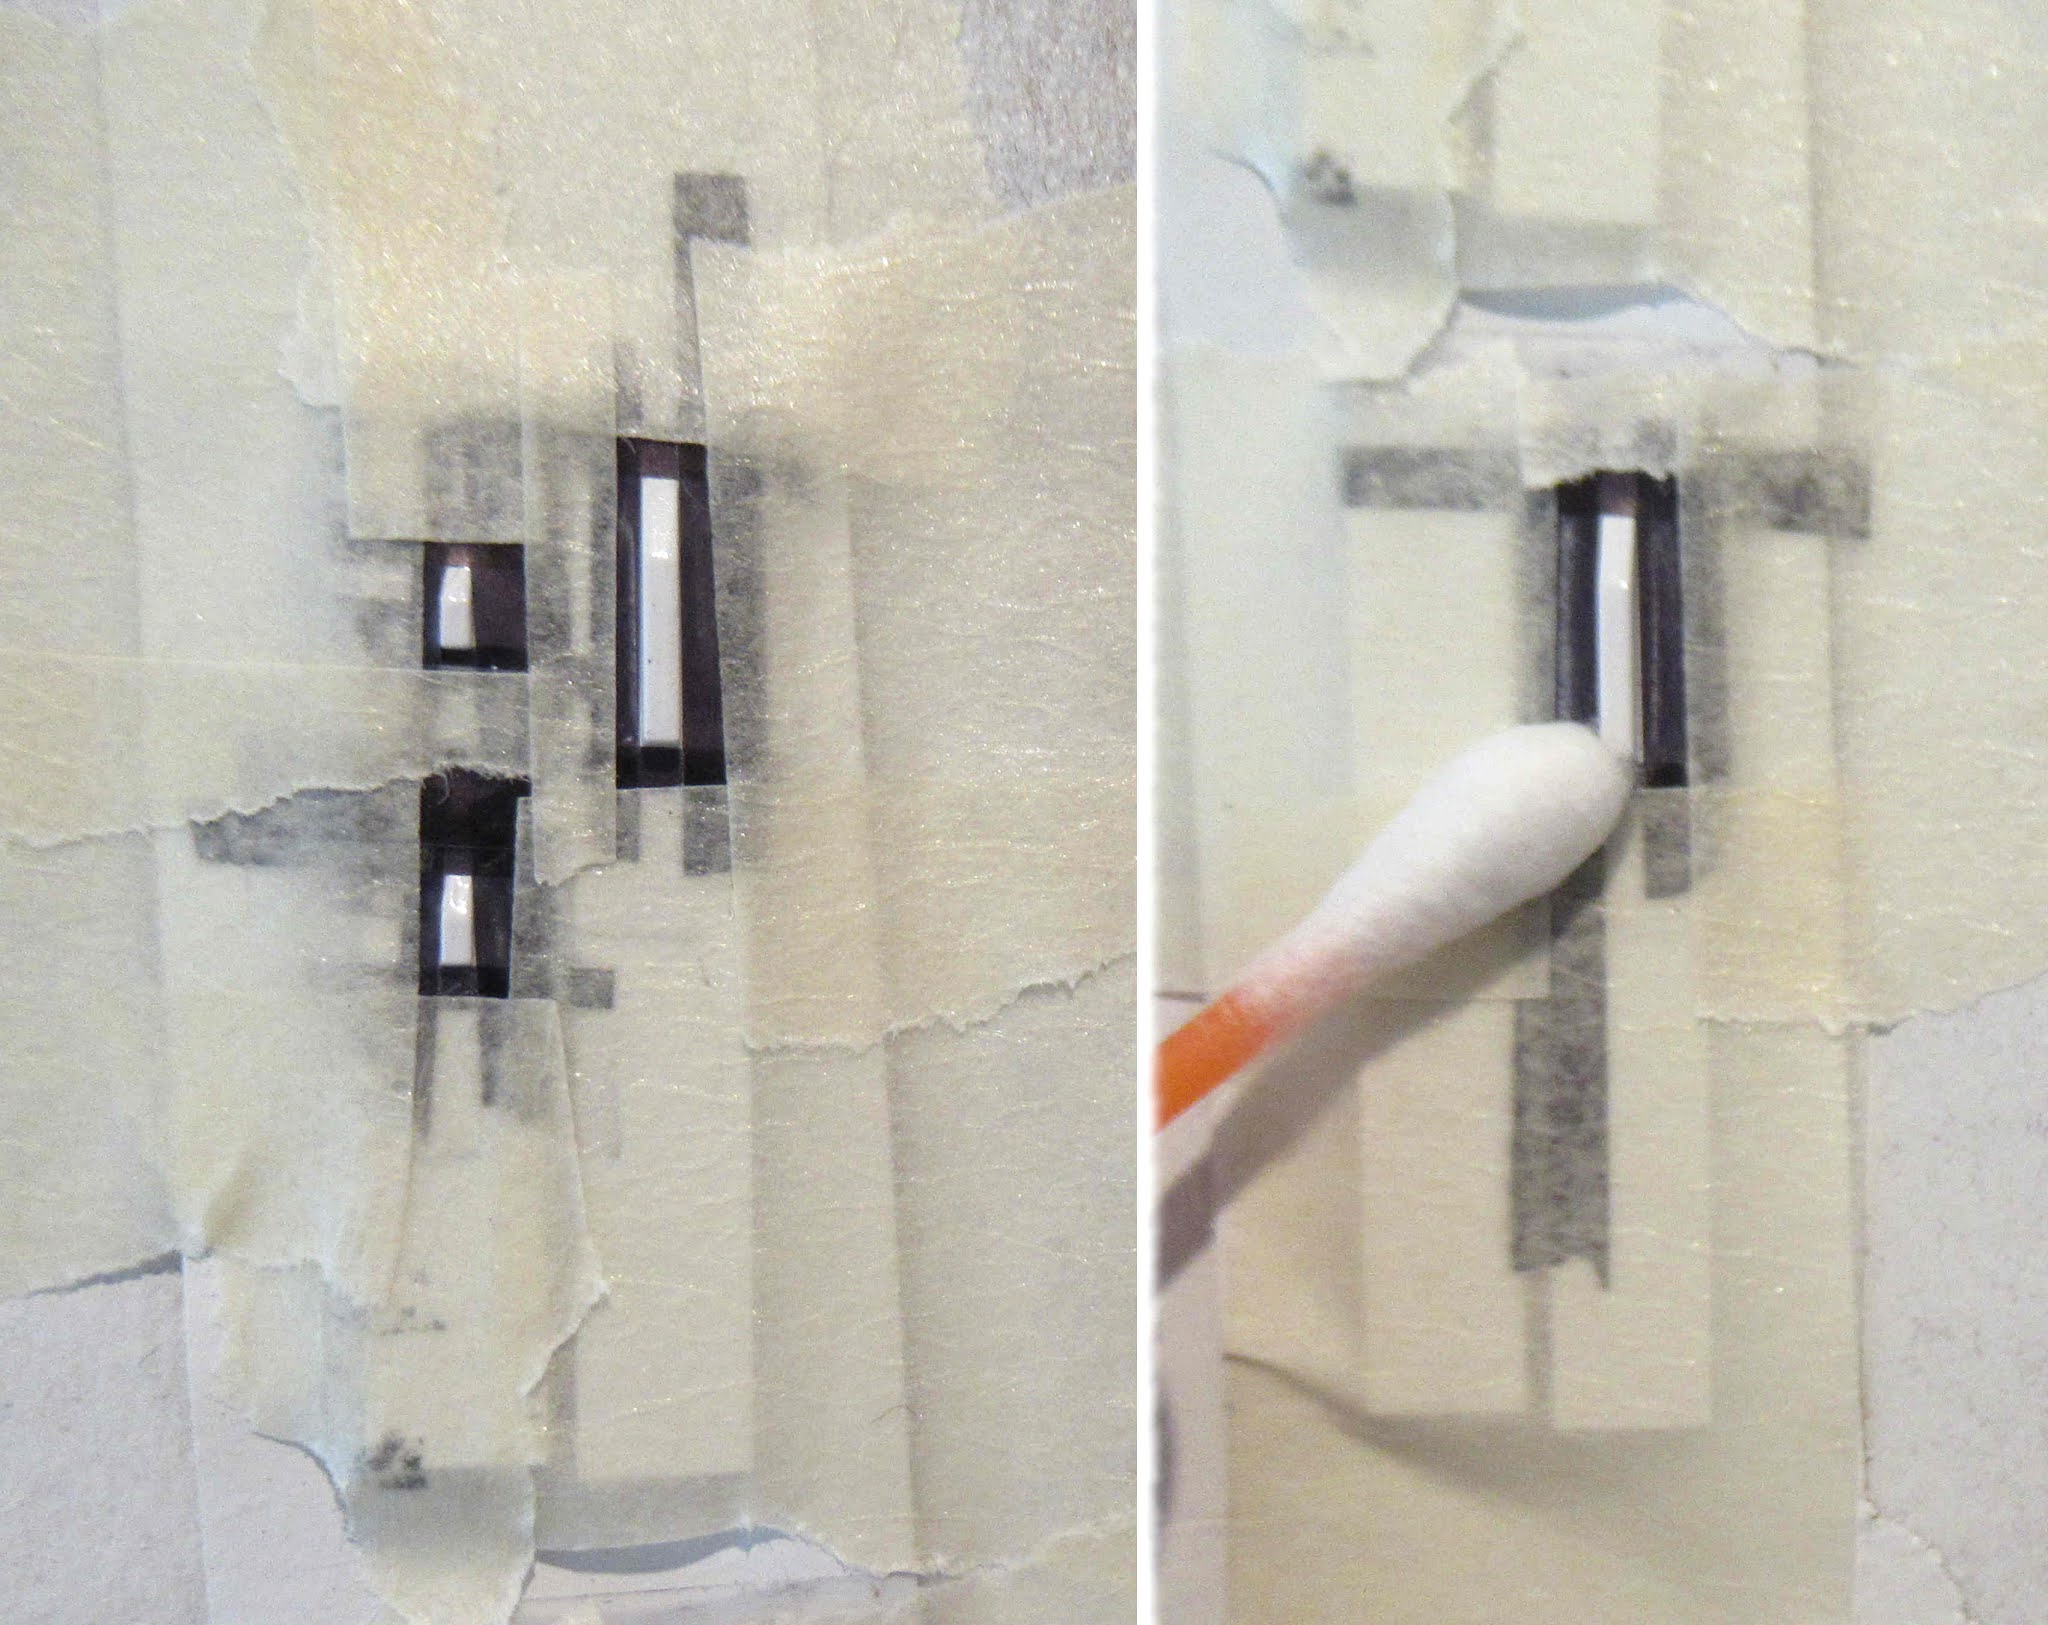
This following step is where some give up making the tower. Four 1/12" x 6" diameter dowels are supplied. the builder should shape the dowels to a thinner diameter. You would think thinner dowels could be supplied. I've seen towers assembled where the dowels diameters weren't reduced. It looked thick and clumsy.

It's hard to get these perfectly round while reducing the diameter.
TIP: Look to the lower left and you'll see a pencil line. Drawing this reference line lets you know when you've made one revolution around the dowel.
I sanded back and forth using 220 grit on a sanding block as the dowel was slowly rotated. Keep an eye out for the pencil line as the dowel makes a full turn.
The upper half of the dowel was sanded round, the dowel is flipped over and the other half sanded.


Two dowels are reduced to .056" diameter. The other two are reduced to .041". Use the sizing templates to check the diameters.


Here's what you should end up with, two dowels at .041" diameter and two dowels tapered to .056" diameter. They don't really have to be perfect, just real close.
Each dowel reduction should take a little over 10 minutes.


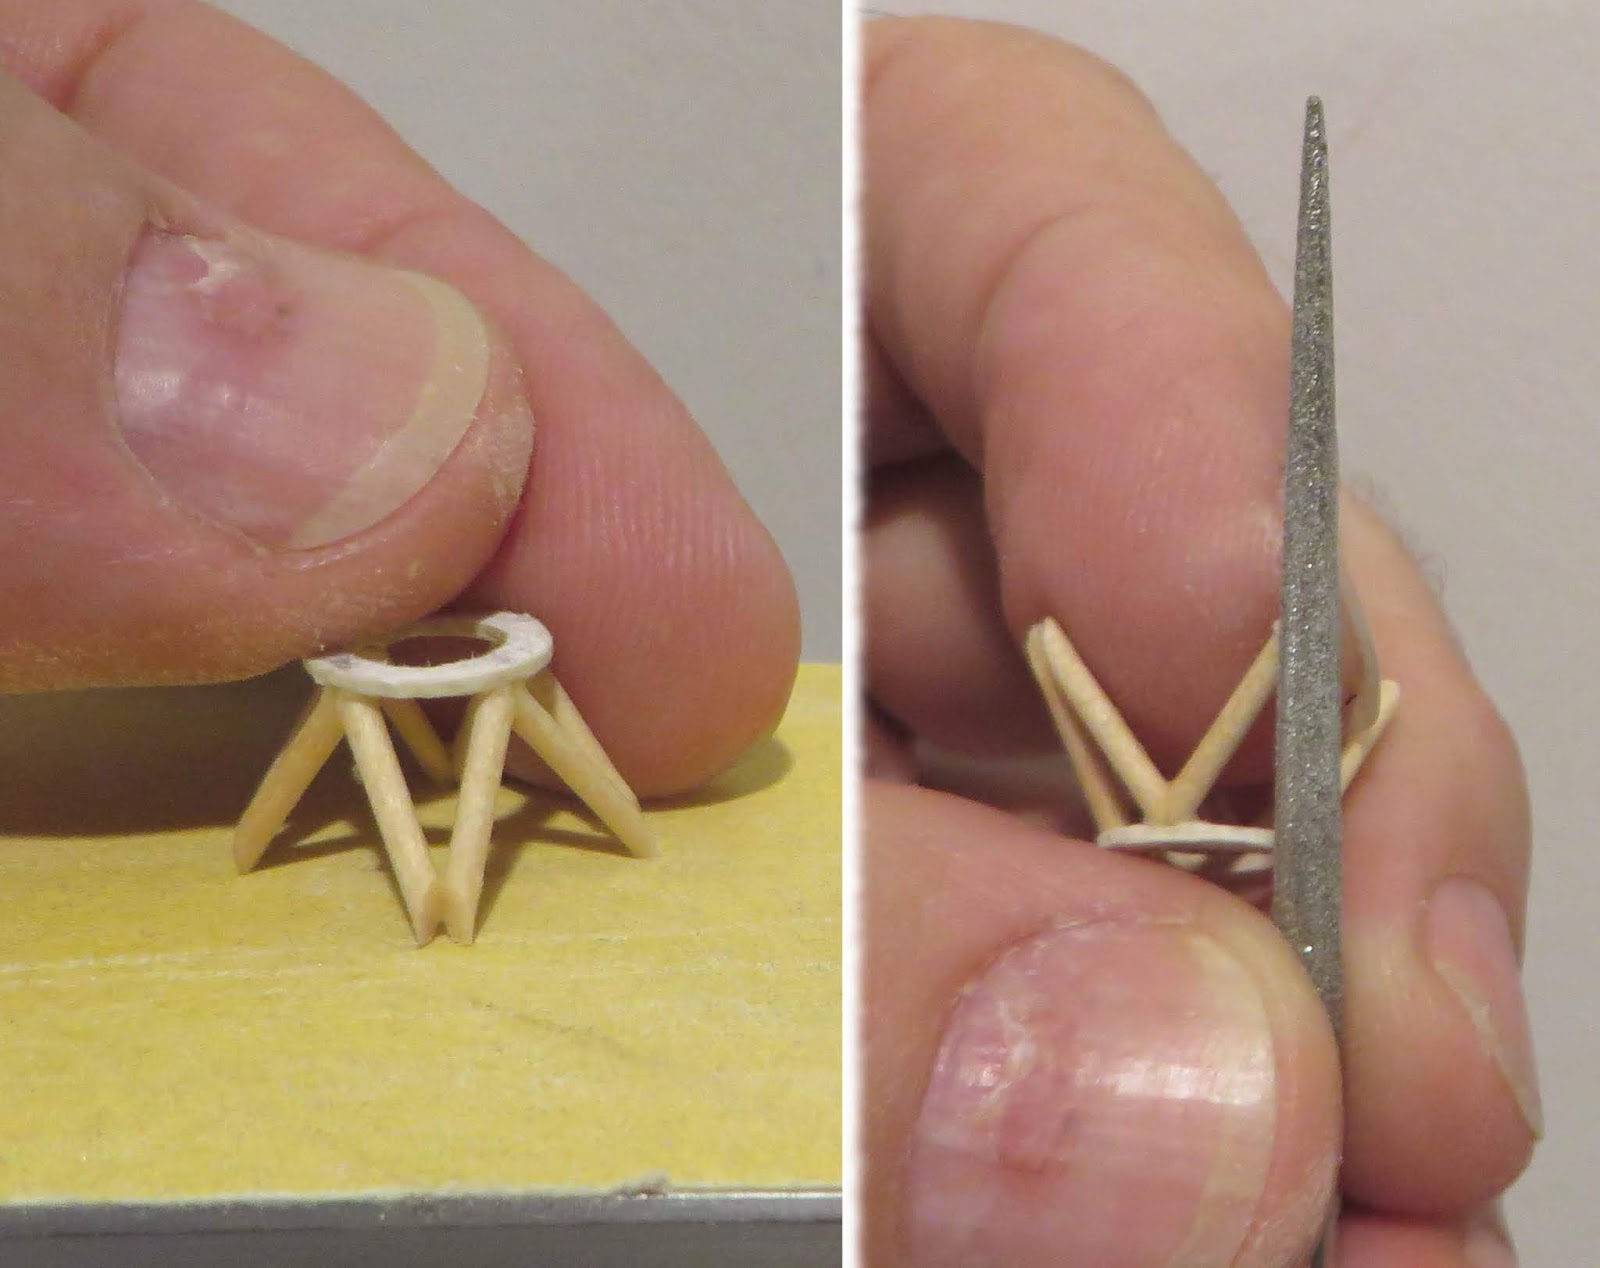
Looking ahead, here's the finished tower.

TIP: To the right is a round tapered toothpick. Right out of the package, the diameter is almost the same as the larger reduced diameter dowel. The toothpick is long enough that you could cut off the top and bottom tips and still have a long enough dowel for the tower sides.

Build time this post: 55 minutes
Total build time so far: 1 hour, 15 minutes