Tuesday, April 30, 2019

New Rusto 2X Nozzles


Greg Eberly posted on the Model rocketry USA Facebook page:

"My favorite paint is Rustolium paints for painting and primer, some people aren’t to Happy with this brand because the spray nozzles clog, which is true because it’s a oil based paint, but the good news is that they changed the nozzles."

Keep your eye out for the new, (improved?) GOLD spray nozzles. 

Semroc Sam 3 Build, Part 10, Kit Differences and Decals


The old Centuri instructions have you glue the upper (3 piece) fin assembly with the rear edge 1/4" from the end of the ST-7 tube.


The Semroc instructions have you glue the 3 piece upper fin assemblies 1/8" above the exposed end of the upper tube.

That throws things off when you go to redraw some decals.
There is a black scalloped wrap decal that should fit in that 1/4" space.

There are some white decals, I'll only be able to print up some black accent pieces.

I drew the scalloped wrap much thinner, but will probably still have to trim it to fit.

Monday, April 29, 2019

Estes Saturn V Parts

On the NAR Facebook page, 
James Duffy pointed out that Estes has added Saturn V parts to their website!
CLICK HERE to see the listings.
You can upgrade your old kit to the new specs.

Semroc Sam 3 Build, Part 9, Paint Plan


I did some searching and found a few pictures of the Russian Sam-3.

It's always interesting to see an actual missile and the design compromises made to produce a sport scale model.


This looks to be the inspiration behind the Semroc kit paint scheme.
This is a smaller model and masking will be a chore.


These missiles with the upper red band are much more interesting. I'm going with this, or something close to it!
With the additional decals it should be a good look.

Sunday, April 28, 2019

Semroc Sam 3 Build, Part 8, Launch Lug, Tunnels & Decals


The launch lug is glued into the root edge of a lower fin, even with the front of the fin.

Tunnels are glued on opposite sides between two fins.

Four tiny fins are glued onto the base of the nose cone in line with the lower fins.


Here's where we are at. Now to figure out a paint scheme.
The original Centuri kit was painted in camouflage. I have no experience painting camo and no airbrush to do it with. Time to do some searches for alternative paint.


There is a scalloped decal separating the first and second stages of the missile.
I wrapped a paper strip around the tube and divided it into fourths.

The original Centuri decals had Russian wording on it. Many of the decals were printed in white.
My decor will be a compromise, just black ink and not as many decals.
I had to make up some Russian lettering under the 19-2C5T decal line. Circles and hatches were added.

Saturday, April 27, 2019

Semroc Sam 3 Build, Part 7, Fin Gluing and Alignment


The large, square rear fins are glued on even with the end of the body tube.


Before gluing on the upper fins, the body tube edge got a quick wipe with CA glue. The edge was a bit rough. With the CA glue on it could be sanded smooth.


The upper fins were aligned with the help of  clothes pins. This works well if the balsa is hard. Soft balsa might be scarred by the clamps.


On the clothes pins I used -  The wood halves are removed and flipped on the center springs so you clamp with the back, longer flatter end.

Friday, April 26, 2019

Semroc Sam 3 Build, Part 6, Fins!

The small nose cone canard fins were cut from basswood. I made a few extras and will pick the best four.

The launch lug seams were filled before gluing on the model.


Along with the nose cone canards, there are many pieces to fill!

For reference, the small fins at the top should be shown in the middle position.

I ended up using the balsa tunnels provided in the kit.
The ends and sides are rounded. This is tough to do, the thin balsa stick is easily broken.


Here's the four nose cone canards in place, spaced at 90 degrees like the fins below.

Thursday, April 25, 2019

Semroc Sam 3 Build, Part 5, Joining The Tubes

The upper centering ring goes right over the the tubes joint.

The lower ring is glued 1/4" up from the low end.A bead of glue is set around the upper ring and more glue is applied the outside bottom edge.

Slide the lower tube on until the upper ring is even with the top of the tube.


A glue fillet is added to the lower ring joint. A drop of glue is applied and spread around the joint using a Q-tip. It may take four drop applications to get the glue ring all the way around.


Here's the main body assembly.
Fin gluing is next.

Wednesday, April 24, 2019

Semroc Sam 3 Build, Part 4, Small Forward Fins

The small, upper fins are made up of three pieces. I cut new forward strakes from basswood, the large middle piece is the kit supplied 3/32" balsa, the upper antenna was also cut from  basswood.

The older Centuri instructions have you glue the individual pieces together on the model. The new Semroc instructions have you assemble the three pieces off the model then glue onto the body tube.

Set and glue them together in a line on a straightedge.


Here's all four fins, the flat sides were sanded with 400 grit on a block.


CWF is brushed on and sanded off.

The fins will get a good shot of filler/primer and more sanding before gluing onto the upper body tube.

Tuesday, April 23, 2019

Semroc Sam 3 Build, Part 3, Engine Mount


The engine hook slot was a small punch made with an X-Acto knife tip.
Rather than just punching the engine hook through the tube, I enlarged the slot and cleaned it up.


This is typical of some Centuri engine mounts from the late 1970s. The lower ST-7 tube is 3" long.
No engine block, a coupler butts up against the upper bend of the engine hook. The coupler also connects the longer top tube.

A Kevlar line is tied through a small hole in the coupler.
Instead of masking tape I used a wrap of electrical tape to hold down the center of the engine hook.

Monday, April 22, 2019

Semroc Sam 3 Build, Part 2, Parts Prep Before Building The Kit


The upper fin tip pieces felt weak to me in the kit supplied balsa. The burnt edges were lightly sanded clean.
Four new pieces were cut from basswood using the balsa piece as a template.


I used a single edge razor blade to cut out the new fin tips.
On the left is the initial cut.
On the right is the same angle after sanding and truing up the end.
The nose cone shoulder end could use some sanding.
On the right is the flat sanded end. The shoulder was re-rounded with some 400 grit rolled over a fingertip. The rounded shoulder makes for a better slip fit in the body tube end.

The center is marked before screwing in the screw eye. Mark a center dot with a pencil, roll the nose cone to check the center and mark again if needed.

TIP: The upper end of the tube is sanded flat with 220 grit on a block. This slightly roughens up the end of the tube.
Slide in the nose cone and turn it against the rough end of the tube. The rough edge will "sand" and form the shoulder lip, sharpening up the stepped edge.

Sunday, April 21, 2019

Semroc Sam 3 Build, Part 1, Parts


All parts were good, Centuri thick ST tubing.
This model has a Dr. Seuss decor with a Green Eggs and Ham, "Sam I Am" decal.
Lots of small 3/32" balsa pieces! The original Centuri kit had basswood tunnels. In this kit they are cut on the balsa sheet.
A washer weight is included for better stability.
I won't be using the Dr. Seuss style decal.

Saturday, April 20, 2019

Semroc Sam 3 Background

All the copy below is from the Semroc website.


"The Centuri Russian SAM-3 was first advertised in the Centuri 1878 catalog with an availability date of May 15, 1978. It was one of the four models in the new Strike Force line. It was loosely based on the actual Russian SA-3 surface-to-air missile of the Cold War era. Photos of early prototypes were closer to scale than the final released version. It was released as Catalog No. 5332 and retailed for $3.75."

To see the Centuri Strike Force catalog page: CLICK HERE
To see the original Centuri instructions: CLICK HERE


"The Semroc Retro-Repro™ SAM-3™ is very faithful to the released version. It is a semi-scale model that preserves the flavor of the Strike Force series. We released it as a special kit for our SAM members. The decals do not reflect either the original Russian or Centuri version, but feature the SAM mascot. Added nose weight is provided for better stability."

The Semroc SAM-3 was released to SAM (Semroc Aerospace Modelers) members only. I'm finally getting around to building it.

The only other Strike Force kit I built was the Centuri Israeli Gabriel and Cruise Missile. The Gabriel was one of the few models that survived in my old bedroom until 39 years later.

Friday, April 19, 2019

Quest AS-1 Escort Finished and Comparisons

I mentioned at the start of the build this was a replacement for my older AS-1 Escort rocket built over five years ago. I really like this design, it's perfect with A engines at the schoolyard launch.
I do see why the kit was discontinued. It's rated a Skill level 2 but should have been higher. Tube and lug cutting with difficult decals made a tough build. There are mistakes in the instructions that could confuse younger builders.
Still, a great design. My old build needed replacement after almost 20 flights.

On the left is the earlier build, on the right the new one.
The aluminum paint on the first build looks dull compared to the Rusto Metallic silver.


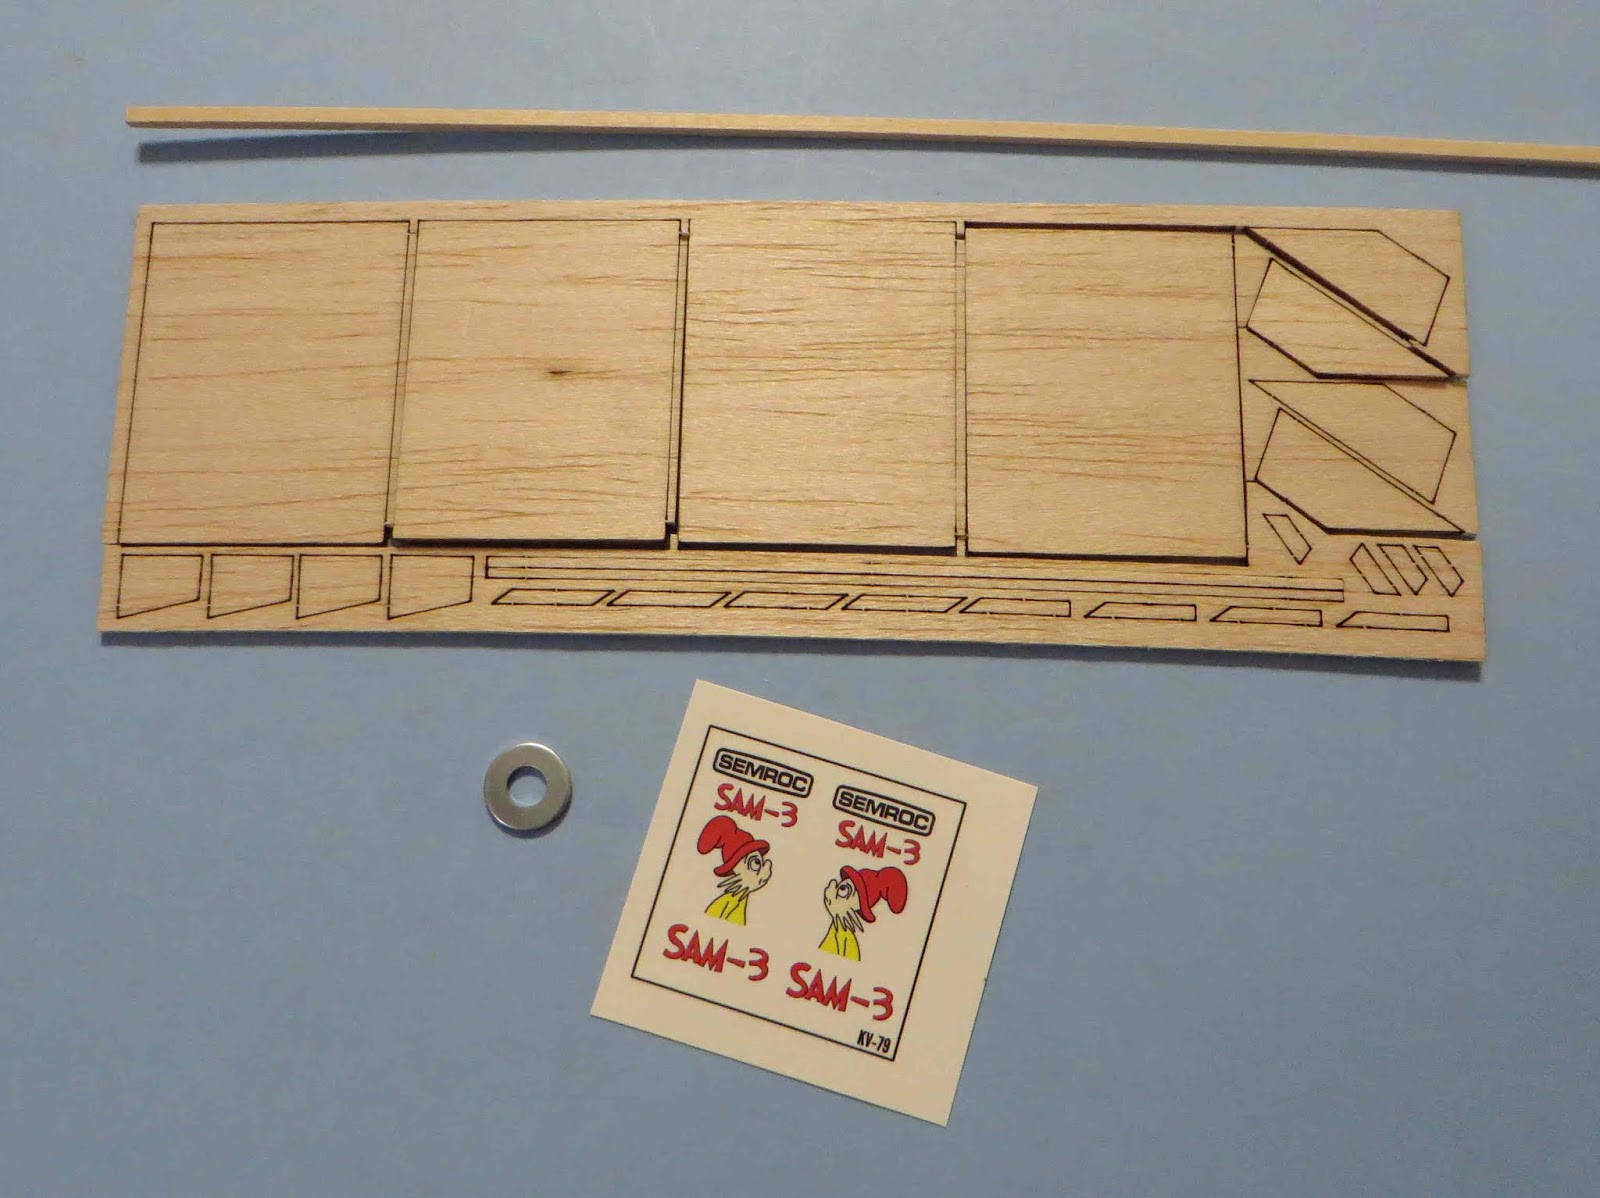
I took more time with the decal placement using the first build as the placement guide.


The canopy decal on the new build is set a little forward so the black line is at the body tube break. I did have to make some cuts so the decal would wrap around the nose cone.
I also added the "escape" and "Caution" triangles under the canopy.

This build was a pain, but it's a great Shrox design and worth the effort.
I remember this model also needed a little nose weight for better stability. I still have to add that.

Thursday, April 18, 2019

Quest AS-1 Escort Build, Part 14, Decal Problems


GOTCHA: This was one of those kits that didn't supply enough decals to match the face card or catalog illustrations. Many of the decals weren't drawn to fit the indicated areas.
On the back the decal wraps weren't wide enough to fill the areas between the fin root edges.
One of the decals had to be cut in two and pieced to cover the open span.


The end overlapped the rudder fin end. A small cut was made at the back so the decal film would lay flat.


This top decal tore when I was sliding it in place. I guess the clear coat wasn't thick enough.


GOTCHA: The yellow and red rear fin decal had no white undercoat. You could barely see it against the black paint.
I won't be using it and threw it away.

Wednesday, April 17, 2019

Quest AS-1 Escort Build, Part 10, Wing and Fin Gluing

Whoops! I didn't post Part #10. 
I'll go back in a day or so and place it in the correct order.


The wing angle shown in the instructions is hard to achieve.
GOTCHA: When I set the glue tacked wings on a straight edge you can see the angle is flatter than the illustration.
I ended up sanding the root edge to allow a flatter placement but not as extreme an angle.


The twin rudder fins are flush with the end of the tube. Draw a pencil tic mark over the end of the tube so you can see the line when the root edge covers up the pencil line.


Here's the view from the rear.
The tail fins look larger than they really are.


I set my sanding block against the 45 degree angle cuts. From the side you can see how everything is in line, from the low rudder fin through the back edge of the small strake on top.

Tuesday, April 16, 2019

Quest AS-1 Escort Build, Part 13, Masking The Black


The instructions have you paint the black first, mask and then spray the silver. This time around I sprayed the silver first. It's a little riskier this way, sometimes silver paint gets marred by the adhesive side of masking tape.

This was a tough mask, it's a smaller model with a lot of pieces in the way.
Here's the low rudder fin mask.
Scotch tape goes down first, then masking tape and finally grocery bags.


After removing the grocery bags and larger masking tape pieces you get to check the real mask line.

The corner of the Scotch tape strip is lifted with the tip of a knife blade being careful not to scratch the silver paint.
Long tweezers grab and pull off the strip.


After the tape was pulled I noticed I didn't get a full black cover near the front leading edge. I cheated with a broad permanent marker after masking off the root edge.
I should have used Scotch tape for a better seal. There was a little bleed under the tape. In the end I'll probably use a strip of black decal to even out the line.