Monday, May 31, 2021

FlisKits Space Raider Build, Part 4, Fin Covers

An observation:
On the Forums I see a lot of builders papering fins. They'll paper on side, trim off the overhang edges. Flip over the fin and paper the other side. This leaves squared edges and open balsa grain on all sides. 
Try this:
TIP: Round the leading edge of the fin before papering. 
Lay a "mirrored" skin (shown in the second picture below) and roll it over the leading edge. 
You'll end up with a rounded leading edge, a cleaner look and less exposed balsa to seal!
   

The low (exposed) side of the fin leading edges are rounded.
220 grit took off the corners, 400 grit rounded and smoothed.

I wanted a rounded leading edge to roll the centerline of the printed fin cover over. 
I use a glue stick to attach the paper fins. Apply glue stick to one side and the centerline of the skin.
I don't recommend liquid white glue. It can oversaturate the 20 lb. paper.

Center the fin down the rounded leading edge and smooth one side. Pull and roll the centerline over the rounded leading edge.
Apply glue to the other side and burnish.


Here's on fin with a cover skin in place.

Don't worry if the paper overhangs the other edges, the covers are drawn up a little oversize to be trimmed off after the glue dries.


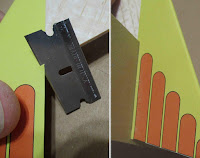
I used a single edge razor blade to shave off the overhang.
After that, a sanding block smoothed off the edge.

The fins on the available PDF are orange with yellow stripes, the reverse of what you see here. 

Sunday, May 30, 2021

FlisKits Space Raider Build, Part 3, Engine Block & Fins

This model has a standard minimum diameter engine mount.
Kevlar is tied around a notched engine block.
Glue is applied inside. The block is slid into position with an empty engine casing until 1/4" of the casing extends out the back.
The Jim Flis instructions say to use 1/8" thick balsa for the fins. That looks like it would match the fin thickness in the original black and white photograph. I didn't have any 1/8" so I went with 3/32" thick.

I figured with the printed covers the fin thickness would end up close to a 1/8" thickness. In the end, the 3/32" balsa and fin covers fit the slots in the body shroud very well.

You'll go through a lot of balsa on this one!

Saturday, May 29, 2021

FlisKits Space Raider Build, Part 2, Making A Nose Block


I didn't have a BT-20 sized nose block handy so I hit the spare parts drawer.
I found a 20/50 balsa adapter. I tend to hang on to spare parts. You never know when they might come in handy.

The narrow upper end was used as a diameter guide.
The lower wide end was shaved down stopping before getting to the BT-20 diameter.


The rough sides were sanded down and evened up using 220 grit on a block.

The final fitting was done by sliding the block into the tube. If the block stopped, I knew there was more sanding to fit. 


Here's the final nose block, much longer than needed.
I'll cut it down to size when I figure out how long it needs to be later on in the build.

Friday, May 28, 2021

FlisKits Space Raider Build, Part 1, Parts


Parts are pretty standard.
That's a 6" long BT-20 and a 6" long 1/8" launch lug.
The long nose block was made from a 20/50 adapter from the spare parts drawer.
I didn't end up using the engine hook.
Balsa isn't shown, I went with 3/32" instead of the 1/8" thick. It's what I had handy.

Jim Flis Patterns for home prints from the NAR Facebook page: 
https://www.facebook.com/groups/2255560886/permalink/10157795697170887
Print all three pages on 110 lb. cardstock
Instructions:
https://www.facebook.com/groups/2255560886/permalink/10157795696185887
Print on 20 lb. copy paper

TIP: I'd recommend using white glue for construction on this one. Yellow glue can discolor home print cardstock models. White glue will dry clear and disappear after the final clearcoat.


Jim Flis drew up a fin cover in black and white.
I drew up four covers and colored them in.

These PDFs is available to Patreon supporters.
Email me at oddlrockets@bellsouth.net
and ask for the Space Raider PDFs.


I had some trouble with the fit of the bottom plate.
I re-drew four separate pieces to fit my build.

My nose cone came out a little short, leaving a gap at the top of the body.
I re-drew the nose cone just a bit longer. These are hard to fold, so three are supplied on the PDF. You might get better results on a second or third try.

Thursday, May 27, 2021

Fliskits Space Raider Background


If you grew up in the early 1960s, you could find this "accident waiting to happen" in many city parks. This one looks like a climbing structure. Most playground rockets had a ladder to climb. You would pass through the rocket body to a slide on the other side.


I found out that George Gassaway posted this backyard play gym picture on Facebook.
This photo inspired Jim Flis (FlisKits) to draw up a smaller flying model rocket - a cardstock body, pattern sheet and instructions. 
The build starts tomorrow.

Wednesday, May 26, 2021

Humidity & Gloss Paint - TIP

This is an important post for anybody spraying rockets in an area with high humidity! 
I may have figured out the relationship between humidity levels and gloss finish spray paint!

Boy, did I have this wrong!
Since moving to Florida in the early 1980s, I assumed humidity levels rose with the temperature.
In the Summer months, gloss finishes can dry with a flat finish. So, I tried spraying (outdoors) in the morning. I reasoned - cooler temps = lower humidity.

According to this chart, humidity levels are higher in the Morning then drop in the Afternoon.
Lately, I've been having a hard time getting gloss finishes to dry shiny.
Yesterday I sprayed a heavier final coat in the afternoon when humidity was lower. 
The paint went on wet and dried glossy!

Try a search of your state or better yet - your hometown humidity.
Insert your State (XXXXXXX) in this address:
https://www.currentresults.com/Weather/XXXXXXX/humidity-june.php
That will bring up the humidity for June in your state. Change the month as needed.
In the above Florida chart, the morning humidity was recorded at 8 a.m., the afternoon humidity was from 4 p.m. The humidity level recorded times vary in different state charts.

My spray cans say to spray when the relative humidity is 60 or below! 

I grew up in the Monterey Bay area of California. The average temperature was 70 degrees. If there was any humidity you didn't notice it. Back then, the old formula Krylon went on smooth and dried glossy!

TIP: If you live in a high temperature area, think twice about using a final clear coat acrylic. Acrylic clear coats get sticky on a hot day. By the time you walk your rocket to the launcher, there could be fingerprints left in the clear coat!

Tuesday, May 25, 2021

Estes Antar #7310 Build, Finished


This is a big model, I had to take it outside to get a full, finished picture.
It's impressive! I'm glad the C5-3 engine is now available for it.

I mentioned before, those black nose cone dots are tiny, smaller than the box illustration shows. This model was a difficult masking job.


The back end - 
This was a pre-production kit, the kitted decals now have a darker red ink, almost a red/brown color.

This will be a popular kit for Estes. I'm curious what upcoming Designer Series rockets might be.


James Duffy has just posted and ANTAR unboxing video with some history and great paint ideas. To see it: CLICK HERE

Monday, May 24, 2021

Estes Antar #7310 Build, Part 18, More Decals

The low ends of the fins get these black decals.
The picture on the right shows about the best fit I could get.
I don't like setting decals all the way to the edge. That can lead to peeling up and cracking of the thin decal edges.

You are provided with three sets of these decals in black. Set over the upper dark green fin, the black decal is very hard to see.

The "T 01" and "ANTAR" black decals go on the top white areas of the wings.

On the bottom, the white "01" and "FT" decals go over the green. 

TIP: Notice the paper towel wrapped around the top of the model. This protects the silver paint from oily fingerprints. Fingerprints can dull the silver. 
After all is complete, you can finally glue in the pre-painted engine mount.

With a mount like this you can apply a ring of glue up inside the tube. Slide the engine mount about halfway in, not up into the glue yet.
Apply a second ring of glue just inside the edge of the tube. Slide the mount all the way in. The mount will stop when the overhanging crescent vane tips touch the end of the tube.

I like to line up the engine hook with the launch lugs.

Sunday, May 23, 2021

Estes Antar #7310 Build, Part 17, Decals


This picture is from the Estes website, it shows the two red boxes on either side of the longer green top fin.
That leaves the wrap band with the single red box to be placed around the top of the body tube.

Your kit will have darker red decals. My builds were pre-production kits. Estes wanted the kit decals to reflect the colors on the original G. Harry Stine model.
The three rear green bands will have to be cut close to their edges so they can be placed nearest to the tube edge. 
TIP: I don't like to lay a decal right up on the edge. A little clear border will help prevent the decal from peeling up or cracking.

The launch lug is actually centered. Sometimes I focus pictures to the left to allow inset pics on the right side when editing. Positioning pictures to the left can cause some distortion.

Again - 
The top (single red box) wrap band goes at the top of the body tube.
The wrap with the two red boxes goes towards the rear over the silver/white color separation line

Saturday, May 22, 2021

Estes Antar #7310 Build, Part 16, Silver Body Mask

This post could have been presented earlier, before the small wing pieces were glued on - In the pictures below, the glue mask strip for the K pieces hasn't been lifted yet.

TIP: Do all silver masks last - Never lay masking tape over a metallic paint! The sticky tape can mar the reflective paint surface.
   

After the green has been sprayed, you've still got more masking! Most of the upper body tube is sprayed silver.

On the left, the picture shows the mask around the rounded leading edge of the wing. After the root edges are masked, the rest of the wings are covered.
The green top fin and forward extension are also masked.


After the silver was sprayed - 
Here's how the top looks after the tape was pulled.

I have some rolled paper slipped into the top of the tube to keep out the paint.


And the bottom view . . . 

Friday, May 21, 2021

Estes Antar #7310 Build, Part 15, Mask & Glue The Wing Details


Masking down the leading edges of the "K" pieces is tricky.
One side is white, the other side is green.

Again I used Scotch tape down the center of the leading and trailing edges. They are set down on a piece of cardboard for controlled spraying. The white underside was fully masked off to keep the green out.

After the tape was pulled.
On the other side, the root edge is still bare balsa for a stronger glue bond on the wing.


The glue strip mask is pulled up from the wing.

The strip of tape is a bit narrower than the 1/8" root edge thickness.


The "K" pieces are glued in place.

You'll have to visit the next post to see the Silver mask shown on the left.

TIP: Do the silver mask last - You don't want to lay sticky masking tape over any metallic paint! The tape can mar the reflective paint surface.

Thursday, May 20, 2021

Estes Antar #7310 Build, Part 14, Spray & Tape Pull


Ace Hardware Premium Enamel Hunter Green is a perfect match for the dark green on the decal sheet.

Here I'm wiping off the nozzle after the first base coat spray.

Most of the larger full cover mask has been removed.
Here the center wing mask is being pulled.

The Scotch tape masks will be removed next - Fingers crossed!


The mask lines were very clean.
There is some spots that will need cleaning up.
It seems there is always a bit of paint that sneaks under the tape edges. I like to remove the mistakes before the paint fully dries. You wouldn't want to remove over spray a few days later.

On the far left is a Mr. Clean Magic Sponge. Wet the sponge and wring out most of the water.
On the right the green has been rubbed and removed.

Wednesday, May 19, 2021

Estes Antar #7310 Build, Part 13, Wing Mask


Here's the first draw of the wing mask.
After printing the PDF, it is cut down the zig-zag mask line.

One half of the full size mask template is set on the fin, matching up the ends.

The picture on the right shows a very faint pencil line for the masking tape placement. If you trace a pencil line on balsa, go light! You don't want to scar the soft wood.

I use Scotch tape for masking.
To see the tape edge, I mark it with a wide tip permanent marker. 
After the black ink dries, wipe over the line with a paper towel to remove any extra that might be transferred onto the model surface.


The other half of the template is used as a cutting guide for the zig-zag color separation line. 


Here's the mask for the green paint. The open white areas of the body will need to be covered before spraying the green.
Notice the many smaller pieces at the upper tips to fit the rounded leading edges.

Tuesday, May 18, 2021

Estes Antar #7310 Build, Part 12, Nose Cone Decal Dots

Those 12 black dots are tiny!

I drew up three circle templates to help with their placement.
A final set of computer drawn templates are available to Patreon supporters. It would be difficult to place these dots without them.
Write and request the Antar PDF at: oddlrockets@bellsouth.net


Tweezers! You'll need long tweezers to pick these decals up after soaking. They also help with placement on the nose cone. 
Here's what the templates look like on the final home print.
Cut out the centers and place over the nose cone tip. Make sure the card stock template is level.

The dot decals are placed directly in line with the dots printed on the templates.


Here's the finished nose cone.

Monday, May 17, 2021

LASER Club Launch May 16, 2021

Winds were about 12 mph and the heat wasn't unbearable - yet! Wait until next month. 
Will there be another launch next month? By the end of the day we were informed that this would be the last club launch at this field. The new owners want to develop and plant the field. It was fun while it lasted!

It was a first launch for my Jim Flis designed SPACE RAIDER with the recommended B6-4. I would expect it to use a B6-2 but the four second delay was fine. Altitude was an estimated 275'.
The pyramid was very stable. A small 8" chute  ejected to bring it home without damage. The instructions suggest a streamer but the small chute seemed a better choice.
This build will be featured on the blog with some additional PDFs for Patreon members. 


We had some new flyers today, turn out was good!


With todays wind I kept to A and B engines. I'm at the age where I don't have to reach a thousand feet or walk hundreds of yards to pick up a rocket.

The Estes GALACTIC TAXI got to 225' with an Estes A8-3.
At ejection the nose cone got a dent and a forward toothpick gun was broken off. Still a good launch and recovery.


Here's the picture of the day 
That's Aleena getting a cheek lick from Beau the rocket dog. 

I like dogs - if they don't bark at every launch. Beau was a very well behaved poodle/cocker mix.


David H. and Mike H. launching a beautifully finished Centuri/Estes Hornet.


Ted flew his Estes Illusion with an A8-3.


Here's my Centuri ARGUS clone with a Estes B6-4. 
I should have went with a C6-5 but was concerned with the wind gusts.
This was a gentle "loft" flight only reaching 225'. A sturdy rocket that should last forever.


Lonnie Buchanon brought out his new Saturn 1B MO2. 
This was a fantasy build - What may have happened with the Saturn 1Bs if early design variants were ever followed through.

A BT-80 based scratch build, highly detailed and very stable.


Last in the air for me was my second BAR  build from 2006, A RED MAX clone before the Estes reissued kit.
You can tell by the gray smoke it's a Q-Jet B4-4. Textbook launch and recovery.

Also flown:
ASP Micro Maxx HAWK using a MMX engine to 65 feet. Streamer recovery.
Centuri VECTOR V clone with an Quest Chinese A6-4. 250' altitude estimate.

A great day until we found out the field would be closed for club launches. I'm sure area searches has already been started.