Tuesday, January 31, 2023

Home Improvement Using Rocket Building Skills

Why include this on a Rocket Building Blog? The skills learned building rockets can teach patience, build confidence and hone skills needed for home improvement.

When I moved into my Townhouse 17 years ago there were very few upgrades. All the fixtures were construction grade, the cheapest available. The toilet paper holders and towel bars were white porcelain looking like something out of the 1950s!
Little by little I've been replacing them with modern chrome or brushed nickel faucets, handles and hardware.  


The old toilet paper holder and wallpaper. 
This old T.P. holder is inset in a square cut into the drywall. It had to be chipped out! 
The T.P. is a bit wet, I was just starting a damp test to soak and remove the old wallpaper.
Wallpaper was removed and the wall joints caulked.
Rocket skills: New caulking - finger smoothed fillets. 

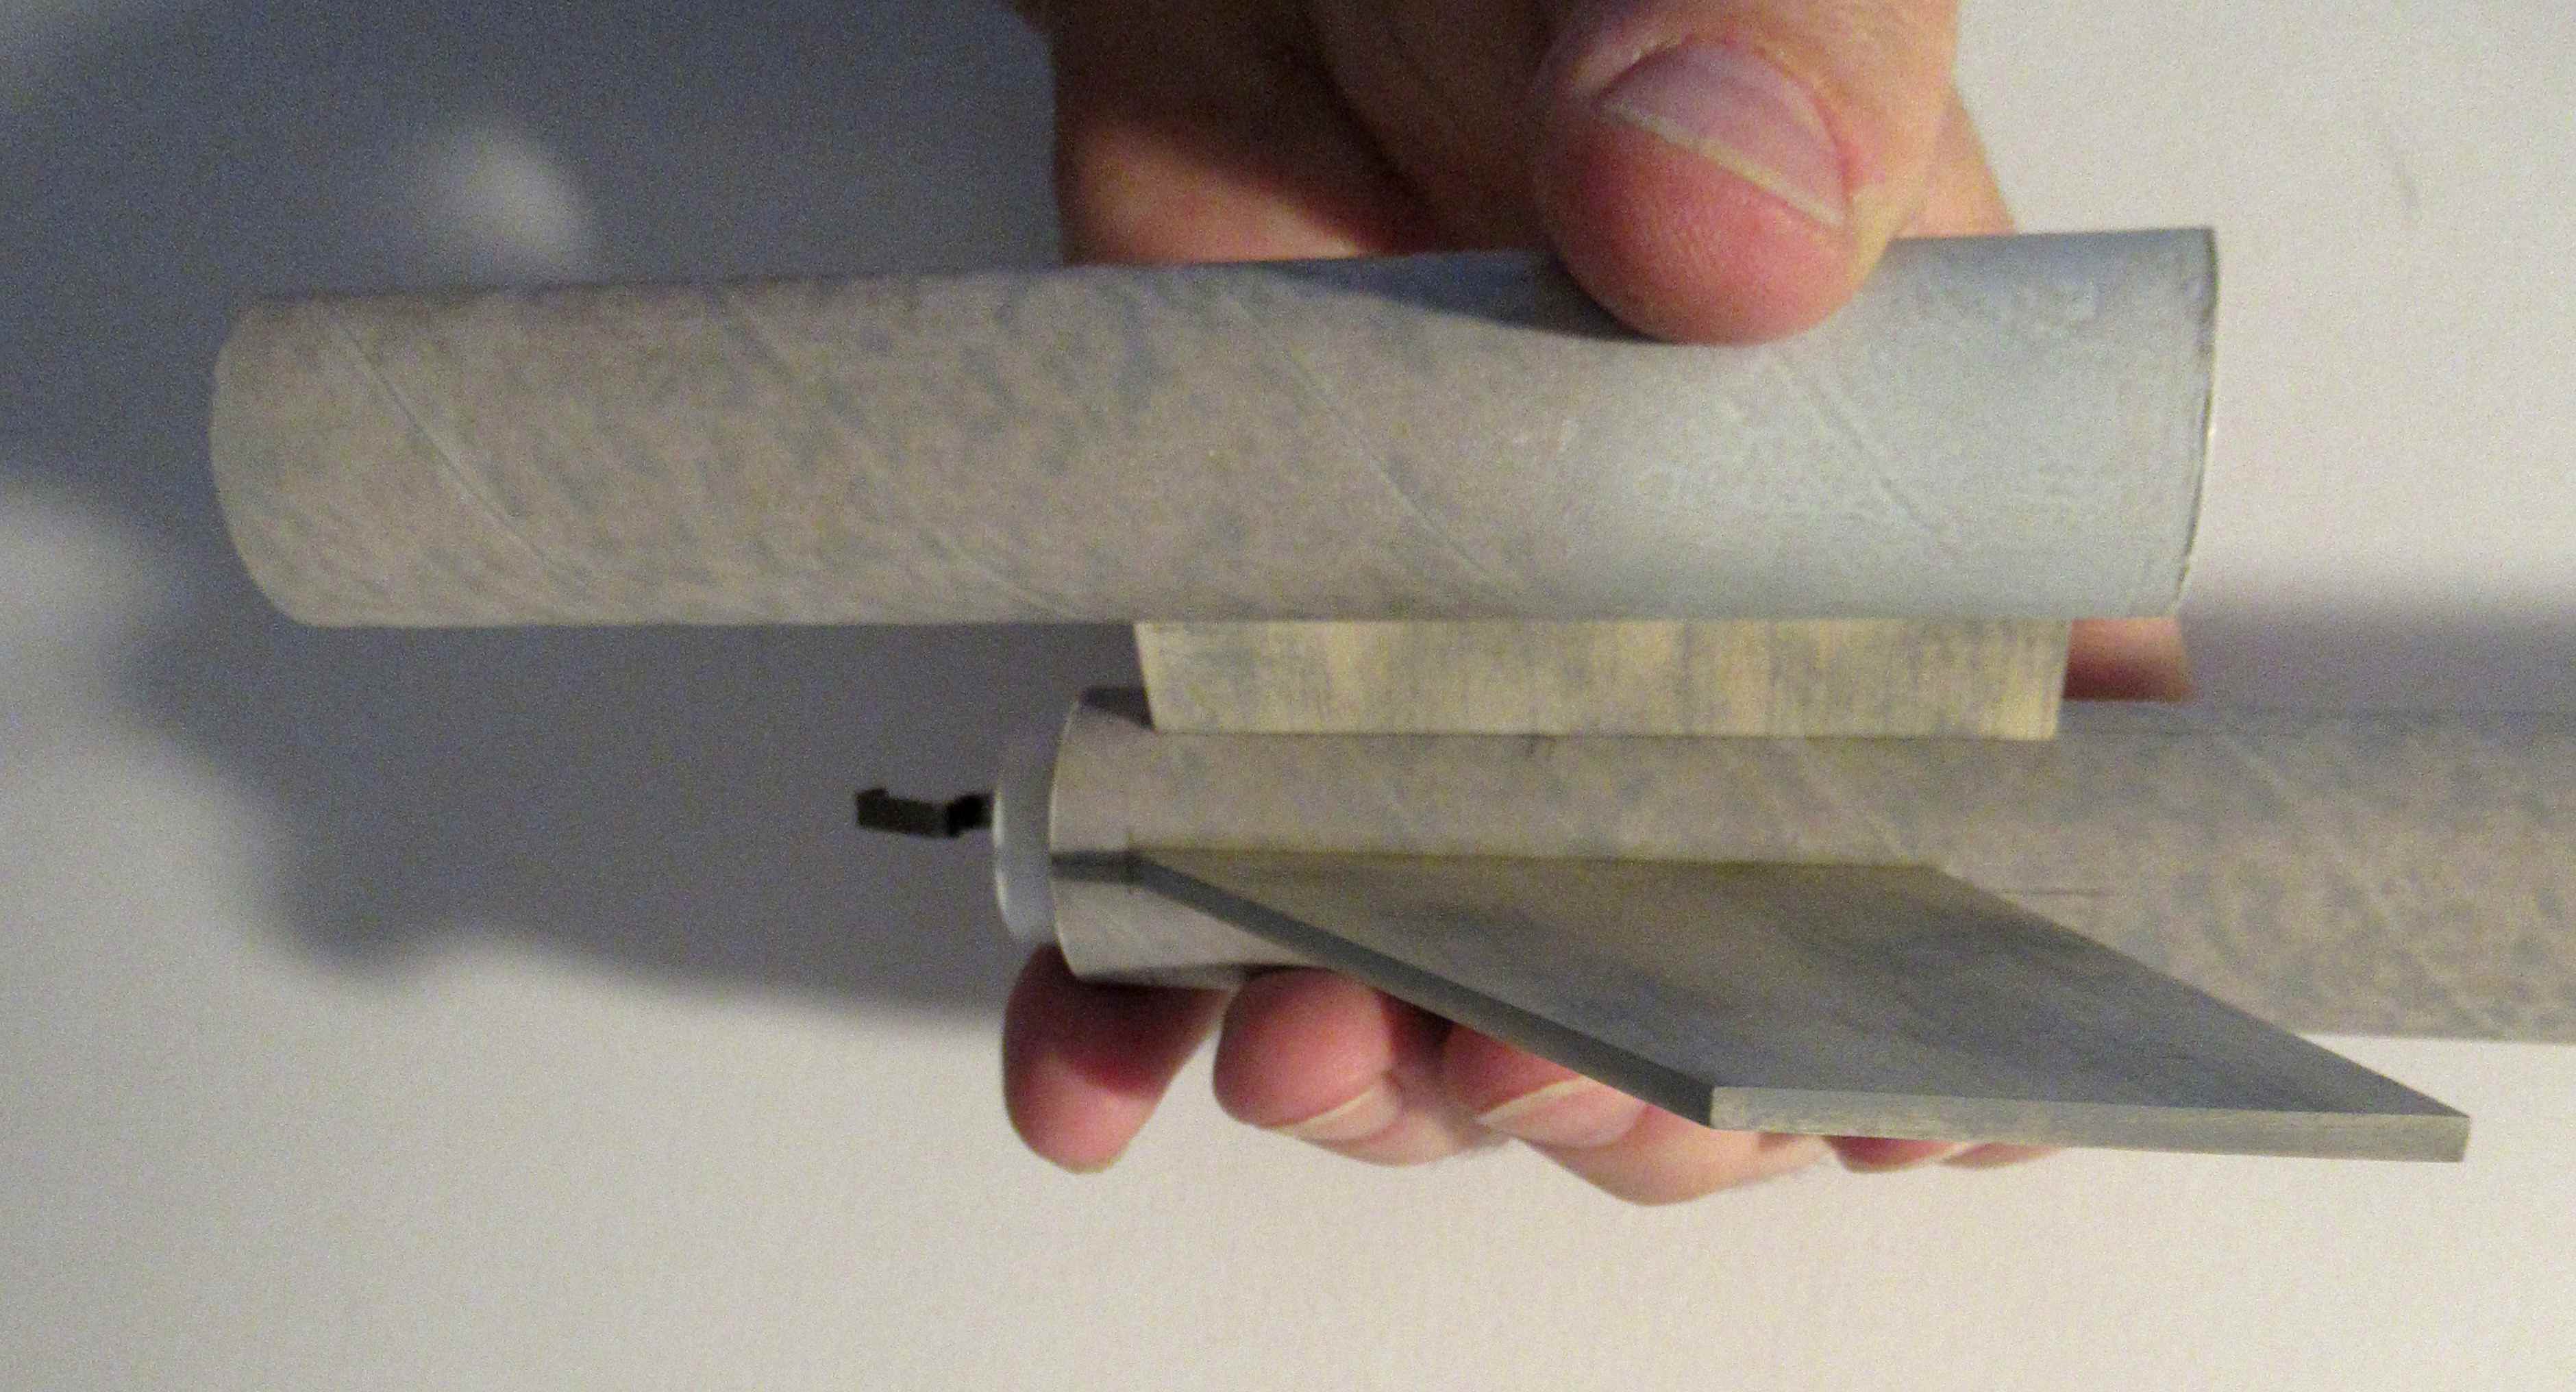
The rough cut out hole was cleaned up for a better fit of the patch. This style of drywall cut is called a "California Patch." Score the back and crack leaving the paper overlap lip.
Rocket skills: Measuring, a few passes using a sharp knife and straight edge.

Apply drywall compound around the edges, flip over the patch and press into the hole. Burnish to smooth out the sides for a feathered in edge.
Rocket skills: Filling and sanding, repeat until smooth.

This wall texture product sprays like a bad can of Rusto 2X Gloss White paint. 
It purposely spatters and gives you a rough texture to match the existing pebbled finish. Using this texture paint is the fun part of drywall patching. A textured, flat finish surface covers imperfections. 
Rocket skills: Flat finish paint can cover rough areas. Gloss paint shows everything!


Old and new, side by side. Before screwing in the new T.P. holder the wall was primed and painted.
Rocket skills: Priming, masking and brush painting.
Much better!

Monday, January 30, 2023

Old Vashon Commercial

An old Vashon (Pre-Estes) commercial ad I found on YouTube:


To see the video: CLICK HERE
The picture above shows an engine/propellant/timer disk test. Vashon Rockets used Freon, a self refrigerant. You could hold onto the filled rocket body and pull the nozzle plug. The aluminum rocket body would get cold as the compressed gas was expelled. 

Sunday, January 29, 2023

Estes BOSS Kit #7316, Build, Finished


The "Propulsion Units" look great with the stepped yellow and black caps.
I've mentioned the use of three colors on models before -
Primary major color is Gloss White
Secondary is Black,
Third trim color is Yellow.


From the top side - The large disk fin.


The underside.


The 12 vane fins,
Nose cone and cockpit decals.

Saturday, January 28, 2023

Estes BOSS Kit #7316, Build, Part 21, Recessing The Shock Cord Mount

The Tri-Fold shock cord mount is glued up.
Note that I've already got the mount formed into a curve, ready to be glued into the body tube.

The mount is recessed 1 1/2" inside the tube.
Mark with pencil on both sides of the cord. This will be your depth guide.


An even coat of wood glue is spread on the tri-fold mount. 

Drop in the mount without touching the inside wall of the body tube. 
Stop when the pencil mark is at the edge of the tube.

It's hard to see in the picture, but the mount is hanging inside the tube, not touching the tube walls yet.


Now you can press the mount into the inside of the tube.
I use a rounded dowel to lightly press the mount into the tube over the entire mount -  from side to side and top to bottom. Don't press too hard with the dowel, you don't want to dent the body tube.

The parachute and shock cord are tied to the small loop on the shoulder of the nose cone.

Friday, January 27, 2023

C'mon Toyota!

This showed up on Facebook today - An ad for a Toyota RAV4.
The quick video on the left shows a rear hatch opens to reveal a rocket already on the launcher. Who does that?

The clip on the right shows the rocket on the ground with a slow flame coming out of the engine.
The rocket is bent, the parachute deployed with the nose cone still in place.

Estes BOSS Kit #7316, Build, Part 20, Upper End Decals


I tried to figure out the decal spacing visually and this is what I came up with.
But you're not locked into this, you can place the decals as you like.


I saved the tube marking guide to help the placement of the Nuclear Logo decals.

I lined up the punched holes over the upper black dot. The pencil line gave an alignment reference for the centerline of the decal.


From the side, lined up with the centerline on the wrap.


The cockpit decal is in place.


The thin bands wrap around doesn't quite match up - almost!
Start and stop on the underside to hide the mismatch.


There are some extra decals left over - hatches and vents. Locations aren't shown in the instructions picture. You can place them where you like.

Thursday, January 26, 2023

Estes BOSS Kit #7316, Build, Part 19, Transferring the BIG Disk Decal


Here's the disk before the large disk decal is placed.

All the position reference tape strips are in place.


I'd recommend cutting these decal close to the black ink, especially around the outside arc.

I cut the disk into smaller "arc" pieces and applied all the outer ring pieces first. The center circle is placed last.

I always wet the surface where the decal will be placed.
TIP: Be careful not to get the water over the edge of the cardstock. It can be absorbed into the sides and swell up the fibers.

I did my best to lightly press and absorb any moisture into a paper towel. After a few hours the raised area did shrink down some, you can still see it - almost!

Wednesday, January 25, 2023

Estes BOSS Kit #7316, Build, Part 18, Overthinking The BIG Disk Decal


TIPS: You'll have to cut the large disk decal CLOSE to the edges of the black ink. (See the cut line directly under the scissors.)
Do a dry fit (no soaking yet) and you'll see how close the decal is to the edge of the round card stock overlay.
The cardstock raised the surface - You probably don't want any clear border hanging over the edge.
The instructions recommend cutting up this large decal for an easier transfer. I recommend placing the decal in pieces.
That could be problematic trying to line up and space all the pieces.

Roll a piece of masking tape and set on the center backside of the blue backing sheet. Place the dry decal centered on the top of the disk. 
This holds the dry decal for some positioning tape markers.


The decal hasn't been cut up or transferred yet, it is still one big disk - 

I placed small strips of masking tape at all the open lines around the outside of the card stock ring on the painted balsa rim. The tape ends stop just before the card stock, keep it just on the balsa lip. 

This gives me a double check when positioning the cut up decal pieces.

Tuesday, January 24, 2023

Estes BOSS Kit #7316, Build, Part 17, Decals!

TIP: Don't start with the large solar array decal on the big disk! Start with smaller decals to get used to the soak times and slide transfers.
    

This SCC 7107 seems to be Star Trek influenced. The ship designation number on the Enterprise was NCC 1701.
The decal is long and subject to stretching. Soak long enough so it easily slides off the backing.

These horizontal decals are a bit tricky with the five different root edge angles.

I found the center of the visual space between the engine tubes and the forward black vanes. The center of the UNITED STATES decal is the space between the two words.


Quite a few small decals to be added, I haven't even started on the forward, BT-55 section yet.

Monday, January 23, 2023

Estes BOSS Kit #7316, Build, Part 16, Black Mask


The disk centers were glued up earlier,
Now they are glued and centered on the yellow front shown in the last post.

Before gluing on the black and yellow disks, the larger yellow disk center had the paint scraped off in the center gluing area.


The only mask left are the coolant vanes (I think that's what they are called) 
I thought spray paint would be difficult to get into the nooks and crannies. I used my ultra fine point Sharpie to black in the cracks.
Here's the black mask - 
The instructions don't show the entire model masked off. I chose to cover everything remaining. I didn't want to take the chance of finding any black overspray later on.

With the tape pulled, we're ready for decals!
I'm not gluing the upper BT-55 body tube on.
These three builds are going back to Estes - the finished model is longer than the plastic shipping box! 
The two segments can be easily glued together in Penrose.

Sunday, January 22, 2023

Estes BOSS Kit #7316, Build, Part 15, Masking The Yellow Disk


The instructions suggest using yellow and black markers to color the raised disk intakes at the front of the engines. I didn't think I could get an even color using markers - I decided to mask and spray.

I had already painted the disks and glued them together. I still have to paint the front of the engine tubes.

Above - I masked using marked Scotch tape to start. The yellow will overlap the edge slightly. This isn't called for in the instructions, it's just something extra I wanted to try.

Some tube masks followed with plastic grocery bag wraps.


Then an entire bag was taped to cover the entire model.


Here's what I was going for - 
A little extra color overlapping onto the tube.

Saturday, January 21, 2023

Estes BOSS Kit #7316, Build, Part 14, L. Lug Move & First White Coats

My kit was pre-production and the instructions weren't finalized. There was a questions about the launch lug position. I found out my guess was incorrect and I had to move the lug and standoff forward. Luckily there weren't any fillets applied, it was easily removed and moved up. Be sure your lug is set between the vanes above it.
    
In the top picture you can see the new lug position closer to the vanes. The paint has been scraped off.
Below that you can almost see the previous lug gluing spot.
I did some light sanding and spot sprayed the old area with filler/primer. The vanes and lower body were masked off from overspray.

Here's the model before the first gloss white coats.
I haven't glued on the big disk yet - I thought it would be difficult to get good spray coverage with it in the way.

The engine tubes are white from previous white sprayings.
It's not shown here - the notched fin (outside edge) was masked to keep the paint off for the glue later on.


Before spraying the body gloss white,
The upper centering rings were also masked off.

Friday, January 20, 2023

Estes BOSS Kit #7316, Build, Part 13, Motor Intake Disks

The medium front motor disks (Parts I) are sprayed black, the smallest dots (Parts J) are sprayed yellow.

The instructions says to use colored markers but I thought I could get a more even color coverage by spraying them before gluing them together.

Both colors were sprayed on the same scrap cardboard. A piece of cardstock covered the smaller yellow disks while the upper disks were sprayed black.
The black disks were covered with the same cardstock and the small disks sprayed yellow.


After the first coats of white and black, the disks got a light sanding.
The black disks didn't need a white undercoat.


The centers of the Part I disks got the paint scraped off for the best glue bond.

The yellow disks are glued in the center circles.

The flat fronts of the motor tubes will be painted yellow before these are glued on.

Thursday, January 19, 2023

Estes BOSS Kit #7316, Build, Part 12, Upper Window Gluing


The marking guide was rolled around the tube and the circles marked with a pencil.


The paint was carefully scraped off inside the marked circles. The glue will stick better to a rough bare tube. 

Before gluing on the windows, 
form the disks into a curve to fit the body tube. Press the sides around a 1/4" dowel or the back of a X-Acto knife handle.

It's hard to see in the picture but there is a curve in the right side picture.


After the first window is glued on, lay a strip of tape down the tube to align the bottoms of the remaining dots.


Repeat on the other side.

Wednesday, January 18, 2023

Estes BOSS Kit #7316, Build, Part 11, Fins, Shock Cord & Windows


The motor tube standoffs are glued 1/4" from the rear of the main BT-50 tube.
Shock cord is a standard tri fold. 
Sometimes I glue the mount in later after the model is painted.

The tri fold mount is molded into a curve to fit the inside of the body tube while the glue in the mount is still wet.
Press it into the body tube (dry) and insert the nose cone to mold the mount into a curve.


The little round windows (Part AA) can be painted black off the model and glued on after the gloss white is sprayed.

The dots were taped down for black spray.


I made a window positioning template out of the upper tube marking guide.

Tuesday, January 17, 2023

Estes BOSS Kit #7316, Build, Part 10, Vane Gluing & Ring Shims

I didn't get photos of the vanes (Parts T) being glued at the upper part of the BT-50 tube.
TIP: I decided not to do glue fillets on the sides of the vanes. There just isn't room between them to smooth out the glue.
Instead, I applied glue only to the root edge and removed the excess before placing on the tube. Try not to get any glue "squeeze-out".

The vane area will be painted black so nobody will really see a fillet anyway. Still, I wanted to keep it clean.

The fit of the two 50/55 rings was loose in the upper tube. I cut a 1/4" wide strip of copy paper and wrapped it once around the centering rings. A glue stick is less wet than wood or white glue in this type of application.


The six forward windows (Part AA) are tiny!
The hold down tics should be trimmed after they are removed from the index sheet.


I sanded off any remaining tic with some 400 grit on my sanding block.

TIP: Keep small parts in a zip-lock style jewelry bag. These are easy to drop of misplace. They'll be easier to keep track of in a bag.