Sunday, February 28, 2021

ASP MMX Jayhawk Build, Kit Corrections Already Made

I had some concerns and was a little confused when building the A.S.P. MMX Jayhawk.
A quick email to Andy at A.S.P. got some easy answers.
I was sent a pre-production kit. Before the kit went into full production, corrections were made in the templates and decals.


On the top is the Main Fin Cutting Guide I had from the instructions.
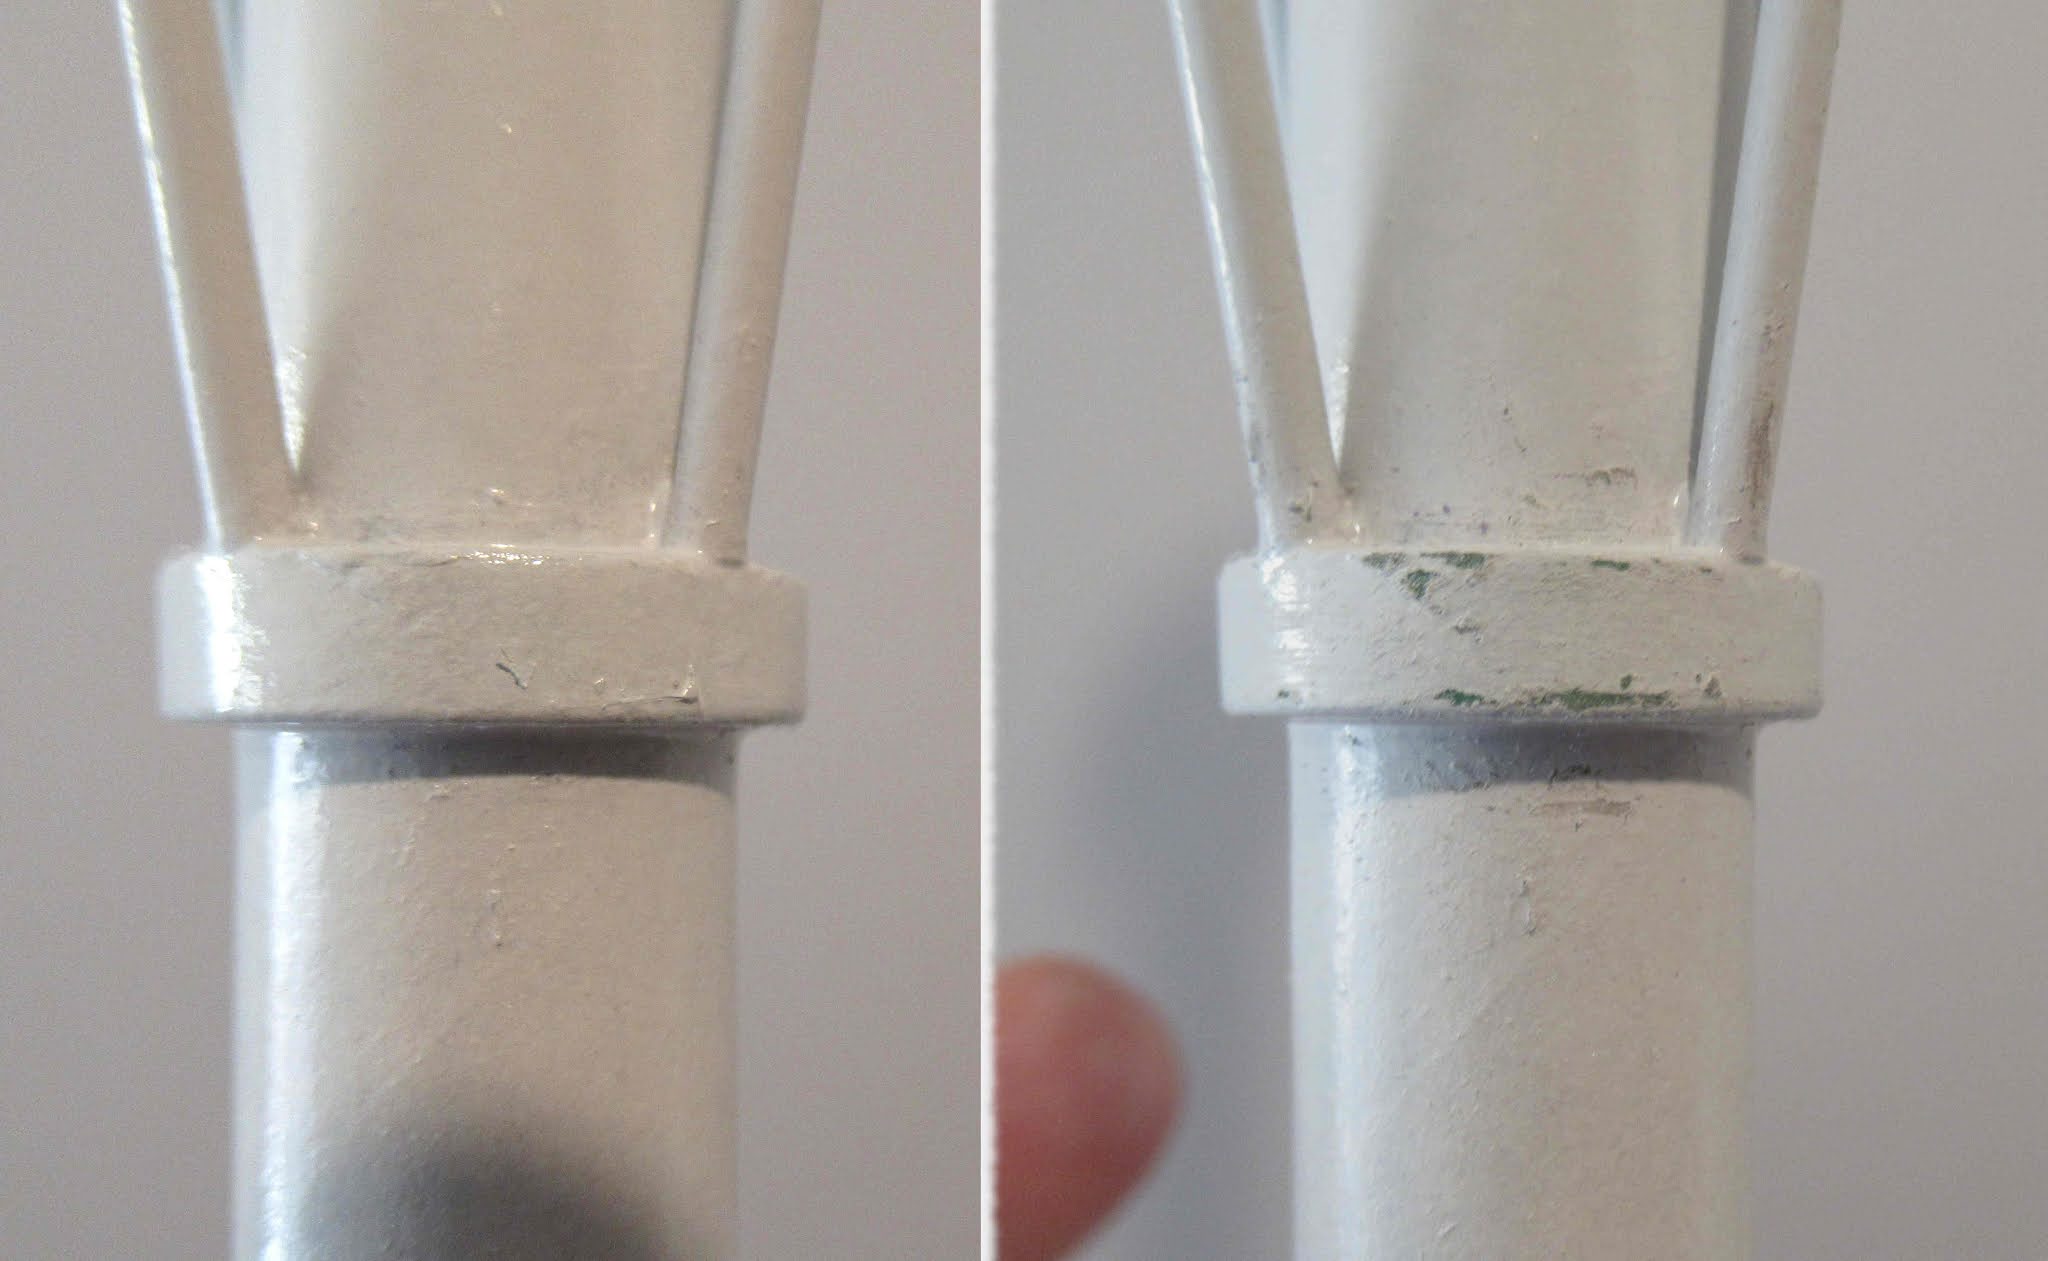
Note the "root edges" designation and arrows.


Here's the corrected version, now in the kits.
The illustration is flipped and the "root edges" are now clear.    
This decal wrap in my kit had one of the Stars and Bars flipped. When wrapped around the body, one star ended up upside down. I simply cut off the stars and bars and turned it over.

The kits now have Stars and Bars in the correct orientation.

I've produced a few kits and can certainly understand how this happens. 
On my Odd'l Rockets F-104 Starfighter kit I left off a measurement. On the first run of kits, the instructions said to glue a cut tube XXXX" from the back end of the model.  The XXXX" was a pre-production place holder for the final measurement. 
Measurements, parts, instructions and templates can change as you go through prototypes and test flights. Producing kits (especially the instructions) takes more time than most modelers realize.

Transporting Rockets?

From the Estes Model Rockets Facebook page, 
John A. Schilling found one way to transport his rockets to the launch site.

Amazon describes the box as - 
"Classroom Keepers Poster & Roll Storage
24" H x 12 1/4" W x 12 1/4" D
Comes with a divider that can be modified to fit up to 16 storage spots

To see the listing: CLICK HERE

It looks like it can comfortably fit BT-60 models. The box is 24" high. 
You just have to be careful of fin contact with other rockets.
It is made from cardboard, some water protection might be needed on the flat bottom.

Saturday, February 27, 2021

ASP MMX Jayhawk Build, Part 4, Fin Gluing & Seam Filling

Note: I've made a correction in the previous Part 3 post regarding the fin templates.
Check Step 3 before cutting out the "wing" fins.   


One of the launch lugs was longer than the other.

I simply cut the longer one down to the length of the shorter lug.

On the left - 
This was when I noticed the outside edge of the wing was too high. It should be the height of the chevron shaped tip piece. I trimmed the leading edge down a bit so the outside edge better matched the height of the tip piece. 

Notice on the right, the leading edge of the fins were rounded. This is an optional step.


There were still some spiral seams on the body tube.
These were filled with CWF and sanded.

A shot of filler/primer and sanding followed filling the seams.
This is one of the few rockets I use CA glue to glue on the fins.
The wing tips were glued on and allowed to dry. A CA glue fillet was applied with a toothpick.
Squeeze out a drop of CA on scrap cardboard. Roll the tip of a toothpick in the glue drop and transfer onto the joint.
 

The small nose cone fin was slid in place and glued with medium CA.

Friday, February 26, 2021

ASP MMX Jayhawk Build, Part 3, Cutting Out The Fins

CORRECTION
On the template, the outside of the left and right dashed lines says "Root Edge". I took that to mean it was the root edge of the fins. I cut out the wrong part of the fin template. Calling the edge of the template the "Root Edge" was a bit confusing.
My knife blade is set on the center triangles - cut out the two solid line triangle pieces in the center.

The Root Edge markings have been corrected in the production kits. My kit was pre-production.


Here's the wing tips - 
The instructions say to use double sided tape. I taped the flat plastic down then taped the template on top of that.
I scored the plastic about halfway through, removed the template and finished the cut. 

When I set the wing tip on the outside edge of the wing fin I realized I should have cut out the larger center wing template. 

This is the little nose cone fin piece.

I cut out the pattern and traced the cut out with a pencil on the smaller piece of plastic sheet.


The dry fit in the nose cone slot is pretty good.

There are some small gaps at the top and bottom. I can fill that with some CA glue on a toothpick tip.

Thursday, February 25, 2021

B8 Engines Coming Soon?

I got my first packs of the new C5-3 engines.
These came with igniters and plugs. 
I wasn't familiar with the light blue plugs, it's been a few years since the Super C engines have been made.

Note the end tag says "B8 and C5". I would think the B8 engines are coming soon -  

ASP MMX Jayhawk Build, Part 2, Parts Prep


Before sliding the couplers into the tubes -

Round off the edges with some 400 grit sandpaper.
The rounded coupler won't fold in the edge of the body tubes.


On the left is the tube ends butted against each other. Small tubes are difficult to cut square.
Square up the tubes with 400 grit on a sanding block.

On the right are the same tubes after sanding and truing them up.
The marking guide matches up and fits the little tube diameter!
Thanks A.S.P.!

Here's the kit supplied small plastic angle to mark the body tubes for the fin locations.

Hang onto the marking angle - you might need it for a future MMX build.


The base and shoulder of the nose cone needed a little squaring up.
Not a big deal - the outside surface was smooth and the slot cut very clean.

Wednesday, February 24, 2021

ASP MMX Jayhawk Build, Part 1, Parts


On the right is my original ASP MicroMaxx Jayhawk. 
I've successfully launched it many times.
It is truly a micro model rocket.

Andy (from A.S.P.) sent me a new version of the kit.
There are some improvements.

On the far left is a small plastic right angle piece, used like a larger aluminum angle to mark the body tube for fin placement.
The white strips are sheet plastic fin material. No filling needed.
The skinny white piece is a half round used to make the tunnel.
Two pieces of body tube. Above that is the solid plastic nose cone.
There are two long couplers. One is used as a coupler. The other is cut for an engine block and gluing spacer.

Notice the pre-cut slot through the nose cone.
There are two short lengths of launch lug.
Two fishing weights to put the C/G forward.

The decals have white ink under the stars and bars!
A length of Mylar streamer material is included. If used, this would have to be cut down to fit in the body tube. 


The instructions are good with plenty of descriptive copy.

Tuesday, February 23, 2021

Estes Mercury Redstone Capsule Tip

When I assembled my Mercury Redstone capsules - 
I scraped and turned a small file to remove paint from the gluing "dimples" in the upper ring. (Shown at the right) With the paint removed I can get a better glue bond.

Here's a great TIP in a comment from LDJBaxter:
"As an experiment on our Little Joe capsule we placed a drop or two of white glue from a toothpick into the "dimples" prior to painting. After the glue dried and the piece was painted we used the hobby knife blade to pop out the glue and had a clean surface for glue."

Thanks Mr. Baxter! A small dot of white glue won't stick to the plastic and when removed makes a great small "point" mask! 

Estes Airborne Surveillance Missile Build, #7257, Finished


This one turned out very well. A good value from the last Estes Cyber Monday sale.

The lower section was hit with a clear dull coat for more contrast.


The upper section - 
The white decals were thin but went on without problems.
The white ink seemed opaque but did show where it overlapped another decal. 


I did have to go back and re-spray the white nose cone. It does look better white.

This build was a good challenge fitting the four dowels and filling twelve fins. Those upper fins are tiny!
 

Monday, February 22, 2021

Launch! L.A.S.E.R., Groveland, FL, February 21, 2021


Wind gusts to 18 mph were in the forecast today.
I prepped my flights with that in mind.

Here's a typical rack ready for launching.


I had launched my downscaled Centuri ALIEN ENCOUNTER SAUCER with C6-3 and C6-0 engines before. I used a C5-3 for the first time today.

While the C5 motors have a higher initial impulse, I didn't notice that much difference from a C6. I would estimate the altitude at 125' with no damage after touching down on the wire legs.


Jim Lytle flew his Launch Pad Sidewinder with a D12-3 motor. There was a little wiggle during boost, typical of the forward fin designs.


Lonnie Buchanon finally painted his profile Vostok. It had earned it's finish after some very stable test launches. 

With the wind it drifted. He couldn't find it on the first recovery search. On the second trip Lonnie finally found it floating in the nearby lake!
They float for quite a while when the tubes and fins are sealed.   


Even with a spill hole cut in the chutes, I had a few long recovery walks. 
My CHEROKEE GOON almost made it to the waters edge.
With the Estes B6-4 it peaked at 325'.


Another Goony - 
this time the NIKE GOON boosted by a Q-Jet B4-4. Estimated altitude was 325'. Recovery this time was much closer.


The wind gusts were hitting more often as the morning progressed. 
I tapered back with an Estes A8-3 in my Centuri VECTOR V clone. 

Textbook launch and recovery. Altitude was probably around 250'. 


Liam bought a few finished models from Jim Lytle.
Here's his Cosmic Interceptor launch with a D12-3 engine.


Mike Hughes Drifter touched down on the hood of my car! No damage to the car, one fin did pop off the rocket. In the picture that fin is still sitting on the hood. 

Two more of my "also flowns".
The final launch of my MMX PIGLET-SUS. It is pretty well worn out, I might make another.

The second launch of my Estes TWIN FACTOR. My first flight was great! This time - not so much. At second stage ignition it turned 45 degrees to the west. I would estimate the altitude at only 75'. 

Six launches - it's great to get out of the house and hang out with fellow rocket nerds.

Sunday, February 21, 2021

Estes Airborne Surveillance Missile Build, #7257, Part 10, Upper & Lower Assembly


I kept the sections separate until after the decals were applied.

No real reason, I just thought it would be easier to apply the decals on smaller, separate sections.
GOTCHA: Before applying a glue ring inside the upper tube, I double checked the position of the upper centering ring on the low section.
The instructions said the glue should be 3" from the bottom of the tube. 

The upper ring is 2 5/8" from the top of the scalloped "D" ring. I placed the glue ring at 2 1/2" so the upper centering ring would contact the glue and push it up the remaining 1/8" to the final position.

This is one of those instances where you can apply the upper ring of glue and a lower ring of glue for the engine mount.
TIP: On larger ring engine mounts, like these 5/50 rings, setting the mount in at an angle lets you clear a lower ring of glue inside the larger tube. Straighten out the mount as you slide the mount in the rest of the way.


Line up the vertical white lines of the decal "Ts" right over the dowels.

The fins should end up in the right position.
 

Saturday, February 20, 2021

Estes Airborne Surveillance Missile Build, #7257, Part 9, Oops & Decals


I'm an idiot!
Why did I leave the nose cone on when the orange was shot? It was already gloss white - the desired final color!
Now I have to re-shoot it . . . shoot.


The upper edge of the lowest ring didn't get a full black coverage, that's okay.
Sharpie to the rescue.


The first decal is a white band that goes around the lower, exposed 5/20 centering ring.

There is a slight overlap at the ends. I tried to "hide" it below the launch lug.

Place the vertical white stripes first.
Center them in the area between the middle fins. The low end is even with the end of the body tube.

These decals required a long soaking to release from the blue backing paper.


Then add the top making a tall "T" decals. 
Do your best to center them so the spaces between them ends up even. It's not easy to get them perfect.

Friday, February 19, 2021

Estes Airborne Surveillance Missile Build, #7257, Part 8, Chute, Lug, Paint & "Mask"


The parachute seems small. I wasn't sure what the diameter was.
I went to the Estes website to learn the yellow print parachute is 9" diameter.

I did my usual tug of the shroud lines, they easily broke.
These were replaced with #10 cotton embroidery thread with an added snap swivel.


The launch lug is glued with the top even with the leading edge of the upper section mid fin. 
Be sure the lug clears the wide points of the scalloped "D" piece.

The model got an overall coat of gloss white spray paint. This is when you find the glue blobs and rough areas.

The green ring (Part E) had some spots that needed fine sanding before the next white undercoat.

The upper section was set over a taped dowel for painting. I might go with a gloss orange instead of the face card red color.
Why? Because I'm a rebel.

The lower half was readied for the gloss black paint. The two upper centering rings were masked off for a better glue bond.


Thursday, February 18, 2021

Estes Airborne Surveillance Missile Build, #0867, Part 7, Fin Gluing


The largest lower four fins are glued on.


The smaller eight upper fins are glued onto the segment of the BT-50 tube. 
The wraps of tape let me line up the leading front edge tip of a four fins evenly, all the way around.


Here with the fins tacked on you can see how the tape line is used to set the fins on evenly.

The tape alignment wrap comes in handy when you have fins that aren't glued on even with the rear edge of the body tube. 
The upper and lower segments are not glued together yet. 
The lower BT-5 section will be painted black, separately.  The upper BT-50 section will be painted red separately. This makes a clean color separation with no tricky mask.

The nose cone isn't tied in yet, it'll be painted white off the model. Again, no masking!