Showing posts with label FK Saturn V. Show all posts
Friday, August 9, 2013
MMX Saturn V Comparison
Here's the two smallest, flyable Saturn Vs out there.
On the left is the recently finished Fliskit Saturn V.
On the right, the Quest plastic Saturn V.
Without an engine installed -
The Fliskit Saturn V weighs .08 oz
The Quest Saturn V weighs .23 oz, almost three times heavier!
The Fliskit Saturn has a slightly smaller diameter than the Quest model.
With the rear shroud of the Fliskit model, they are almost the same height. Flis advertises their theirs as the smallest flying Saturn V.
It is slightly smaller and much lighter. It will certainly get better altitude.
Regarding the longer vertical black bars at back end of the FlisKits Saturn V - Earl Cagle made a recent post on TRF:
"There was one Saturn V (the 500-F facilities checkout mockup Saturn V from May, 1966 timeframe) that had the lower roll pattern . . . but no flying Saturn V did."
Earl
I thought the lower roll pattern was taller than I remembered.
It's an easy fix, just cut the tops down a little above the "U" in the vertical red USA.
The roll pattern on the Quest Saturn model is closer to the truth.
Thursday, August 8, 2013
FlisKits MMX Saturn V Finished
This was not a level 1 build!
The nose cone tapers were a challenge to get right.
The fin skirts took a lot of coaxing to stay shaped when gluing.
The finished model does look good. The decals add the right amount of trim.
It's flown twice already - very stable.
It falls slowly after ejection of the streamer. The tail cone really slows the descent.
Wednesday, August 7, 2013
FlisKits MMX Saturn V Build Part 12, Streamer Install
The supplied Kevlar line was pretty long, I cut off a few inches.
On the Flis MMX kits the Kevlar is attached to the nose cone with a small nail. This kit had one of the newer, split brad nails.
Press a pin hole in the cone shoulder. Tie a knot in the Kevlar.
Squirt glue into the hole. Press the knot into the hole.
Apply more glue to the hole and press the nail in place locking in the Kevlar.
The instructions have you tape the streamer halfway down the Kevlar line.
With the streamer halfway down the Kevlar, the nose section would hit the lower body during recovery.
I taped the streamer as shown in the picture so the nose section is between the streamer and lower body.
On the Flis MMX kits the Kevlar is attached to the nose cone with a small nail. This kit had one of the newer, split brad nails.
Press a pin hole in the cone shoulder. Tie a knot in the Kevlar.
Squirt glue into the hole. Press the knot into the hole.
Apply more glue to the hole and press the nail in place locking in the Kevlar.
The instructions have you tape the streamer halfway down the Kevlar line.
With the streamer halfway down the Kevlar, the nose section would hit the lower body during recovery.
I taped the streamer as shown in the picture so the nose section is between the streamer and lower body.
Monday, August 5, 2013
FlisKits MMX Saturn V Build Part 11, Decals
The lower band decals have to be cut apart to fit around the fairings and launch lug.
The vertical black bands seem too tall. To fit around the top of the skirt it was raised above the top of the scalloped ring.
The USA decal to the left of the launch lug was set right against the lug.
Cut it out and apply separately from the other decals.
The upper decal can be applied in one piece.
Just be sure the vertical black bars are set right above the bars on the bottom.
The left sides of the skirts are painted black, the fins are painted silver.
At first I tried to use a fine point Sharpie to do the black but the black match wasn't good.
The Sharpie line did give me a straight black line down the skirt.
I ended up painting the skirt with some black paint and a brush.
Friday, August 2, 2013
FlisKits MMX Saturn V Build Part 10, Gluing Fins
I probably should have glued these on before the first white coats.
The paint was scraped off the fairing center line where the fins are glued.
A drop of glue was set down and the root edge drawn through the glue drop.
Use tweezers to hold the fin and set them in place on the fairings.
All the fins are in place.
Fillets were applied down the root edges.
Light color coats were sprayed and rough spots showed.
These were sanded smooth with 400 grit.
Thursday, August 1, 2013
FlisKits MMX Saturn V Build Part 9, Cutting Out Fins
The kit supplied fins are printed on a single layer of 110 lb. card stock.
I wanted them a little thicker.
Some scrap 110 lb. card stock was creased and folded.
A glue stick was applied and the stock folded over and burnished.
The fold will end up being a rounded leading edge.
The printed fins will be used as a cutting pattern.
The fins were taped over the doubled card stock lining up the leading edge of the fin over the edge fold in the card stock.
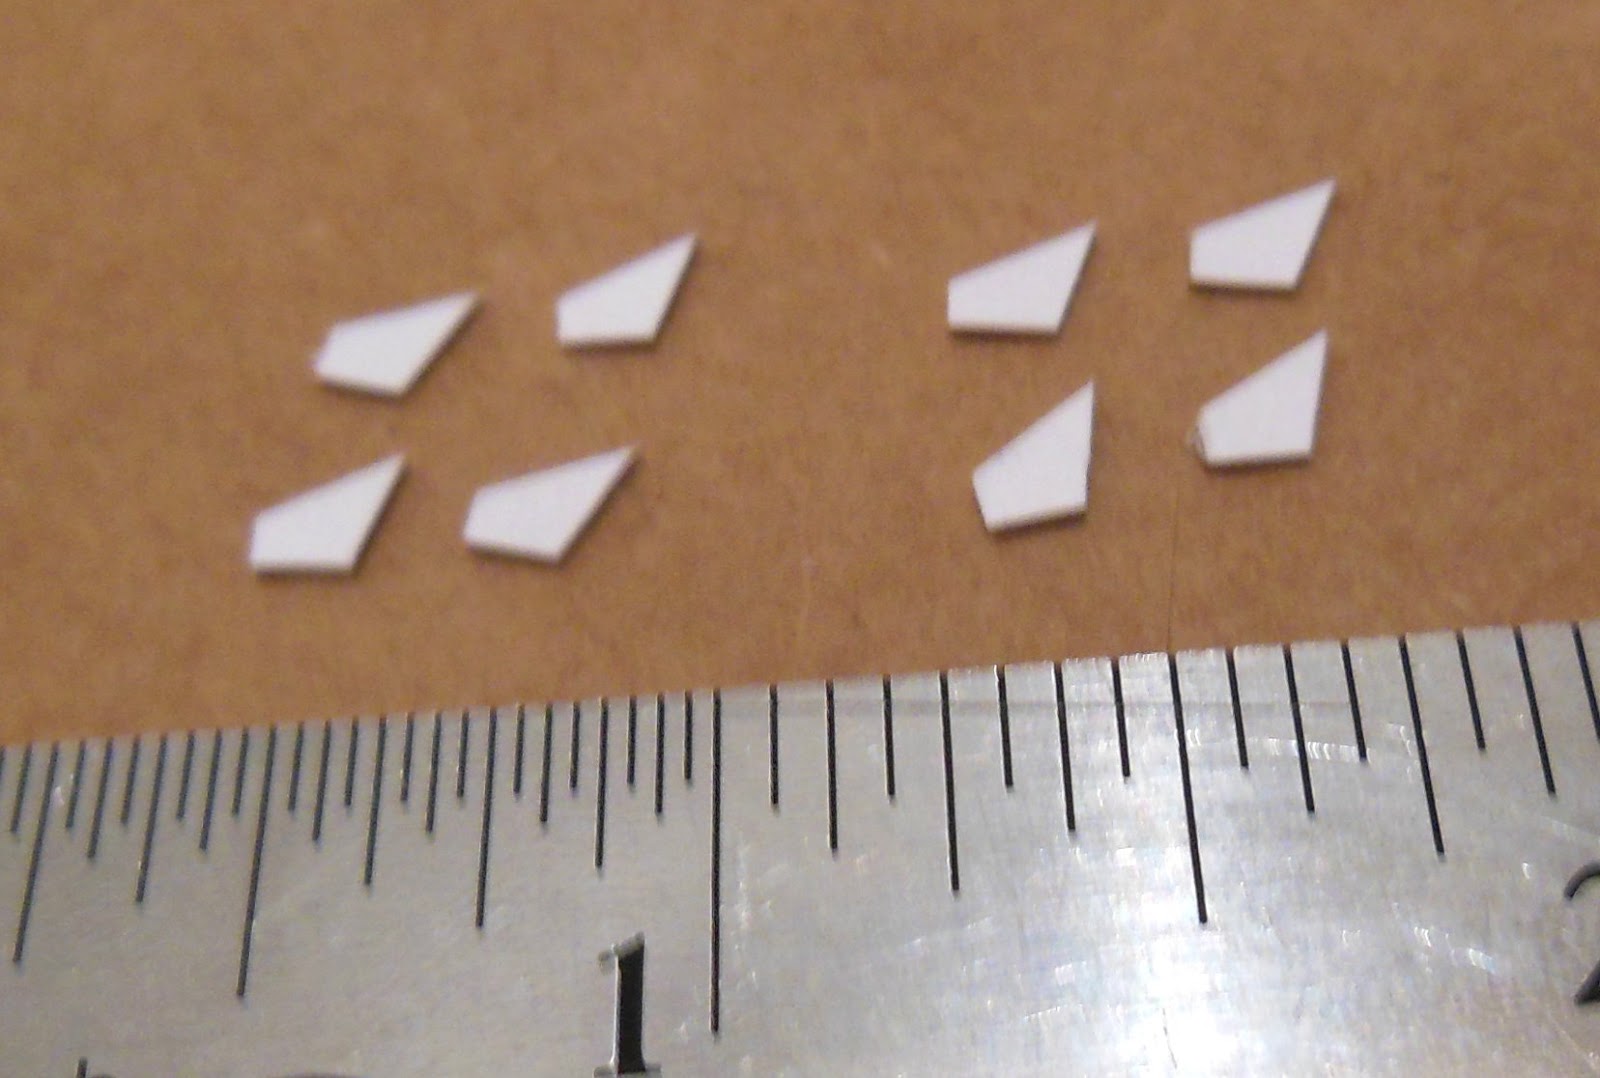
Fliskits always gives you extras. The kit supplied eight fins.
I cut out that many from the doubled card stock.
I picked four of the best, the ones that were closest in size.
The four on the left will be used on the model.
Wednesday, July 31, 2013
FlisKits MMX Saturn V Build Part 8, Escape Tower
The escape tower is a small round plastic rod.
You have to drill a small hole for the rod to glue into.
The CM part of the nose cone is already pointed.
I decided to flatten the point slightly to make it easier to set the center hole.
A needle is slowly pressed in. Press a little and check to be sure the needle is straight before drilling any farther.
The instructions say the "tower" should extend only 3/16" above the tip.
That looked to be a little short. I made mine a bit longer.
Tuesday, July 30, 2013
FlisKits MMX Saturn V Build Part 7, Drag Shroud & Launch Lug
The drag shroud is printed in black on 110 lb. card stock.
Before cutting out the shroud, the launch lug hole was made using the smaller barrels of the rotary punch. The lug hole is oval shaped.
A larger center hole was punched, two smaller holes were punched outside of that to make the oval.
The white edge was blackened with a Sharpie.
To show the difference, only the bottom half (near my thumb) has been blackened.
Most people use too much white glue when joining the edges of a shroud. You only need a very thin coat.
After you are sure the tab alignment is correct you can burnish the tab down rolling a dowel over the glued area. I set another dowel inside the shroud for a still backing.
Inset picture: the hole needed to be widened slightly to fit over the engine mount tube. I flared out the opening with a dowel.
TIP: The edge of the shroud was hardened and "set" with a coat of medium CA.
This will waterproof the edge and protect it from a wet grass landing.
The supplied launch lug is 2" long. It seemed too long when set down the side of the small model. (Upper picture)
I cut the lug in two an it seemed less noticeable. It should still be plenty long for a stable slight off a MMX launch rod.
Monday, July 29, 2013
FlisKits MMX Saturn V Build Part 6, Engine Skirts
A dowel was sharpened to form the skirts over.
You will want to preform the skirts before any gluing.
The length of the taper was the same as the height of the skirt.
The tip of the dowel was rounded off.
Press the dowel into the skirt over your fingertip.
Do enough pressing so the shroud keeps it's full form when removed.
I drew the glue lines with pencil before any glue was applied. I wanted the glue inside and under the skirt edges. The thin glue lines were set down transferred on the tip of a toothpick.
The skirt was picked up with a little glue left on the toothpick tip.
The sides of the skirt should be straight, not rounded.
While the skirt is still wet with glue you can "mold" it by pressing the edge in with the side of a toothpick.
Keep working the skirt until the glue starts to set up. Go gently, the paper stock of the skirt is thin.
Here's how it looks with all four skirts in place.
The back end of the skirts overhangs the scalloped ring a bit.
You will want to preform the skirts before any gluing.
The length of the taper was the same as the height of the skirt.
The tip of the dowel was rounded off.
Press the dowel into the skirt over your fingertip.
Do enough pressing so the shroud keeps it's full form when removed.
I drew the glue lines with pencil before any glue was applied. I wanted the glue inside and under the skirt edges. The thin glue lines were set down transferred on the tip of a toothpick.
The skirt was picked up with a little glue left on the toothpick tip.
The sides of the skirt should be straight, not rounded.
While the skirt is still wet with glue you can "mold" it by pressing the edge in with the side of a toothpick.
Keep working the skirt until the glue starts to set up. Go gently, the paper stock of the skirt is thin.
Here's how it looks with all four skirts in place.
The back end of the skirts overhangs the scalloped ring a bit.
Sunday, July 28, 2013
FlisKits MMX Saturn V Build Part 5, Engine Skirts
The instructions simply say to "roll" the skirts to shape.
They are printed on the instructions, the paper looks to be 24 lb.
I decided to make a form to shape the skirts on.
A dowel was sanded down to the same diameter as the back end of one of the centering ring scallops.
The dowel was shaped to a point, the same length as a printed skirt.
You are given eight skirts, you have four extras.
I drew more on the bottom of the page for practice.
After cutting and fitting a few practice skirts I found out the best way to cut them out.
The sides and tip (on right) are cut just inside the black lines.
The wider base of the skirt (on right) is cut just outside the bottom curve.
They are printed on the instructions, the paper looks to be 24 lb.
I decided to make a form to shape the skirts on.
A dowel was sanded down to the same diameter as the back end of one of the centering ring scallops.
The dowel was shaped to a point, the same length as a printed skirt.
You are given eight skirts, you have four extras.
I drew more on the bottom of the page for practice.
After cutting and fitting a few practice skirts I found out the best way to cut them out.
The sides and tip (on right) are cut just inside the black lines.
The wider base of the skirt (on right) is cut just outside the bottom curve.
Saturday, July 27, 2013
FlisKits MMX Saturn V Build Part 4, Nose Cone Taper Sanding
After sanding and lifting up the nose cone,
The sawdust left on the block shows I was sanding more on one side.
Make adjustments and try to sand the adapter area flat.
Don't change the shape of the adapter angles.
Here's the nose cone after all five surfaces were sanded smooth.
Sanding again after the primer filler coat.
Friday, July 26, 2013
FlisKits MMX Saturn V Build Part 3, Nose Cone Filling
Looking ahead, I tried to figure out filling and painting.
The BT-4 body tube had no seams! At least none I could feel.
The launch lug is long and I could feel the seams with a thumbnail.
First up, rough the surface so the CWF will stick to it. 400 grit was used to take off some of the gloss.
The tapers in the nose cone will be interesting to sand.
After brushing on some CWF, pencil lines were drawn around the high and low spots. These will help as a sanding reference.
This tungsten carbide sanding block surface stops right down the side.
You can sand up to the edge without sanding down the adjoining angled surface.
Check the sanding dust on the block. It will show you if you are sanding the sides square.
The BT-4 body tube had no seams! At least none I could feel.
The launch lug is long and I could feel the seams with a thumbnail.
First up, rough the surface so the CWF will stick to it. 400 grit was used to take off some of the gloss.
The tapers in the nose cone will be interesting to sand.
After brushing on some CWF, pencil lines were drawn around the high and low spots. These will help as a sanding reference.
This tungsten carbide sanding block surface stops right down the side.
You can sand up to the edge without sanding down the adjoining angled surface.
Check the sanding dust on the block. It will show you if you are sanding the sides square.
Thursday, July 25, 2013
FlisKits MMX Saturn V Build Part 2, Engine Mount
The engine mount is similar to a 18mm style, just smaller.
The engine block is set with an engine casing. 1/8" of the casing extends out the back.
The scalloped ring is set into the glue fillet on the rear centering ring.
The engine skirts will form and glue over the scallop circles.
The instructions tell you to notch the forward ring for a Kevlar tie.
There is a small hole already laser cut in both rings.
I used a small rat tail diamond file to clear the hole making it large enough for the Kevlar to go through.
I didn't knot the Kevlar but wrapped the loose end under the loop a few times. A knot might bulge the body tube, there isn't much clearance between the mount tube and mainframe tube.
This will be plenty strong after a glue fillet is added over the top.
The engine block is set with an engine casing. 1/8" of the casing extends out the back.
The scalloped ring is set into the glue fillet on the rear centering ring.
The engine skirts will form and glue over the scallop circles.
There is a small hole already laser cut in both rings.
I used a small rat tail diamond file to clear the hole making it large enough for the Kevlar to go through.
I didn't knot the Kevlar but wrapped the loose end under the loop a few times. A knot might bulge the body tube, there isn't much clearance between the mount tube and mainframe tube.
This will be plenty strong after a glue fillet is added over the top.
Wednesday, July 24, 2013
FlisKits MMX Saturn V Build Part 1, Parts
I found the MMX Saturn V the most interesting of the new releases from FlisKits.
Here's all the parts -
It's advertised as the "World's Smallest Flying Saturn V".
I checked - the Quest MMX Saturn stands 5 3/4" tall. The FlisKit Saturn V is 4.65" tall.
Some parts of interest, clockwise from the left:
Water slide decals that take care of most all of the trim.
The card stock sheet with the fins and drag shroud
Plastic streamer recovery
Scalloped ring that forms the rear edge of the engine skirts
Balsa nose cone forming the upper stages
Small plastic rod for the launch escape tower.
On the back of the instruction sheet are the engine skirts.
Jim Flis always gives extras on pieces that might be hard to make the first time around.
Thanks Jim - a great idea for small parts.
Subscribe to:
Posts (Atom)