
Wednesday, April 23, 2025

New Way Letter - Go Build, Part 1, Parts


Rick from New Way sent me a prototype for a upcoming kit.
The LETTER - GO is a robust BT-60 design, but with a custom fin design.

The fins spell out your name from left to right going around the tube!
The fins are laser cut plywood and thru the wall.
The kit should be available after this summer's NARAM. The kit doesn't include the shorter fin attachment tube and letter fins. You send back the coupon with your name request and your custom letter fins are returned to you. Your name could have three, up to six letters. The number of fin slots will be custom cut to fit the length of your name.

This could be a great personalized Christmas or Birthday gift for a rocket flying family member.


Here's the specs. 
It's almost the size of a Big Bertha. It might be upgraded to a 24mm mount As the fin root edges don't reach the motor mount tube. 
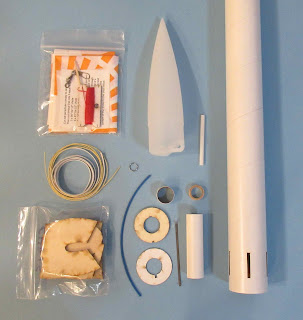

All the parts:

A multi-sized (12, 18 and 24") parachute.
Kevlar (with a blue shrink wrap tube for ejection charge durability)

The engine mount as a cardstock lower centering ring and a plywood upper ring. This gives extra strength for the Kevlar line looped beneath the upper plywood ring. 


Parts of interest:

Water slide name decal with vinyl trim strips
Small metal chute ring for chute attachment
Engine hook retainer ring
That blue shrink wrap tube that goes over the Kevlar line
Two of the letter fins spelling out my name
The New Way sanding and Q-tip build bag.

Tuesday, April 22, 2025

Porthole Tube Fitting - Tip


For the new ROBOT prototype, I needed to fit short tubes, glued horizontally to the (vertical) main airframe tube. 

These are a like the "portholes" on the old Centuri Skylab model, only larger in diameter. 
To see the Centuri Skylab: CLICK HERE
Wrap some 220 grit sandpaper around your main airframe tube.

Sand the tube end against the sandpaper with a back and forth motion, to the left and right. Sand in a straight line.
Try holding the smaller tube still and moving just the larger tube with the wrapped sandpaper.


On the left, the curve sand is about half way through. More sanding is needed until - 

You get the best fit with no gaps.


The outside layer skin will tend to fold under.
Lift out with a fingertip and lightly sand off with some 400 grit. 


Here's a good fit of the Robot head on the neck tube.

This technique rarely comes up, but could come in handy one day.

Monday, April 21, 2025

Not A Tri-Fold Mount - Tip

This type of shock cord mount feels stronger than a thin paper ti-fold mount. It can be used on BT-55 and larger tubes. I wouldn't recommend using this in a BT-20 or BT-50. In smaller diameter tubes, the shock cord knot might block the ejection of a parachute.


Cut a rectangular piece of body tube, from the same diameter as your main airframe tube.

Tie your shock cord around the rectangular piece.


Glue into the body tube with the tail of the shock cord pointing up. The rectangle mount is already rounded to match the inside curve of the main airframe tube.

Be sure to recess the mount deep enough to clear the nose cone shoulder.

This shock cord mount design was used in some Centuri kits.

Sunday, April 20, 2025

D.I.Y. Couplers - Tip


I needed a coupler "sleeve" to fit a Centuri sized ST-18 (1.8" diameter) tube.
This is for a second prototype of a possible Odd'l Rockets ROBOT kit.

You can't find couplers in this size so I'll have to make one using a 1" length of the ST-18 tubing


Cut the coupler in a straight line using scissors.

Slip the cut coupler and mark the overlap with pencil.
On the left, you can see the pencil line.
Cut off the overlap, not directly on the line, but a little large.

Test the fit in the outside tube. 
Is it is too tight, you can sand to fit with some 220 grit on a block. 
Enlarge the right side picture to see a perfect fit in the tube.


Friday, April 18, 2025

Engine Burr - Quick Tip


Before sliding an engine into an engine mount tube - 

Check the top end of the engine. Many have roll over "burrs" that can start fraying a BT-20 size tube. This can happen with the thin blue (Estes) or yellow (Quest) engine mount tubing. 


You can compress the burr down by rolling on a hard surface.

Better yet -
Sand off the burr using some 220 grit on a block. Just roll off the end.


Here's the rounded, sanded off burr.
Don't take off too much, just enough so it doesn't rub or lift the inside layer of the spiral wound tube.

Estes Advanced Target Drone, Kit #1913, Build, Finished


A clean design with high contrast decals.
The intakes are a highlight.


Wing fins are wide.
The rudder and strake fin on the other side are asymmetrical.


The nose cone is simply red, clean with no canopy.
Out of the ordinary from other standard 4F/NC rockets.
 

Thursday, April 17, 2025

Estes Advanced Target Drone, Kit #1913, Build, Part 16, Overlay Decals


Sorry I missed a day, I was camping with no internet!

The Air Force logo is centered on top of the white decal set down earlier.
Before doing an overlay decal like this, be sure the white underlay is completely dry.


The USAF letters are centered onto the white rudder stripe.


The ATD 0416 decal was white in the Estes kit, I printed it in blue. 
Set onto the red paint it almost looks black.

To get a good center position of the three white side decals, center and mark the paper template.


At the top of the tube you can see a small piece of masking tape with a center mark. 
Set down the background white underlay decal first,


Let dry and follow with the Air Force decal.
Look close and you can see the white decal underneath. But, it's close enough for me.