Tuesday, December 31, 2024

Estes Black Star Voyager Build, Part 1, Parts


Quite a few tubes in the kit - 
The long tube in the middle is a heavy wall, 24mm tube.
There is clay for nose cone weight and a 3/16" diameter launch lug.

There are two sheets of laser cut thick card stock.

Five sheets of laser cut balsa, all 1/16" thick.

The water slide decals are printed in white and orange. 
I wish the paper was a light blue, it's easier to see the white against the light blue backing paper.


The nose cone has 12 raised ribs, from the tip down to 1/2" above the shoulder. Something I hadn't seen before.

To the right are the nine basswood strips. Later in the build the are cut at a 45 degree angle and rounded.

Monday, December 30, 2024

Estes Black Star Voyager Build, Background

I purchased this kit in 2013. I looked forward to the build until I studied the instructions. 
Estes has recently re-released the Black Star Voyager, now kit # 9725.
Remember the intake assemblies in the QCC Explorer and the engines on the Low Boom SST? 
The multi-piece fins on the Black Star Voyager are also built up out of 1/16" thick balsa. 
I dug out the kit, and dug into the build. It's a Skill Level 5 or "Expert" build.
Get ready, this is going to be a detailed assembly!


This is a tall model, almost 40" in length.
Lots of cardstock vanes, I counted 27 in total. 
On the upper tube there are 9 basswood strips.

The model is powered by D12-3 and E12-4 motors.

Saturday, December 28, 2024

2024 Top Ten Builds, Part 2

Continuing from build 5 to number 1 -


5. Enerjet by Aerotech STRONG ARM

A great missile design, no masking.
The large graphics décor looks great!
While I'm not a fan of slightly raised stickers, most large mid and high power rockets use stick on vinyl anyway!


4. Estes Astron CONSTELLATION

A classic reissue from the "Estes Vault".
I posted a earlier build from a few years back showing an alternative to the balsa fin tip pods.

3. Estes SKYTRACER clone

This clone required a complete decal draw and construction of the engines from various pen parts and nose cones.
The nose cone canopy was fashioned from cardstock.


2. Estes CONDOR 

Built from an original kit.
This reminds me off a smaller Orbital Transport. 
I was lucky, the old decals transferred just fine.
And the best kit and build of the year - 


Number 1, the New Way/Old Way

A clone kit of the Estes Nike Ajax model from 1976!
Tall and detailed, the build was a good challenge. 
This picture only shows the upper half!

Friday, December 27, 2024

2024 Top Ten Builds, Part 1

Here we go again - The TOP TEN builds of 2024! 
    These are personal preferences, you may not agree with my choices.
    Picks are based on design, engineering, instructions and construction.

Click on the model names to go to the builds. 
Searching builds like the Great Goblin might bring up every post where the word "Goblin" was mentioned. Scroll down to find the kit build you want, then to the bottom of that post and click on the Label "E Great Goblin". That will focus on the individual build, in reverse order from finished model to start.
  
You can SEARCH "Top 10" to see builds from previous years.
 
 
10. Estes MINI BERTHA

A mini engine clone from the 1970s Estes Mini Brute line. It was fun looking back on the Mini Brutes I owned as a teen.


9. Enerjet By Aerotech ARREAUXBEE HI 

A large scale tribute to the original Model Missiles Aerobee Hi model rocket.
While not a true scale model, it captures the spirit of the first model rocket kit design.

8. Carded MINI GOBLIN
A rebuild of a carded MMX rocket. This was one I've wanted to draw-up and build for quite some time.


7. Estes GREAT GOBLIN

This was a show build for Estes and is now on display in Penrose.
Interesting built-up fins.


6. Enerjet by Aerotech INITIATOR

Sorry, there is not a full blog build for this one - 

I built five of these for Aerotech, three flight and two show versions. It's a great introduction into mid-power rocketry. I found it hard to match the red nose cone paint to the red ink on the stickers.

The rest of the Top 10 tomorrow!

Thursday, December 26, 2024

Estes (Semroc) Constellation Finished


A real classic, now available from Estes as the K35 Astron Constellation.

I finally got the landing pods right this time!
I was never happy with my first attempts carving them out of balsa layers.
The white edged "1" decal looks good against the single black fin. It was worth the extra effort.

The nose cone shoulder is well hidden behind the black bands.

There are a few decals left over, some black rounded rectangles. I'll save them for another build. This model shared many of the same decals as the two-stage Shrike kit, CLICK HERE


Wednesday, December 25, 2024

Merry Christmas!


MERRY CHRISTMAS
From the Model Rocket Building Blog and Odd'l Rockets!

Tuesday, December 24, 2024

Estes Constellation Build Part 18, White Trim on the "1" Decal TIP

Before soaking the trimmed red decal -
Have a sheet of decal paper sprayed with gloss white paint. This will be used for the white edge. Spray a clear sheet with white getting full coverage. Let dry thoroughly. No clear coat is needed on the white sheet, the white paint seals the surface. You'll be making a composite decal, the red "1" set on the white border base.


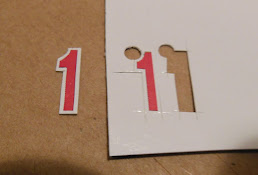
On the left is the two trimmed red "1"s.

You'll need tweezers to hold onto the decal when soaking.

Dip the decal for 15 seconds and remove from the water.
Change the position of the holding tweezers so the entire decal is soaked.

Set the decal on the sprayed white decal sheet.
Use you rotary punch to get the upper left round edge cut.
This punch sets the thickness of the white border.

On the left is the trimmed decal with the new white border.
On the right is the second decal being trimmed.
Be sure your straightedge is perfectly positioned before cutting the white border.
You get one chance to get it right. Use a new blade.


I was surprised how well the red stayed on the white backing during the re-soaking. It didn't shift when sliding off the backing paper.


The "2" and "3" decals are wider than the "1".
It was set between the pencil lines.


And finally, the engine hook was scraped clean of paint and polished with some 400 grit
.

Monday, December 23, 2024

Estes Constellation Build Part 17, White Trim on the "1" Decal TIP


The Semroc clone kit didn't have any white ink on the decal sheet.
The original Estes kit had a black fin that needed a white border on the #1 decal. Here's how I made a white border so the red decal would show up against the black fin. 

The "2" and "3" decals were applied.
I drew up a simple paper wrap that folded over the leading edge for easier positioning. This folded piece and pencil marks are identical on both sides.

These numbers were set down a bit, closer to the landing pads as shown on the catalog page.


Now the tricky part: 

The black border is cut off the "1" decals.
The top of the "1" isn't really rounded but nobody will notice the difference.
I'll never get a smooth round cut with my hobby knife, so I selected the appropriate size barrel on the rotary punch.
Just punch off the black edge.


Carefully set your straightedge and trim off the remaining black borders.

Just leave the smaller red "1" in the center.

TIP: Notice the straightedge is turned over. Sometimes I want the edge closer to the surface of the cut without the cork backing raising it up.

Sunday, December 22, 2024

Estes Constellation Build Part 16, Single Black Fin Mask

I wanted the model to match the old catalog pictures. The Semroc face card shows all three fins in white. One fin should be black. For the red and black "1" decal to show up on the black, I'll add a white edge to the decal in the next post. This is not not easy to do, plan your finish after reading the next post.


I used marked Scotch tape for the mask. It takes a lot of straight pieces to round the airfoiled leading edge shape.


The rest of the model is covered with cheap masking tape and grocery bags.


TIP:
 Another use for the Q-tips-
They make a good cushioned burnisher for the taped mask lines.
No scratching, just a well set tape edge.

Saturday, December 21, 2024

Estes Constellation Build Part 15, Masking The Clear Payload Tube

The face card shows the upper and lower ends of the clear payload tube painted black.
The black paint will cover up the balsa shoulders on the nose cone and nose block.
On the left is the line mask using the marker drawn Scotch tape.

The center was covered with masking tape.
It's hard to see the exposed clear tube ends, you can see the reflected light on the upper right.
Small pieces of masking tape are in the top and bottom, sticky side out.
Two rolled up pieces of paper (yes, those are Sudoku puzzles) were stuck in ends.


After the tape was pulled, here's what I was shooting for.


The black paint just covers the exposed balsa shoulders.
The clear payload tube plastic accepts the spray paint very well.


Easy red mask -

Tape the shoulder of the nose cone and paint it gloss red.
Instant, sharp color separation.

Friday, December 20, 2024

Estes Constellation Build Part 14, Fin Gluing


There is a light paint ridge where the fillet area was masked.

Lightly sand the ridge line with 400 grit sandpaper.


The fins were glued on using my prototype Odd'l Rockets FinTool. 
(The Fin Tool never went into production and is not for sale.)

The fin trailing edge is even with the back end of the body tube.
The rear end of the launch lug is even with the front edge of the fins.

Thursday, December 19, 2024

Estes Constellation Build Part 13, Fin Prep


Before spraying a white coat to check for flaws, a small bit of the root edge was masked off.
This was to keep some of the fillet area clear for a stronger glue joint.


After a light coat of gloss white the tape was removed.
You can see the fillet area is clear of white paint.


The pencil fin lines on the body tube were roughed up with 220 grit on a block.
After sanding off the lines they were drawn on again.

Wednesday, December 18, 2024

Estes Constellation Build Part 12, Primer Sanding


Here's the body tube and nose cone after the primer filler was sanded down.
The nose cone was slipped into the body tube for primer painting.
The clear payload section will be trim painted later.


The fin and fin pod transition joints looked pretty good after spraying with the primer filler.
The primer was sanded with 400 grit
.


There is plenty of inside edges that need to be sanded.

TIP: Here's another use for the Q-tip swabs.
Roll a piece of 400 grit around the cotton tip.


This gives you a small, round cushioned sander with no sharp creases in the rounded end of the sandpaper.

Tuesday, December 17, 2024

Estes Constellation Build Part 11, Odds & Ends


This lug standoff probably isn't needed, the payload section isn't wider than the low end tube.

This style of standoff goes back to when Estes sold it's "C Rail". The dowel standoff fits the C Rail launch rod.

TIP: A BT-50 tube reinforcement coupler was made out of a split piece of body tube. This was glued in place in the tail end, pushed in place with the engine mount.

I'm tired of BT-20 and BT-50 models crimping and buckling right above the fins. That's a weak point when the model touches down.

This coupler should strengthen that weak area that's prone to bending.
After the strengthening coupler was pushed into place the engine mount was quickly removed.


Another line of glue was applied with a dowel end and the mount slid into place. The rear centering ring is even with the back end of the main air frame tube.

To be sure the ring is flush, the last 1/2" was pressed in place with the flat side of my sanding block.


The rear ring was "sealed" with some medium thickness CA applied with a Q-tip.
This hardens the outside surface and can be smooth sanded with 400 grit.

Monday, December 16, 2024

Estes Constellation Build Part 10, Nose Cone and Adapter Details

On the left is the nose cone and adapter from the Semroc kit.
You'll see these shoulders through the clear payload section when the model is finished. I usually sand these flat then round the edges.

On the right is the dry fitted payload section with the rough ends smoothed out.

TIP: To get a sharper edge on a balsa nose cone shoulder -

Brush on some CWF just slightly over the edge.
I'm not covering the entire nose cone yet, just the shoulder edge. this leaves the nose cone dry to hold on to it.

Slide the nose cone shoulder into a squared BT-50 tube.
Turn the nose cone and CWF on the shoulder onto the tube top edge.

Turning the nose cone base forces the CWF into the shoulder lip.
In the picture you can see the raised ridge of CWF at the bottom.
Slide the nose cone back out and let dry.
Sand off the raised CWF ridge with a block.
The nose cone shoulder lip will be stronger and the edges sharper.