Thursday, July 3, 2014

Estes Specials (Clearance Items)

While I expected to see a Big 4th of July Sale at the Estes website, they are now listing all the sale items as "Specials".
EDIT: It is now listed as a 4th of July Specials on the home page.

Many of the same rockets are listed from the past sales held in observance of:
Easter, Father's Day, Mother's Day, Groundhog Day, Prince Johah Kalanianaole Day, Arbor Day, Jefferson Davis Birthday, Rosh Hashana, White Cane Safety Day and Kwanzaa.

The page title says "Specials"
But the web address line says clearance.
http://www.estesrockets.com/clearance/

Great prices on all listed items.
Gee, how many more Super Alphas can I put into storage?

Ebay Score!

This was one of those:
"I'll bid but if I don't get it, no big deal."
I got it for a great price at $37.50! 
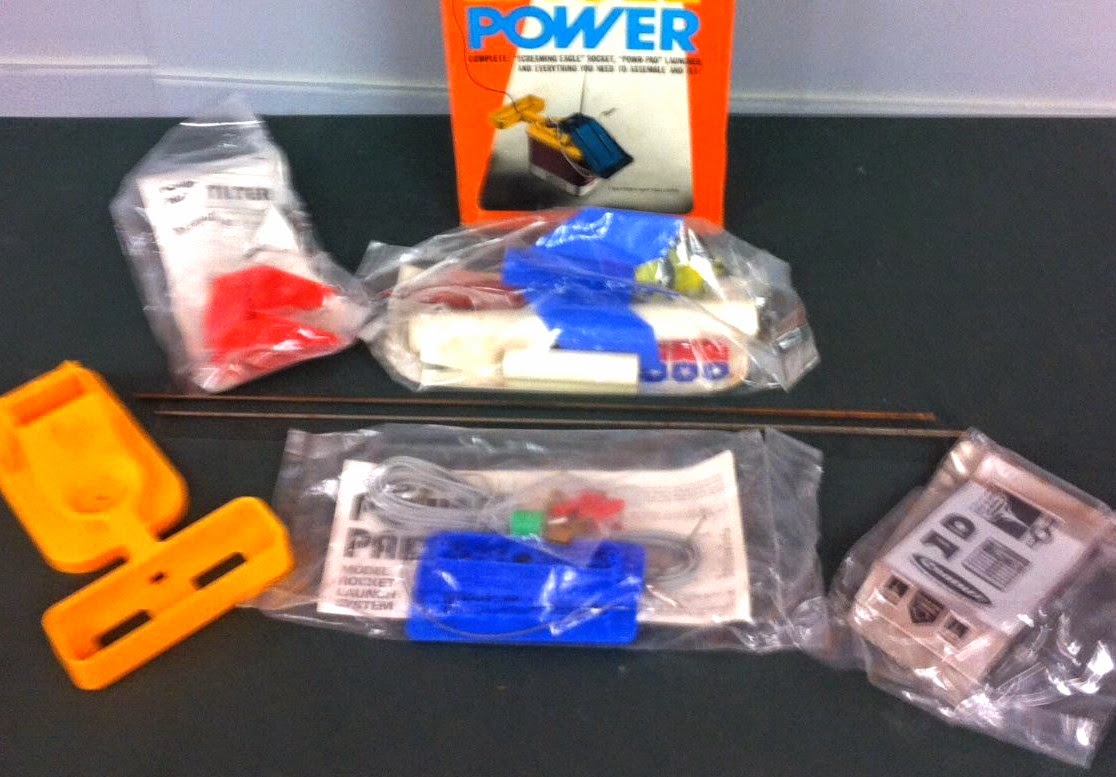
This is the Centuri Eagle Power Starter Set.
It looks like it was bought and stored, only opened once for the Ebay pics!

I always thought the Screaming Eagle was innovative with the well designed plastic fin can and chrome stickers. (I don't mind stickers if they are chrome.) One of the better looking starter models out there.
The launcher base was also interesting. A six volt lantern battery gave it some weight and stability.
The wire leads wrapped around the hand held controller and stored in the carrying handle.
The Safety Key "Medallion" could be worn around the your neck so there would be no chance of it staying in the controller.

It's all here and the bags are unopened.
Even the after market Powr-Pad Tilt Adjustment is there.
The earliest sets didn't include the tilt piece.

I don't see any engines, tho.
Production dates were from 1973 until the last Centuri Catalog in 1983.

Here's the blue fin can for the Screaming Eagle model.
I'll have to wait to see if the body tube has yellowed or not.

This is one I'm looking forward to checking out.

Fliskits MACME Shrew Build, Part 6, Tube Marking and Cutting

On the first try, I didn't mark the long internal engine mount tube with red and black lines. (Parts 4 & 5)
Heck, I'm stuck in Mexico and don't know where to find the fine tip pens.
I used the instruction drawing and place the centering rings by eye.

Trust me - Mark the tubes with the red and black reference lines!
The tube segments and their placement will be easier with the lines.

These are the pens to use - Ultra Fine Line, Paper Mate Flair style pens.


The Black an Red lines are drawn on opposite sides down the length of the BT-5 tube.
To the left of the black line is a pencil line for the launch lug location.

Note: This is a white BT-5. The kit came with a brown tube. I ruined the brown tube cutting out the segments incorrectly the first time.


Wrap and tape the cutting guide tightly around the tube.
When cutting you don't want the guide to slip.

Be sure the black and red lines are lined up with the designated lines on the wrap around guide.
Start at the top end and work down to the bottom.

TIP: When cutting a small tube like this, it's easier to keep the blade still and rotate the tube under the blade.
Cut about 1/8" at a time, adjust and cut 1/8" more.
As always, never try to cut a tube with one pass. Multiple light cuts are better.

Wednesday, July 2, 2014

No Tangle Shroud Lines Article

I wrote a new article for the Apogee Peak Of Flight Newsletter #368 on:
PREVENTING TANGLED SHROUD LINES

To read the article - CLICK HERE

This is a simple way to tie and attach no-tangle shroud lines during construction.
It takes an extra minute or two but you'll have "clear" parachute shroud lines before and after flights.

While this article was originally going to be a series of blog posts, I felt it was important enough to reach a  larger audience.

Fliskits MACME Shrew Build, Part 5, Tube Segment Cutting - Wrong!

Again, this is not the correct way to do it!
In the next post I follow the directions and do it right - 

I used the A Section cutting guide to mark the low end of the BT-5.
This lowest section is underneath the tail cone shroud.
The other sections will be cut near the printed color edges.


Here's the before and after on the A Section cut.

While the pattern piece sides are "bell" shaped, when they are squared up the tube ends are flat and at an angle.


The segments were cut just outside the printed color area.
This way I can sand the tube ends flat with a block right up to the edge by removing the white area.
If I were to cut right on the edge the segment might end up being too small after sanding the edge flat.


Here I'm sanding down the white edge up to the red printed area.
By the time you get close to the color, some of the white paper may roll over the edge.
Push the white lip down and lightly sand off.


Tuesday, July 1, 2014

Fliskits MACME Shrew Build, Part 4, Body Wraps Before Cutting - Wrong!

The glue stick I bought for this trip was crap!
The Staples stick didn't lay down an even glue coat. You could never smooth this mess out.

Travel TIP: If you are stuck in Mexico and need a glue stick look for the brand shown in the inset. The DieTrix brand stick made a thin even clear coat on the backs of the MACME skin pieces below.


Enlarge and read the "NOTE:" in the FlisKits directions. This probably should have been placed earlier in the instructions.
I printed up extra body skins before leaving. They were also clear coated.

The instructions have you cut the body tube segments after marking with the body wrap. The skins would then be cut out and glued on to each part.

I thought I had a better way to do it (see the picture at the right)
Rather than cut the tube segments, then glue on the skins, why not glue on the skins first then use the printed edges of the skins as a guide to cut the tubes . . . WRONG! 

It's just too confusing. Mr. Flis had a better way to keep track of the segments and their position on the internal tube. I'll re-cut another BT-5 and follow the directions this time.

Hand Painted Estes Leviathan


From YORF, Here's a Leviathan by Kimble29

Estes Leviathan built and FINALLY painted
"Took forever to paint this thing. Lots of different reasons but I finally got it done. I went with a WWII fighter plane theme for this rocket inspired by one of my kids toy planes. I just kinda winged and figured things out as I went along. I did the girlie "nose art" last and it's pretty small... just over 3 inches tall. No decals on this rocket, everything is paint. The rivets actually came out a lot better than I thought they would and I heeded the advice I got in regards to painting them in a previous thread and used a micro brush to apply them. All in all I'm pretty happy with the outcome and I definitely learned a few things along the way. Enjoy the photos!"


NO DECALS HERE - All the detail work and rivets are hand painted!
This is a great example of patience and a steady hand.

To see more pictures CLICK HERE


Kimble29 did some great WWII Bomber Nose Art and a tribute to his wife Melissa.

Inspiring work -
Once in a while somebody gets it right!

Here's another example of some great hand painting:
CLICK HERE