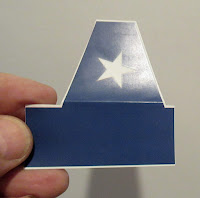
Note: The right side of these pictures faces the nose cone end of the rocket. Note how the edges are cut - close to the printed image. On the fin stickers - No overhanging clear areas.
Previously I mentioned not to do a sharp crease. You'll have to make a definite fold, but don't make it so sharp that the ink cracks.
Center the piece noting the even white space of the fin border around the sticker.
WET THE STICKY SIDE and WET THE FIN to allow for lifts and repositioning.
Set the fin side first, press in place, Push the root edge fold into the root edge and press. Then roll the rectangle area around the "tube".
On this fin can I had to go back and touchup the exposed yellow plastic from the shaved rod.


The images of this post nails down one of the things that had been bugging me about the sticker sheet (in particular how it relates to the depiction of the rocket on the facecard).
ReplyDeleteI went back to the image on the facecard and noticed some things that make me ask if the markings had been "photoshopped" in (e.g. the shape and orientation of stars don't seem to match the angle of the fin surface they're on, the stylized falcon doesn't look right, the banded marking doesn't match the surface angle).
Hi Naoto,
DeleteI'm sure the face card pictures were photoshopped. The stars are a little different than the face card picture. That's not unusual in kit development. These builds were for Quest. I'll be sending along my concerns (18mm engine mount and stickers) with the finished models.
One thing that I'm unsure about is what was originally intended with respect to the blue areas on the fin can. Was it supposed to be an uninterrupted field of blue (which the facecard image seems to suggest), or was there supposed to be a gap (what you'd get with the stickers).
DeleteHi Naoto,
DeleteThe face card does show a continuous blue area going around between and below two fins. The kit stickers don't allow for this. While I could have tried to fill the area with blue paint before applying the stickers - I knew it would be a hard color match.