Thursday, May 31, 2018
Apogee Payload Altitude Rocket, Finished
I hope readers are seeing something different in these competitions builds. They are a good change from ordinary sport rocketry. Light weight and low drag.
Decals have been printed but not yet applied.
All my competition rockets will be the same theme in single fluorescent colors. The same font will be used for the model names.
My NAR number will be another small decal.
Nose Cone Weights - Lead! TIP
On YORF, DavidQ made some round, flat nose cone weights from lead fishing sinkers.
David was cloning a K-11 Estes Wac corporal. These are his pictures -
These are "Bullet Weights" egg shaped sinkers.
Lead is soft and malleable.
A few hits with a hammer to flatten it out, then some shaping and cutting.
You end up with an old school flat and round nose cone weight.
This style weight is a good choice if you don't want to hollow out the nose cone or use epoxy to retain the weights.
The old Estes NCW-1 lead nose cone weight was 11/16" diameter and around 1/16" thick. The diameter would allow them to sit under the shoulder of a balsa nose cone and inside a BT-20 body tube.
A single weight was 0.12 oz.
Wednesday, May 30, 2018
FlisKits News
From TRF, a post by MALBAR 70 -
EDIT: From TRF -
BEC asked: Did he say why?
Malbar70 response: I believe it is so he can spend more time with his family, mainly his grand kids. He also wants to focus on his career as an educator.
Malbar70 added: As I understand, there may be some negotiations in the near future.
Another Bit of Bad News for LPR
Saturday morning at NSL, Jim Flis announced the closing of Fliskits model rocket company. The closing will take place sometime between the middle of September to sometime in December. Now is the time to grab that Fliskit model you have been eyeballing.
EDIT: From TRF -
BEC asked: Did he say why?
Malbar70 response: I believe it is so he can spend more time with his family, mainly his grand kids. He also wants to focus on his career as an educator.
Malbar70 added: As I understand, there may be some negotiations in the near future.
Apogee Payload Altitude Rocket Build, Part 9, Paint and Weight
I didn't use CWF in the body tube seams.
Primer/Filler was sprayed and most all of it sanded off.
I wanted to paint the model with fluorescent paint, but you have to use a white undercoat with fluorescents.
The trouble is - fluorescent paints are flat and the surface is rough. This flat finish adds surface drag.
TIP: You can shine up a flat finish with polishing compound. After you polish, additional gloss is obtained with a soft cloth and lots of elbow grease. This is not a full gloss finish, but a decent semi-gloss shine.
TIP: Putting a gloss clear coat on a fluorescent finish will diminish some of the "glow". A fluorescent will end up looking closer to a normal orange paint. Still a glowing color, but not as effective.
The small 8" parachute is partially packed inside the red coupler.
It's fine and will be pulled out at ejection.
My model weighed in at .45 oz.
On the Apogee website their finished model weight is .54 oz.
Maybe the thinner, airfoiled fins and omitting the engine block helped out!
Tuesday, May 29, 2018
Apogee Payload Altitude Rocket Build, Part 8, Pop Launch Lug
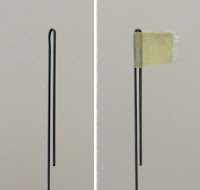
The doubled tip of the top wire is bent to allow an easy insertion and removal in the hole in the body tube.
I'll be using the altimeter vent holes already in the upper payload tube.
This is the bent wire that friction "clips" behind two facing fins.
The initial bend is adjusted to fit each individual model and fin shape.
Both the top and bottom wires are either taped or attached with glued card stock to the top and bottom of the long launch lug.
For an easier fit of the top wire, the hole was formed so the upper end of the hole is pushed out a bit. The low end of the hole is pushed in at the same time. I used a small rat tail file to press and form the hole, I didn't file or removed any body tube wall thickness.
On the left is the pop lug beside the body and ready to place on the model.
On the right - The upper bend is slid in one of the altimeter holes.
The sides of the lower wide bend are set behind two facing fins.
The pop lug will stay on the rocket long enough for it to get up to stable speed. At the top of the launch rod the tape wraps stop the lug, leaving it on the rod. The rocket continues up without the drag of the launch lug.
HISTORY: As far as I know, the Pop Lug was designed by Col. Howard Kuhn of Competition Model Rockets or C.M.R. He came up with many rocketry innovations including the smart, simple Kuhn Tube Cutter. C.M.R. was the first to manufacture lightweight vacu-form nose cones and egg capsules.
Monday, May 28, 2018
Apogee Payload Altitude Rocket Build, Part 7, Pop Launch Lug
I'm going old school, I hope pop lugs are still allowed in competition! I hope to find out find out before going to NARAM.
In the comments below, let me know if they are still used in contest flying.
These instructions are from the OOP CMR V.I.P. kit
Two different wire bends are made.
The upper bent wire goes into a small hole in the body tube.
The bottom wire is bent into a rounded "W" and is held on by going around the fins.
Both wires are taped (or card stock strips are glued) around a launch lug. According to the CMR catalog, the launch lug is around 5" long.
The pop lug is fitted on the rocket at the launcher. A wrap or two of tape goes onto the top of the launch rod. At ignition, the rocket slides up to the top of the launch rod. The top of the pop lug hits the tape wrap and is left on the rod. The rocket continues on its flight without a launch lug.
I'll be using one of the altimeter vent holes for the top bent wire insertion. The upper bend will be a doubled over wire as opposed to the single end.
The first bend is easy enough, near the center of the wire.
TIPS: The tape strip is to direct the next bends. I found it very hard to get the "mirrored" bends accurate. Setting small tape strips at the bend points lets you set the pliers at the same place on both sides.
On the left is the two outward bends. That first tape strip is removed.
Two more small strips of tape set up the next bends.
The bottom is bent round and the width of the half circle sets the wire end tight to the side of the down wire on the right.
More in the next post . . .
Sunday, May 27, 2018
Apogee Payload Altitude Rocket Build, Part 6, Shock Cord and Parachute
The Kevlar shock cord is glued into a tri-fold mount.
TIP: Glue the line (whether it's elastic, rubber or Kevlar) diagonally down the card stock. When the mount is folded and glued, the line will zig-zag inside and the mount will sit flatter inside the tube.
The flatter the tri-fold mount - the less there is to block the ejection of the parachute.
While the glue is still wet on the mount, roll it around an engine casing to form it to a curve. It'll better fit the inside of the body tube.
Plastic reinforcement rings are provided.
I set them close to the "corners" of the chute.
The finished 8" parachute. I added a small snap swivel.
Apogee Payload Altitude Rocket Build, Part 5, Fins
The supplied kit fins are 1/16" thick balsa.
I wanted something thinner for less resistance. I bought some 1/32" thick plywood for my competition builds.
This stuff is so thin and stiff I can cut it with scissors.
I didn't do an exact copy of the kit fins, my fin shape was closer to the old Estes Sprint style.
One great thing about plywood fins - the wood layers act like a depth guide when sanding airfoils! The change in color helps you sand to a constant thickness.
The fins are glued onto the laser cut lines.
The trailing edge of the fin lines up at the small horizontal line on the tube.
With only 1/32" of root edge, the fin joint is strong after the glue dries.
Saturday, May 26, 2018
Glue Bottle Nozzle Switch TIP
These small "Goes On Purple, Dries Clear" Elmer's glue bottles were on sale at a local office supply store. I didn't buy them for the color changing glue.
A large bottle of yellow Carpenter's Glue could last me for a few years. The nozzle tips don't last that long and can be replaced.
On the left is the larger, flat nozzle found on a Carpenter's Wood Glue bottle. You can use this nozzle to build a rocket but you won't have much control over the glue flow.
The pointed nozzles from a smaller white glue bottle (school or the purple glue) will fit the threads on the Carpenter's Yellow Glue bottle.
This idea has been covered on the blog before, but it's been while. New readers could find this helpful.
Apogee Payload Altitude Rocket Build, Part 4, Nose Cone Sleeve, Smoothing The Edges
The short section of BT-20 is glued into the thin vacu-form plastic nose cone with some medium super glue.
The fit seemed loose so I added some white glue to to the shoulder to increase the outside diameter.
Here's the slip fit of the nose cone into the upper payload tube.
The nose cone is held in place with a wrap of thin tape for flight.
This is the back end of the low body section.
You can see the laser cut fin gluing lines. The cross line towards the bottom is the placement of the trailing edge of the fin.
The engine is also held in place with a wrap of tape. An engine block is provided but won't be used to keep the weight down.
With the back end getting a wrap of tape, I like to add a wipe of CA glue to strengthen the tube. The inside of the tube also got some CA applied with a Q-tip.
There is a tube edge "step" where the payload section joins the coupler sleeve. To smooth it out, CA was applied to the edge and smooth sanding with 400 grit.
Friday, May 25, 2018
Apogee Payload Altitude Rocket Build, Part 3, Payload Assembly
The fit of the bulkhead and red coupler tube were a little loose.
A bead of glue was run around the outside of the bulkhead wall. The coupler was marked 1/2" from the top with pencil. More beads of glue were run around the outside of the coupler and allowed to dry. These dry glue lines slightly increase the outside diameter.
Glue was applied inside the low end of the BT-20 sleeve tube with the larger holes at the top. These are the inside vent holes for the altimeter.
The red coupler was slid in up to the pencil mark.
Notice the laser cut line and the pencil line drawn down from the large hole. These are for alignment of the payload tube gluing.
Three smaller holes are pre-cut in the payload tube. These have to be lined up with the larger holes underneath on the sleeve tube segment. The inside larger holes give you a little extra leeway when gluing and sliding the upper tube in place.
Apply glue inside the upper tube, slid over the lower sleeve tube down to the laser cut line. Line up the holes!
A loop knot is tied in the Kevlar for the parachute attachment later on.
Apogee Payload Altitude Rocket Build, Part 2, Tube Cutting & Kevlar Tie
The tubes are almost completely pre-cut by a laser. Cut through the hold down ticks and separate the 18mm lower tube into three parts.
The upper shortest part is the nose cone shoulder. The middle section is the payload sleeve, the longest tube section is the lower rocket body.
After the tube sections are separated, sand the hold down ticks and body tube ends with a sanding block.
The braided Kevlar will unravel some.
To make the bulkhead tie easier, lay some glue on the end to stiffen it up. After it dries you'll be able to make the tie easily.
The red coupler joins the lower body and payload sections.
Tie the shock cord through the smaller outside holes in the bulkhead.
Thursday, May 24, 2018
Apogee Payload Altitude Rocket Build, Part 1, Parts
EDIT: Well, I screwed up! This parts post should have been first. So #2 and #3 will follow tomorrow to put everything in the correct order.
No elastic shock cord, six feet of 100 lb. braided Kevlar is used.
The launch lug will be replaced, more on that later on.
Parts of interest:
Laser cut 18mm (BT-20) sized tube. No tube cutting needed.
Payload bulkhead with laser cut holes.
19mm diameter Payload tube
Vacu-form nose cone.
The above picture shows all the parts. All seem to be very good quality.
The 8" parachute looks to be cut out from orange sheet plastic.No elastic shock cord, six feet of 100 lb. braided Kevlar is used.
The launch lug will be replaced, more on that later on.
Parts of interest:
Laser cut 18mm (BT-20) sized tube. No tube cutting needed.
Payload bulkhead with laser cut holes.
19mm diameter Payload tube
Vacu-form nose cone.
Tuesday, May 22, 2018
Coming Soon - BMS, Alway Saturn V
The Peter Alway Saturn V kit
is coming from Balsa Machining Service!
CLICK HERE, look to the top center for the link
Pre-orders are being taken now, shipping will start on July 1.
This is a great mid-size size model at 22" tall. Larger than the Dr. Zooch Saturn V, a more manageable size than the Estes version.
I have built one in the past.
This is a very well engineered kit - Highly Recommended!
Now that it is available, a blog build is coming -
(Frank C., keep an eye out for it!)
Apogee Payload Altitude Rocket, Build, Background
I'm going to enter the Altitude Payload event at NARAM this August. It's been a long time since that last contest, things have changed!
I don't really know what I'm doing so I'm taking the easy way out by building the Payload Altitude Rocket from Apogee. This design is interesting, it holds an altimeter and the 1 oz. payload unit in the payload section.
(Picture from the Apogee website.)
The old NAR 1 oz. payload was a cylinder of lead! This illustration is from the 1975 Estes catalog.
Can't use lead anymore! I don't think I suffered any side effects from handling the lead payload, I didn't keep it in my mouth very long.
Now a NAR payload is a capped BT-20 sized tube with 1 oz. of sand inside.
Years ago, the NAR altitude competitions used Theodolites to visually track and compute rocket altitudes. The picture on the left is the Centuri Sky-Trak. To see it: CLICK HERE
When the ejection charge went off, the angle on the protractor was recorded. After some elementary Trigonometry, you have an altitude reading. Visual tracking was iffy. You could add some colored chalk so the tracker was more likely to see the ejection. That powdered chalk got everywhere!
At one time I did have an Estes Altiscope but don't remember getting satisfactory results from it. The Altiscope was primarily wood. A clear tube held some oil in it. You tracked the rocket by eye. At apogee a metal rod was pressed down, "locking" the oil flow reading against a paper wrap protractor. To see it: CLICK HERE Check out the screw eye "sights" along the top.
Today you use a NAR approved electronic altimeter. I recently bought a Perfectflight Firefly.
It's amazing how small and light the unit is. It fits into a BT-20 tube! It reads the barometric pressure to give the altitude. Count the flashes and you have the peak of flight!
Monday, May 21, 2018
Estes Citation Patriot, #000652 Build, Finished
This was a fun build, bringing back some fond memories.
The body tube recess seams were disappointing. They did show through on the finished model.
I've read where Estes should fix the logo placement fin decals in the next run of kits.
This rocket should be perfect with the new Quest-Jet C and D engines.
Estes Citation Patriot, #000652 Build, Part 10, Decal Problem
Here's another decal you should position dry before soaking. Notice how the the lower tips of the blue and red diagonal bands match the lower corners of the fin trailing edges.
GOTCHA: The white Estes logo is in the wrong position on the right side decal. To fit the fin shape it'll have to be cut off and slid to the left.
The decal on the right is fine to use as is.
Here's the Estes logo to the left side, even with the side of the "P" in Patriot.
Compare and you can see how the white Estes logo would roll over the leading edge of the fin.
Normally I wouldn't use an Estes logo decal. Everybody knows who made the kit. But on this classic it seemed right.
To finish it off, the paint over spray was scraped off the engine hook using the back side (not the sharp side) of my X-Acto knife. Use the back side of the blade, no sense dulling the sharp side.
I remove the paint because the engine flame will blister and discolor it anyway after the first flight.
Subscribe to:
Posts (Atom)